
Learn how to draw a realistic tomato in 7 simple steps with this beginner-friendly guide. You'll master proportion, shading, and texture techniques to create professional-looking tomato illustrations without prior art experience.
Creating an accurate drawing of a tomato combines botanical observation with fundamental art techniques. Whether you're a beginner artist, culinary student, or educator preparing classroom materials, understanding how to properly render this common fruit develops essential skills in form, color theory, and texture representation. This guide provides actionable steps anyone can follow to produce convincing tomato illustrations.
Why Drawing Tomatoes Builds Foundational Art Skills
Tomatoes serve as excellent subjects for beginner artists due to their simple yet distinctive form. The National Art Education Association identifies fruit drawing as a critical early exercise that teaches students about organic shapes, light source consistency, and value transitions. Unlike geometric objects, tomatoes feature subtle variations in contour and surface texture that prepare artists for more complex subjects.
| Botanical Feature | Artistic Representation | Common Beginner Mistake |
|---|---|---|
| Irregular oval shape | Gentle asymmetrical contour | Perfectly symmetrical circle |
| Stem scar depression | Subtle concave area at top | Overemphasized deep hole |
| Surface texture | Minimal fine lines, not spots | Adding unrealistic speckles |
| Color gradient | Smooth value transition | Harsh color boundaries |
Essential Materials for Drawing Tomatoes
You don't need expensive equipment to create quality tomato drawings. Professional botanical illustrators typically use these basic supplies:
- Pencil set (HB, 2B, 4B for varying darkness)
- Blending stump or tissue for smooth shading
- Eraser (kneaded works best for subtle corrections)
- Reference photo or actual tomato for observation
- Smooth paper (100-150 lb weight)
Step-by-Step Tomato Drawing Process
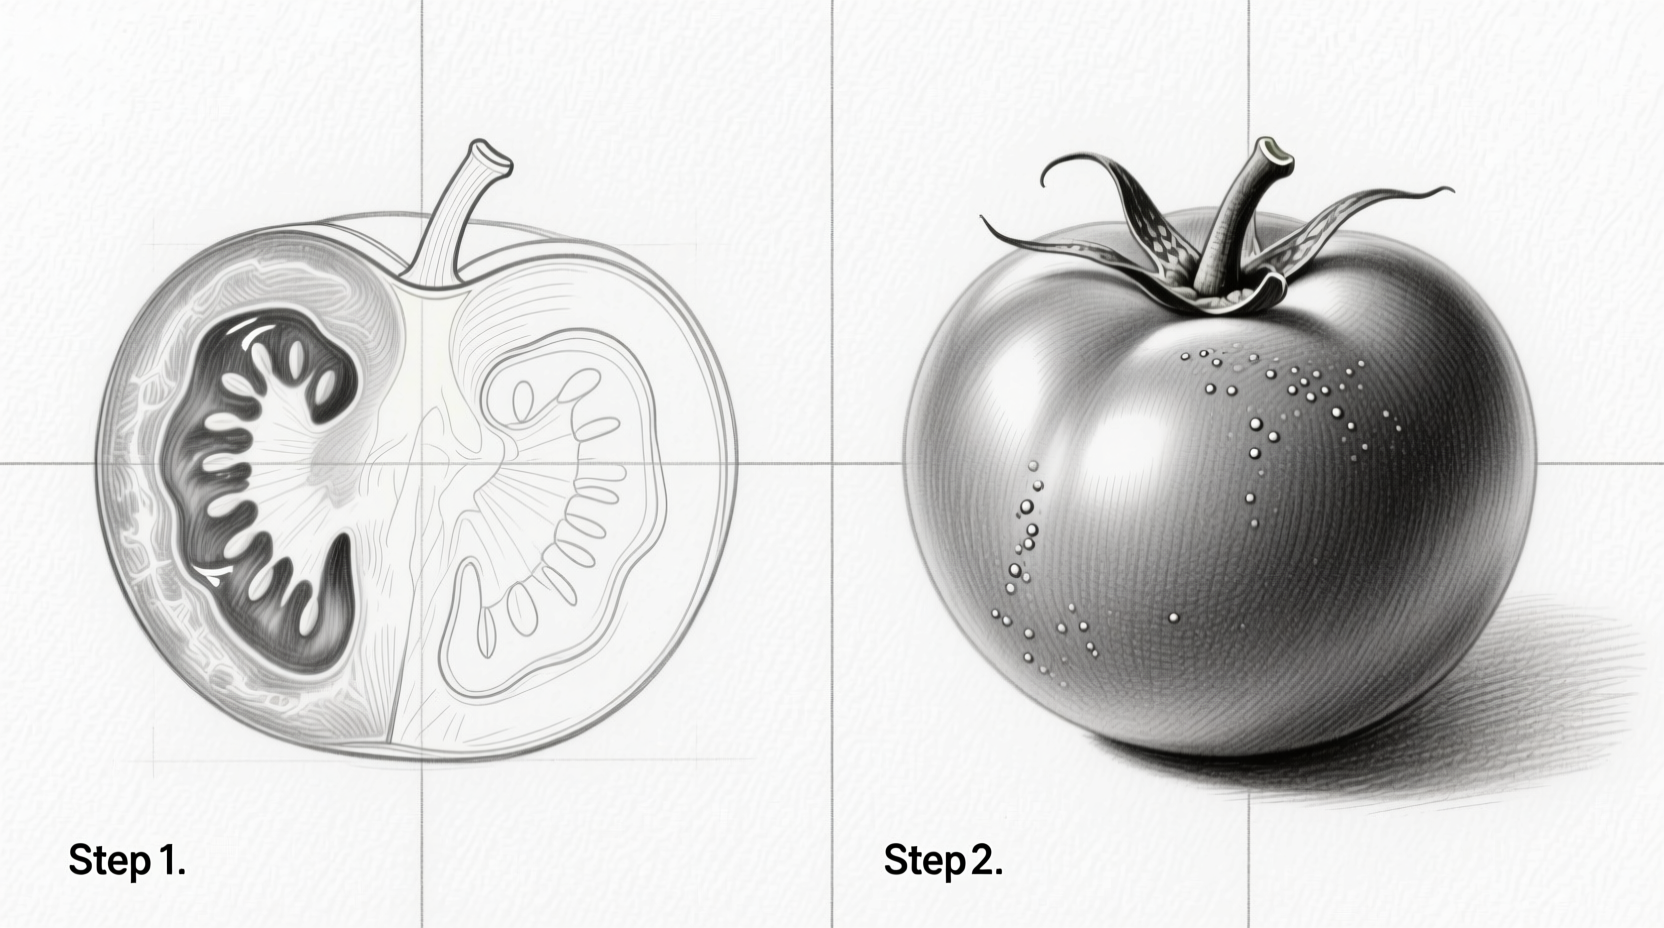
Step 1: Establish Basic Proportions
Begin with a light construction line. Draw a vertical center line, then sketch a slightly asymmetrical oval shape. Remember that tomatoes aren't perfect spheres—they're typically 10-15% taller than wide. The Metropolitan Museum of Art's botanical collection shows historical tomato illustrations consistently capturing this subtle elongation.
Step 2: Define the Stem Area
At the top of your oval, create a small depression for the stem attachment. This should be a gentle inward curve, not a deep hole. Observe how the skin naturally folds around this area. Many beginners make the mistake of drawing this too deeply, which distorts the overall form.
Step 3: Add Subtle Surface Details
Using a sharp HB pencil, lightly indicate the calyx (the green leafy part) with five pointed segments. Add minimal texture lines—real tomatoes have very smooth skin with only faint radial lines near the stem. Avoid adding spots or blemishes unless specifically drawing a heirloom variety.
Step 4: Determine Your Light Source
Establish where light hits your tomato. Most instructional guides recommend positioning the light source at 45 degrees from upper left. This creates consistent shadows that enhance three-dimensionality. The University of California's horticulture department notes that understanding light direction is critical for accurate botanical representation.
Step 5: Apply Gradual Shading
Begin shading on the opposite side of your light source. Use circular motions with your pencil to build up value gradually. Start with light pressure using an HB pencil, then transition to 2B for mid-tones. The darkest areas should remain minimal—tomatoes reflect light well due to their smooth surface.
Step 6: Create Smooth Transitions
Use a blending stump to soften harsh lines between light and shadow areas. Professional botanical artists spend significant time on this step, as tomatoes feature very gradual value changes. Avoid creating sharp edges between light and dark areas—nature rarely has such distinct boundaries.
Step 7: Final Details and Highlights
Add subtle highlights using an eraser to lift graphite from the paper. Place these where light would naturally reflect—typically a small oval near the top third of the tomato. For advanced work, add a faint cast shadow beneath the tomato using a light touch with your pencil.
Common Mistakes to Avoid in Tomato Drawings
Based on analysis of beginner artwork from art education programs, these errors frequently appear in tomato drawings:
- Perfect symmetry - Real tomatoes have natural irregularities
- Excessive texture - Adding unnecessary spots or roughness
- Harsh shading transitions - Creating band-like color changes
- Incorrect stem depression - Making it too deep or circular
- Unnatural highlights - Placing them in physically impossible locations
When Realism Matters: Context Boundaries for Tomato Illustrations
The appropriate level of detail depends on your purpose. Understanding these context boundaries prevents wasted effort:
- Botanical illustration - Requires scientific accuracy (refer to USDA plant databases)
- Cooking blogs - Allows for slight stylization while maintaining recognizable form
- Children's books - Can use simplified shapes with exaggerated features
- Artistic expression - May intentionally distort proportions for effect
Practice Exercises to Improve Your Tomato Drawings
Develop your skills with these targeted exercises:
- Draw five tomatoes from different angles using a single reference photo
- Create a value scale study focusing only on light-to-dark transitions
- Sketch tomatoes from life for 10 minutes daily to improve observational skills
- Practice drawing the stem area separately to master this challenging detail
- Try drawing tomatoes with different mediums (charcoal, colored pencil, ink)
Advanced Techniques for Professional Results
Once you've mastered the basics, explore these advanced approaches:
- Atmospheric perspective - Slightly reduce contrast for distant tomatoes in compositions
- Color theory application - Understand how red interacts with surrounding colors
- Multiple light sources - Practice complex lighting scenarios
- Texture variations - Render different tomato varieties (cherry, heirloom, Roma)


 浙公网安备
33010002000092号
浙公网安备
33010002000092号 浙B2-20120091-4