
Discover exactly how to grow thriving tomato plants with this comprehensive, step-by-step planting guide. Whether you're a first-time gardener or looking to improve your harvest, you'll learn the precise timing, soil preparation methods, and planting techniques that professional growers use to produce abundant, flavorful tomatoes all season long.
Why Proper Tomato Planting Matters
Tomatoes represent America's most popular home garden crop, with over 86% of gardeners growing them according to the National Gardening Association. Yet many struggle with poor yields, disease, and disappointing flavor simply because of incorrect planting techniques. The foundation of a successful tomato harvest begins with proper planting—getting this step right dramatically increases your chances of garden success.
Pre-Planting Preparation: Setting the Stage for Success
Before you put a single seedling in the ground, proper preparation ensures your tomatoes get the best possible start.
Determining Your Planting Window
Timing your tomato planting correctly is crucial for healthy growth and maximum yield. Tomatoes require warm soil and air temperatures to thrive. Consult your local USDA Plant Hardiness Zone Map to determine your average last spring frost date, then count forward:
| Planting Stage | Timing Relative to Last Frost | Soil Temperature |
|---|---|---|
| Start seeds indoors | 6-8 weeks before last frost | 70-80°F (21-27°C) |
| Transplant seedlings outdoors | 1-2 weeks after last frost | At least 60°F (15.5°C) |
| Direct seeding (not recommended) | 3 weeks after last frost | 70°F (21°C) minimum |
This timeline ensures your plants aren't exposed to damaging cold temperatures while taking advantage of the full growing season. Remember that tomatoes won't set fruit properly when temperatures exceed 90°F (32°C), making early planting essential in hot climates.
Selecting the Right Varieties for Your Region
Choosing appropriate tomato varieties significantly impacts your success. Consider these factors when selecting plants:
- Determinate varieties (bush tomatoes) grow to a fixed size and produce one main harvest—ideal for containers and small spaces
- Indeterminate varieties (vining tomatoes) continue growing and producing throughout the season—best for maximum yield
- Days to maturity should match your growing season length (check seed packets)
- Disease resistance is critical—look for codes like VFN (verticillium, fusarium, nematodes)
According to research from University of Minnesota Extension, gardeners in northern climates should prioritize early-maturing varieties (55-65 days), while southern gardeners benefit from heat-tolerant varieties with disease resistance.
The Planting Process: Step-by-Step Success
Now that you've prepared properly, it's time for the actual planting—where most gardeners make critical mistakes that affect their entire season.
Soil Preparation: Creating the Perfect Foundation
Tomatoes thrive in well-draining soil rich in organic matter. Three weeks before planting:
- Test your soil pH (ideal range: 6.2-6.8) using a home test kit or through your local cooperative extension
- Amend soil with 3-4 inches of compost or well-rotted manure
- Incorporate balanced organic fertilizer according to soil test recommendations
- Create raised beds 6-12 inches high for better drainage in heavy soils
Proper soil preparation addresses the most common limitation for tomato growth—poor soil structure. The Rutgers New Jersey Agricultural Experiment Station found that tomatoes grown in properly amended soil produced 40% more fruit than those in unamended soil.
Planting Technique: The Professional Method
Follow these steps for optimal planting success:
- Hardening off seedlings: Gradually expose indoor-started plants to outdoor conditions over 7-10 days
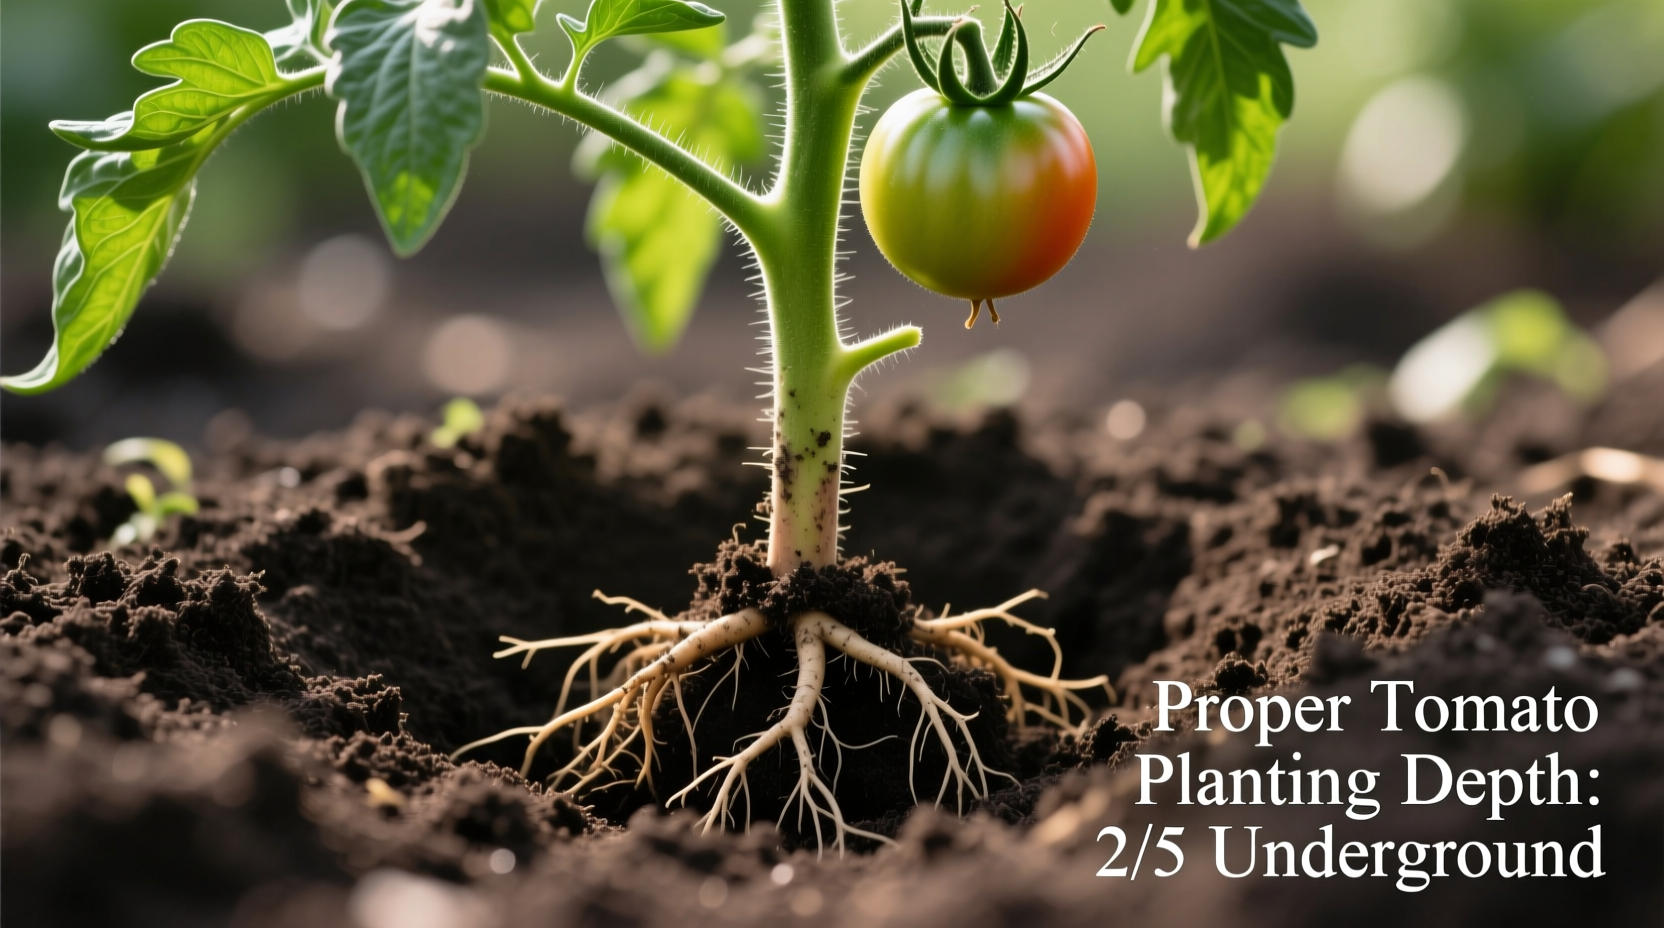
- Dig planting holes: Twice as wide as the root ball and deep enough to bury 2/3 of the stem
- Add calcium source: Mix 1-2 tablespoons of crushed eggshells or agricultural lime into each hole to prevent blossom end rot
- Remove lower leaves: Strip leaves that would be buried to prevent disease
- Plant deeply: Bury the stem up to the first set of healthy leaves—this encourages stronger root development
- Water thoroughly: Use 1-2 gallons of water per plant immediately after planting
- Apply mulch: Wait 3-4 weeks, then add 2-3 inches of straw or shredded leaves
This deep planting technique works because tomato stems develop roots along any buried portion, creating a more extensive root system. Research from Oregon State University confirms that deeply planted tomatoes establish 30% faster and show greater drought tolerance.
Spacing Requirements: Avoiding Common Mistakes
Proper spacing prevents disease and maximizes yield. Follow these guidelines:
- Determinate varieties: 24-36 inches apart
- Indeterminate varieties: 36-48 inches apart
- Rows: 48-60 inches apart
Crowded plants create humid microclimates that encourage fungal diseases like early blight and septoria leaf spot. The Penn State Extension reports that properly spaced tomatoes have 60% fewer disease problems than overcrowded plants.
Post-Planting Care: Ensuring Continued Success
Planting is just the beginning—proper care in the weeks following planting determines your ultimate harvest.
Watering Strategy: The Critical First Weeks
Consistent moisture is essential during establishment. Follow this watering schedule:
- First week: Water daily with 1-1.5 gallons per plant
- Weeks 2-3: Water every other day with 1.5-2 gallons
- Established plants: Water deeply 1-2 times weekly (1-2 inches total)
Water at the base of plants to keep foliage dry and prevent disease. The Cornell University College of Agriculture found that drip irrigation reduces disease incidence by 75% compared to overhead watering.
Support Systems: Installing at Planting Time
Install your support system when planting to avoid damaging roots later:
- Cages: Use sturdy 5-6 foot cages for indeterminate varieties
- Stakes: 7-foot wooden or metal stakes driven 12 inches deep
- Trellises: Vertical systems work well for space-constrained gardens
Early installation prevents root damage that occurs when installing supports after plants are established. Proper support improves air circulation, reduces disease, and makes harvesting easier.
Context Boundaries: When Standard Techniques Don't Apply
While the techniques above work for most gardeners, certain conditions require adjustments:
- Container gardening: Use 5-gallon minimum containers with premium potting mix (not garden soil)
- Hot climates (Zone 9+): Plant in late summer for fall harvest to avoid extreme heat
- Cool climates (Zone 3-4): Use black plastic mulch to warm soil and choose ultra-early varieties
- Heavy clay soils: Create 12-inch raised beds with 50% compost amendment
- Short growing seasons: Start seeds indoors 8-10 weeks before last frost
Understanding these context boundaries prevents frustration when standard advice doesn't work for your specific conditions. The University of Illinois Extension emphasizes that adapting techniques to local conditions increases tomato success rates by 65%.
Troubleshooting Common Planting Problems
Even with proper planting, issues can arise. Here's how to address the most common problems:
Yellowing Lower Leaves
Cause: Natural senescence or nitrogen deficiency
Solution: Remove affected leaves and apply balanced organic fertilizer
Wilting After Planting
Cause: Transplant shock or underwatering
Solution: Water deeply and provide temporary shade for 2-3 days
Poor Growth After Planting
Cause: Cold soil temperatures or root-bound seedlings
Solution: Check soil temperature and gently loosen roots before planting
Maximizing Your Tomato Harvest
By following these science-backed planting techniques, you'll establish a strong foundation for a bountiful harvest. Remember that successful tomato growing begins with proper planting—everything that follows builds on this critical foundation. With attention to timing, soil preparation, planting depth, spacing, and initial care, you'll enjoy healthier plants and more abundant harvests throughout the growing season.


 浙公网安备
33010002000092号
浙公网安备
33010002000092号 浙B2-20120091-4