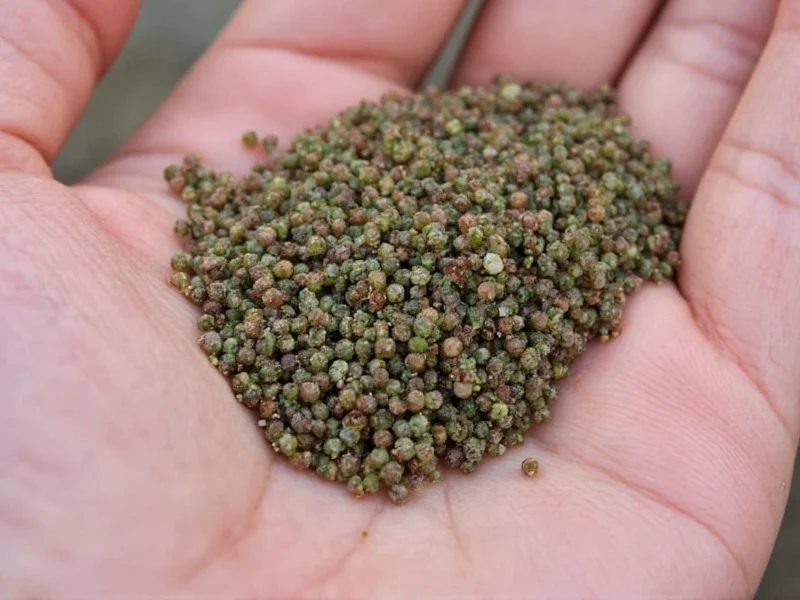
Thyme (Thymus vulgaris) is a versatile herb prized for culinary, medicinal, and ornamental uses. While many gardeners propagate thyme through cuttings or divisions, growing from seed offers access to unique varieties and builds gardening skills. Understanding proper seeding techniques significantly increases your success rate with this hardy perennial.
Optimal Timing for Seeding Thyme
The timing of thyme seed sowing directly impacts germination success and plant development. For outdoor planting, wait until soil temperatures consistently reach 60°F (15°C) with no risk of hard frost. In most temperate climates, this occurs 2-4 weeks before the last expected spring frost. Alternatively, start thyme seeds indoors 6-8 weeks before your region's last frost date to give plants a head start.
Thyme seeds germinate best with consistent temperatures between 65-70°F (18-21°C). Avoid planting during extreme temperature fluctuations, as thyme seedlings struggle with sudden cold snaps. In warmer climates (USDA zones 8-10), fall seeding allows plants to establish before summer heat.
Soil Preparation for Thyme Seed Germination
Thyme thrives in lean, well-draining soil that mimics its native Mediterranean habitat. Create an ideal seedbed by:
- Amending garden soil with 30-40% coarse sand or perlite
- Maintaining a slightly alkaline pH between 6.5-7.5
- Ensuring excellent drainage (raised beds work well)
- Avoiding rich compost or fertilizer at seeding stage
For container seeding, use a specialized seed starting mix rather than regular potting soil, which often retains too much moisture. The best soil for thyme seed germination prioritizes drainage over fertility.
Step-by-Step Thyme Seeding Process
Follow these steps for successful thyme seed propagation:
- Surface sow seeds: Thyme seeds require light for germination. Place seeds on soil surface without covering.
- Press gently: Lightly press seeds into soil contact using a flat board or your palm.
- Mist thoroughly: Use a spray bottle to moisten soil without displacing seeds.
- Cover container: Use a clear plastic dome or plastic wrap to maintain humidity.
- Provide light: Place in bright, indirect light (avoid direct sun during germination).
- Monitor moisture: Keep soil consistently moist but not waterlogged.
When considering how to plant thyme seeds outdoors, create shallow furrows spaced 12 inches apart, but still place seeds on the surface rather than burying them.
| Factor | Requirement | Notes |
|---|---|---|
| Seed Depth | Surface only | Do not cover seeds |
| Soil Temperature | 65-70°F (18-21°C) | Use heat mat if needed |
| Germination Time | 14-28 days | Can be erratic |
| Light Requirements | Bright, indirect | Avoid direct sun initially |
| Watering Frequency | Daily misting | Keep soil moist |
Watering and Care During Germination
Proper moisture management represents one of the most critical aspects of thyme seed starting temperature requirements. Overwatering causes damping-off disease, while underwatering prevents germination. Use these techniques:
- Mist seeds twice daily with a fine spray bottle
- Check soil moisture by touch (should feel damp but not soggy)
- Remove plastic covering once green shoots appear
- Gradually reduce misting frequency as seedlings develop
Thyme seedlings grow slowly during the first month. Resist the urge to over-fertilize, as thyme prefers lean soil conditions. Begin applying a diluted seaweed solution only after seedlings develop their second set of true leaves.
Transplanting Thyme Seedlings
Transplant thyme seedlings when they reach 2-3 inches tall with multiple sets of true leaves. Follow these guidelines for successful transplantation:
- Harden off seedlings gradually over 7-10 days
- Space plants 12-18 inches apart in final location
- Plant at same soil depth as in containers
- Water thoroughly after transplanting
- Provide afternoon shade for first week
When determining thyme seed spacing guidelines, remember that mature plants spread 12-15 inches wide. Proper spacing prevents overcrowding and improves air circulation, reducing disease risk.
Troubleshooting Common Seeding Challenges
Gardeners often encounter these issues when growing thyme from seed step by step:
- Poor germination: Thyme seeds have variable germination rates (40-60%). Sow extra seeds and be patient.
- Damping-off: Caused by overwatering. Improve air circulation and reduce watering frequency.
- Leggy seedlings: Indicates insufficient light. Move to brighter location or add supplemental lighting.
- Slow growth: Normal for thyme. Avoid fertilizing until established.
Understanding these challenges helps avoid common mistakes when seeding thyme, such as planting too deep, overwatering, or expecting rapid growth.
Long-Term Thyme Care After Seeding
Once established, thyme requires minimal care but benefits from these practices:
- Water deeply but infrequently (only when top inch of soil dries)
- Prune regularly to encourage bushy growth
- Apply light mulch in winter for cold protection
- Divide plants every 3-4 years to maintain vigor
Thyme typically flowers in its second year. Allow some flowers to develop for pollinator benefits, but harvest regularly to maintain leaf production. Remember that watering thyme seeds properly during establishment sets the foundation for drought tolerance later.


 浙公网安备
33010002000092号
 浙B2-20120091-4