
Learning how to draw a potato might seem basic, but this humble vegetable offers perfect practice for developing foundational art skills. Potatoes provide excellent opportunities to practice rendering organic shapes, understanding light and shadow on irregular surfaces, and capturing subtle textures—skills that transfer to more complex subjects. Whether you're an art student, educator, or hobbyist, mastering potato drawing builds confidence in observational drawing while requiring minimal materials.
Essential Materials for Potato Drawing
You don't need expensive equipment to create impressive potato illustrations. Start with these basic supplies:
- HB and 2B pencils (for varied line weight)
- Soft eraser (kneaded works best for subtle corrections)
- Blending stump or tissue (for smooth shading)
- Medium-weight drawing paper (90-140 lb)
- A fresh potato (preferably with interesting features)
Understanding Potato Anatomy for Accurate Drawing
Before putting pencil to paper, examine your subject closely. Potatoes aren't perfect ovals—they have unique irregularities that make each one distinctive. The USDA Agricultural Research Service identifies over 200 potato varieties in the United States alone, each with characteristic shapes and textures.
| Common Potato Variety | Shape Characteristics | Surface Texture |
|---|---|---|
| Russet | Elongated oval with tapered ends | Rough, netted skin with deep eyes |
| Yukon Gold | Round to oval with uniform shape | Thin, smooth skin with shallow eyes |
| Red Bliss | Round with slightly flattened sides | Smooth, thin skin with small eyes |
| Sweet Potato | Tapered with irregular curves | Thin, sometimes cracked skin with shallow eyes |
This comparison shows why identifying your specific potato variety matters for accurate botanical illustration. Notice how eye depth and skin texture vary significantly between types—details that dramatically impact your final drawing's realism.
Step-by-Step Potato Drawing Process
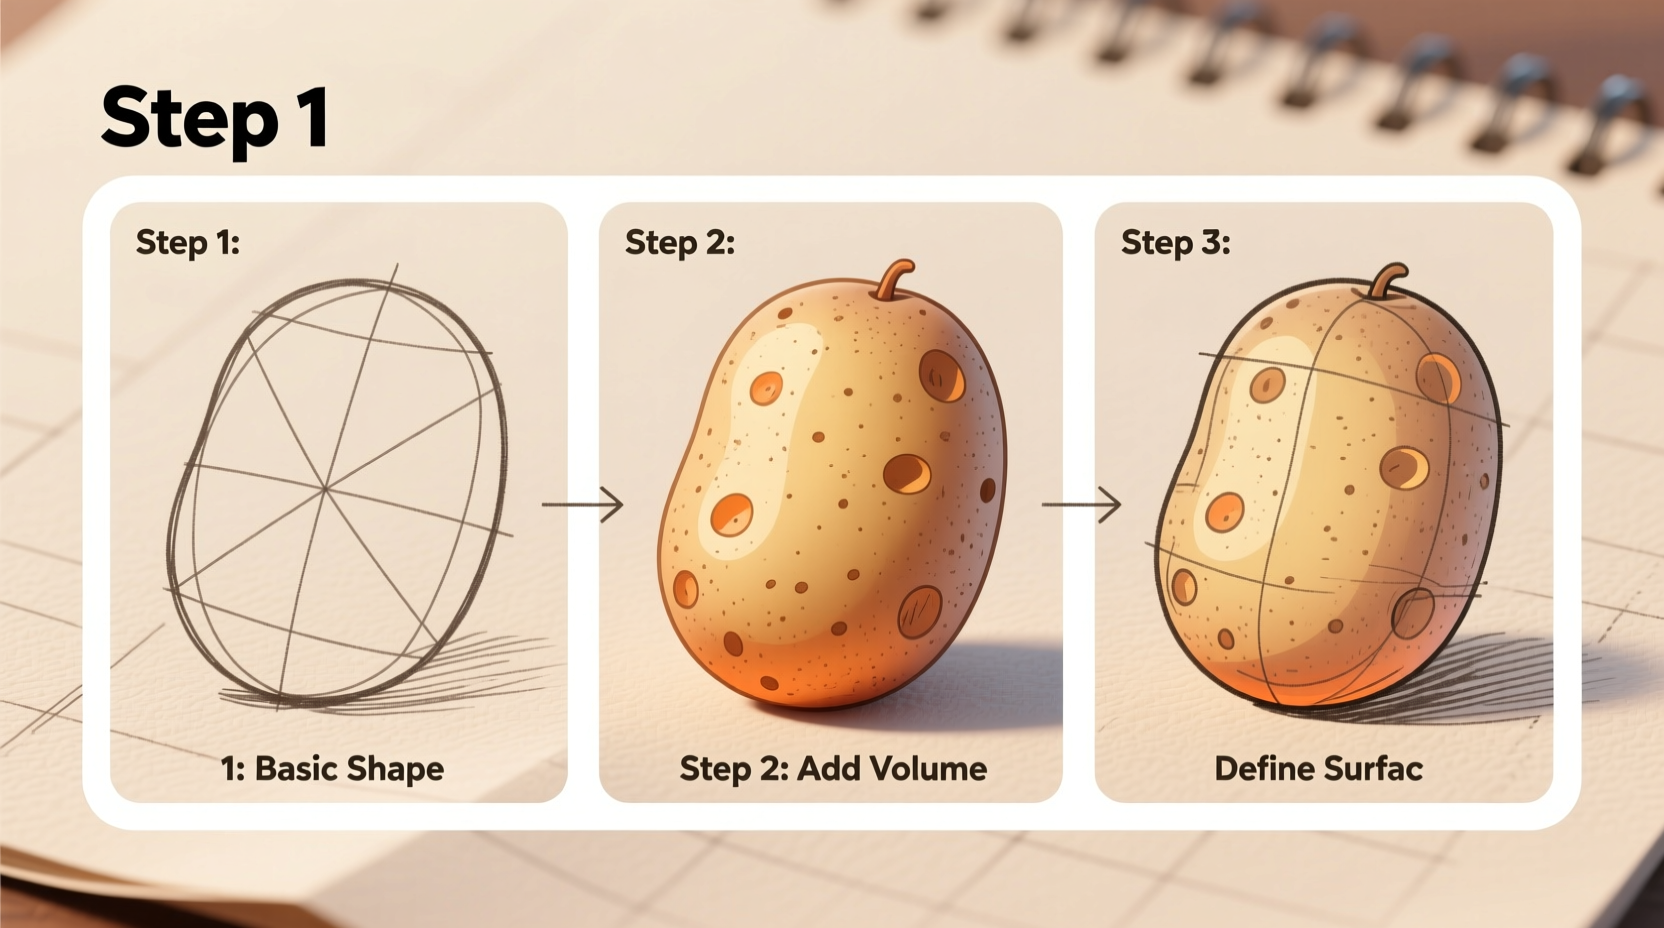
Step 1: Basic Shape Construction
Begin with light construction lines. Most potatoes follow an oval base shape, but avoid perfect symmetry. Draw a slightly irregular oval, then add secondary shapes for bumps and protrusions. Professional botanical illustrators at the Royal Botanic Gardens, Kew emphasize starting with simple geometric forms before adding complexity.
Step 2: Defining Key Features
Locate and lightly mark the 'eyes'—these aren't random but follow natural growth patterns. According to agricultural studies from Cornell University's College of Agriculture, potato eyes typically cluster near the stem end and follow spiral arrangements. Don't overcrowd your drawing; most potatoes have 6-12 prominent eyes.
Step 3: Establishing Light Source and Basic Shadows
Determine your light direction (consistency is crucial). Block in the darkest areas first using your 2B pencil. Remember that potatoes have matte surfaces, so highlights appear soft rather than sharp. The National Art Education Association recommends practicing with a single light source for beginners to understand value relationships.
Step 4: Building Texture Gradually
Use short, directional strokes to suggest skin texture. Russets require rougher marks than smooth-skinned varieties. Build texture slowly—overworking too early creates muddy results. Art educators at the Metropolitan Museum of Art note that successful botanical drawings balance detail with suggestion, allowing viewers' eyes to complete the texture.
Step 5: Refining Values and Edges
Adjust contrast between light and shadow areas. Soften edges where light transitions gradually, keep edges sharper in areas with defined shadows. Use your eraser to lift out highlights rather than drawing them white—this creates more natural light effects.
Common Potato Drawing Mistakes to Avoid
Even experienced artists encounter challenges with potato illustrations. Based on analysis of beginner artwork through The Art of Education University, these errors appear most frequently:
- Over-smoothing - Potatoes aren't perfectly symmetrical; embrace organic irregularities
- Ignoring eye depth - Eyes create small shadows that define their dimension
- Harsh transitions - Potato surfaces have gradual value shifts, not sharp lines
- Over-detailing - Focus on major texture patterns rather than every skin variation
Practical Applications for Your Potato Drawings
Once you've mastered basic potato drawing, expand your skills with these creative applications:
- Create a series showing potatoes at different growth stages
- Experiment with colored pencils for realistic skin tones
- Incorporate potatoes into still life compositions with other vegetables
- Use potato drawings as templates for printmaking projects
- Develop educational materials for teaching plant biology
Practice Exercises for Skill Development
Improve your potato drawing abilities with these targeted exercises:
- 30-Second Sketches: Practice quick gesture drawings to capture basic potato shapes
- Value Studies: Create a grayscale study focusing only on light and shadow
- Texture Focus: Draw just a small section (2x2 inches) emphasizing skin texture
- Comparative Drawing: Draw two different potato varieties side-by-side highlighting their distinctions


 浙公网安备
33010002000092号
浙公网安备
33010002000092号 浙B2-20120091-4