
Making cinnamon rolls from scratch creates a bakery-quality treat with that signature swirl of cinnamon and sugar encased in pillowy-soft dough. While store-bought options exist, nothing compares to the aroma and taste of freshly baked homemade cinnamon rolls made with care. This guide provides professional techniques developed through decades of baking experience to ensure your cinnamon rolls turn out perfectly every time.
Essential Ingredients for Perfect Cinnamon Rolls
The foundation of great cinnamon rolls lies in using quality ingredients measured precisely. Unlike many online recipes that offer vague measurements, this guide provides exact weights for consistent results.
| Ingredient | Volume Measurement | Weight Measurement | Temperature Requirement |
|---|---|---|---|
| All-purpose flour | 3 1/2 cups | 450g | Room temperature |
| Granulated sugar | 1/2 cup | 100g | Room temperature |
| Unsalted butter | 1/2 cup (1 stick) | 113g | Melted and cooled |
| Warm milk | 1 cup | 240ml | 105-115°F (40-46°C) |
| Active dry yeast | 2 1/4 teaspoons | 7g | Dry |
Crafting the Ideal Cinnamon Roll Dough
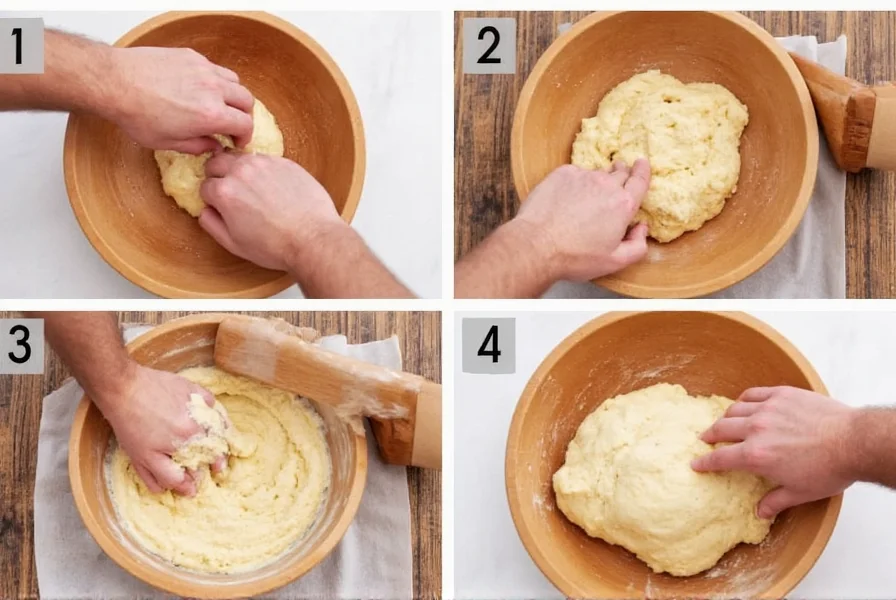
Dough texture makes or breaks your cinnamon rolls. Many home bakers struggle with dough that's too dense or doesn't rise properly. Follow these professional techniques:
- Activate your yeast properly: Combine warm milk (not hot, which kills yeast), 1 tablespoon sugar, and yeast. Wait 5-10 minutes until foamy. If it doesn't foam, your yeast is dead—start over.
- Mix ingredients in the right order: Combine wet ingredients first, then gradually incorporate flour. Stop adding flour when the dough pulls away from the bowl but remains slightly sticky.
- Knead with purpose: Hand-knead for 8-10 minutes or use a stand mixer with dough hook for 5-7 minutes until smooth and elastic. Properly kneaded dough springs back slowly when poked.
- First rise matters: Place dough in a lightly oiled bowl, cover with damp cloth, and let rise in a warm spot (75-80°F) for 1-1.5 hours until doubled. Don't rush this step—under-proofed dough yields dense rolls.
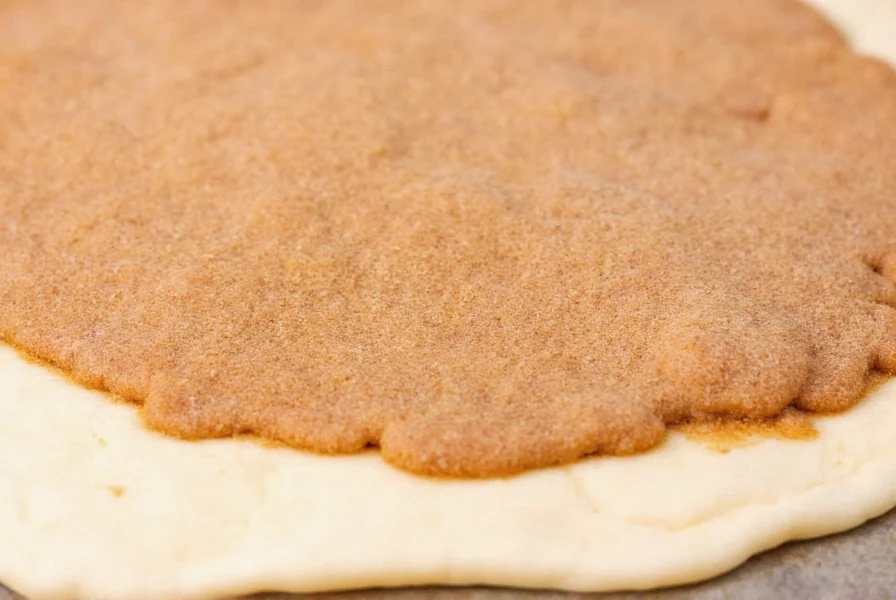
Creating the Signature Cinnamon Filling
The filling separates good cinnamon rolls from exceptional ones. Many recipes use too much sugar or the wrong cinnamon type. Professional bakers recommend:
- Use Ceylon cinnamon for its complex, less harsh flavor (though Cassia works in a pinch)
- Maintain a 4:1 ratio of brown sugar to cinnamon (1 cup brown sugar to 1/4 cup cinnamon)
- Add 1/4 teaspoon salt to balance sweetness
- Mix filling ingredients thoroughly before spreading
- Use softened (not melted) butter as the base layer before adding sugar mixture
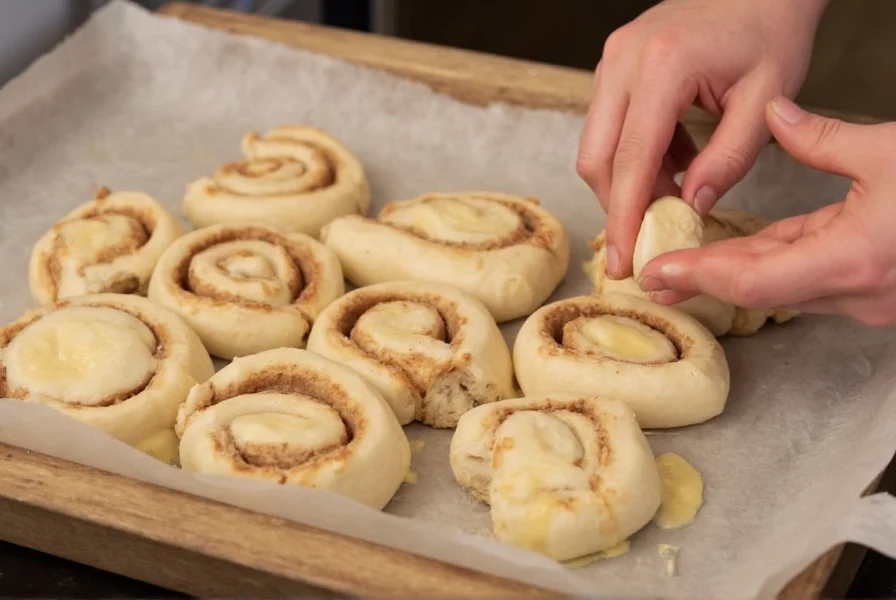
Rolling, Cutting, and Second Proofing
How you shape your cinnamon rolls dramatically affects their final texture:
- Roll dough evenly: After first rise, punch down dough and roll into a 16x12 inch rectangle. Uneven thickness causes irregular baking.
- Spread filling uniformly: Leave a 1/2 inch border along one long edge to prevent leakage during baking.
- Roll tightly but gently: Start from the filled edge and roll toward the bare edge, applying even pressure. A too-loose roll creates gaps; too-tight compresses the dough.
- Cut with dental floss: Use unflavored dental floss or fishing line to slice rolls (1.5 inches thick) for clean cuts without squishing.
- Second proofing is critical: Place rolls in greased pan, cover, and let rise 45-60 minutes until nearly doubled. Under-proofed rolls won't develop their characteristic pull-apart texture.
Baking and Frosting Techniques
Avoid common baking mistakes that lead to dry or undercooked cinnamon rolls:
- Bake at 350°F (175°C) for 20-25 minutes—use an oven thermometer to verify temperature accuracy
- Rotate pan halfway through baking for even browning
- Check for doneness at 20 minutes; internal temperature should reach 190°F (88°C)
- Let rolls cool 15 minutes before frosting to prevent melting
For the cream cheese frosting, use full-fat cream cheese and butter at room temperature. Whip until smooth before adding powdered sugar to avoid lumps. Add 1-2 tablespoons of milk if needed for proper consistency.
Troubleshooting Common Cinnamon Roll Problems
Even experienced bakers encounter issues. Here's how to fix them:
| Problem | Most Likely Cause | Solution |
|---|---|---|
| Dense, heavy rolls | Over-flouring, under-proofing, or old yeast | Measure flour by weight, verify yeast activity, allow full proofing time |
| Filling leaks out | Rolling too loosely or insufficient border | Roll tighter, leave 1/2 inch bare edge, chill rolls 15 minutes before baking |
| Burnt bottoms | Oven too hot or dark pan | Place pan on middle rack, use light-colored pan, reduce temperature by 25°F |
| Dry texture | Overbaking or incorrect flour ratio | Check at 20 minutes, use exact flour measurements by weight |
Adapting Your Cinnamon Rolls for Dietary Needs
With careful adjustments, you can create delicious variations:
- Gluten-free cinnamon rolls: Substitute with 1:1 gluten-free flour blend, add 1 teaspoon xanthan gum, and increase liquid by 2-3 tablespoons
- Vegan cinnamon rolls: Replace dairy with almond milk, use vegan butter, and substitute egg wash with almond milk wash
- Lower sugar option: Reduce filling sugar by 25% and use monk fruit sweetener in frosting
Storing and Reheating for Maximum Freshness
Proper storage maintains that fresh-baked quality:
- Store unfrosted rolls airtight at room temperature for 2 days
- Freeze baked rolls (without frosting) for up to 3 months—thaw overnight before reheating
- Reheat individual rolls by wrapping in damp paper towel and microwaving 15-20 seconds
- For best results, refresh in 300°F oven for 5 minutes before serving
Frequently Asked Questions
Can I make cinnamon roll dough ahead of time?
Yes, you can refrigerate prepared dough for up to 24 hours after the first rise. Punch down, shape into a ball, place in oiled container, cover, and refrigerate. When ready to use, let sit at room temperature for 30 minutes before rolling. The cold fermentation actually enhances flavor development.
Why did my cinnamon rolls shrink after baking?
Shrinking typically occurs when rolls are under-proofed before baking. The yeast hasn't fully activated, so when heat hits the oven, the yeast works overtime then collapses. Ensure your second proof reaches nearly double in size—rolls should jiggle slightly when pan is tapped. Proper proofing creates the signature pull-apart texture.
What's the difference between cinnamon roll dough and bread dough?
Cinnamon roll dough contains more sugar and fat than standard bread dough, creating a richer, softer texture. The higher sugar content feeds the yeast differently and affects browning. Cinnamon roll dough typically has 25-50% more butter and sugar than basic bread dough, which contributes to its distinctive tender crumb and caramelized edges.
How can I prevent my cinnamon filling from sinking to the bottom?
To prevent sinking filling, spread a thin, even layer of softened butter over the dough first, then sprinkle your cinnamon-sugar mixture. Avoid making the filling too wet or using melted butter in the filling. Chilling the shaped rolls for 15 minutes before the second proof helps the filling set. Using brown sugar (which contains molasses) rather than white sugar also helps the filling adhere better.


 浙公网安备
33010002000092号
浙公网安备
33010002000092号 浙B2-20120091-4