

The best instant pot chili recipe combines ground beef, kidney beans, diced tomatoes, and spices for a rich, flavorful meal ready in under 45 minutes. This pressure cooker method reduces cooking time from hours to minutes while developing deep flavors. Key steps include sautéing aromatics directly in the pot, using proper pressure settings (high pressure for 15 minutes), and allowing a natural 15-minute release to prevent bean breakage and ensure optimal texture.
Creating perfect chili in your Instant Pot isn't just about speed—it's about unlocking complex flavors through controlled pressure cooking. Unlike traditional stovetop methods requiring hours of simmering, the Instant Pot's sealed environment intensifies flavors while tenderizing ingredients rapidly. This comprehensive guide delivers restaurant-quality chili with minimal hands-on time, featuring precise timing, ingredient ratios, and troubleshooting tips you won't find in basic recipes.
Why Instant Pot Chili Outperforms Traditional Methods
Pressure cooking transforms chili preparation by creating steam pressure up to 12 psi, raising the boiling point to 250°F (121°C). This higher temperature accelerates the Maillard reaction—the chemical process responsible for browning and flavor development—while simultaneously breaking down tough connective tissues in meat. The sealed environment prevents flavor evaporation, concentrating tastes that would otherwise dissipate during open-pot simmering.
Ingredient Science: Building Flavor Layers
Successful instant pot chili recipe construction follows a precise flavor hierarchy:
| Ingredient Category | Critical Function | Pro Tips |
|---|---|---|
| Aromatics (onion, garlic) | Foundation of flavor | Sauté 3-4 minutes until translucent—don't rush this step |
| Tomato paste | Umami depth | Cook 2 minutes until brick red color deepens |
| Dried spices | Flavor activation | Add after aromatics, cook 60 seconds to release oils |
| Beans | Texture balance | Add after pressure cooking to maintain integrity |
Essential Equipment Checklist
While your Instant Pot does the heavy lifting, these tools ensure success:
- 6-quart or larger Instant Pot (8-quart recommended for batches)
- Silicone pressure cooking spoon (metal can scratch coating)
- Meat thermometer (for verifying ground beef reaches 160°F)
- Quick-release valve guard (prevents splatter during release)
Step-by-Step Instant Pot Chili Instructions
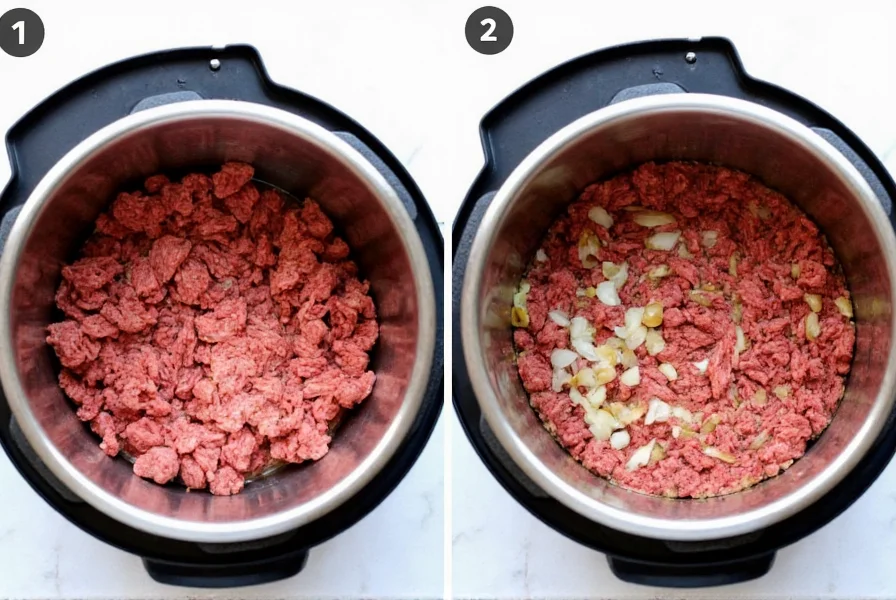
- Sauté aromatics: Use "Sauté" function to cook 1 diced onion and 4 minced garlic cloves in 1 tbsp oil for 3-4 minutes
- Brown meat: Add 1.5 lbs ground beef (80/20 ratio), breaking into small crumbles until no pink remains
- Build flavor base: Stir in 2 tbsp tomato paste and 3 tbsp chili powder, cooking 60 seconds until fragrant
- Deglaze: Pour ½ cup beef broth while scraping bottom to prevent burn errors
- Add remaining ingredients: Include 1 (15oz) tomato sauce, 1 (15oz) diced tomatoes, 1 tbsp cumin, 1 tsp smoked paprika, ½ tsp cayenne
- Pressure cook: Seal lid, set to "Manual" or "Pressure Cook" at high pressure for 15 minutes
- Natural release: Allow 15 minutes natural pressure release before quick release
- Final adjustments: Stir in drained beans, adjust salt, and simmer uncovered 5 minutes
Critical Timing Considerations
Many instant pot chili recipe failures stem from improper timing. The 15-minute natural release is non-negotiable—releasing pressure too soon causes beans to explode from rapid pressure change. Similarly, adding beans before pressure cooking guarantees mushy results. For optimal texture, always add canned beans after the main pressure cooking cycle completes.
Avoid These 3 Common Instant Pot Chili Mistakes
- Overfilling the pot: Never exceed the ⅔ fill line with liquid ingredients. Chili expands during pressure cooking and can trigger burn errors.
- Skipping the sauté step: Building flavor foundations in the pot itself creates depth that dumping pre-cooked ingredients can't match.
- Incorrect spice timing: Adding delicate spices like cumin too early causes flavor degradation. Add most spices after aromatics have softened.
Customization Options for Dietary Needs
This versatile instant pot chili recipe adapts to various dietary requirements without sacrificing flavor:
- Vegetarian version: Substitute 2 cups cooked lentils and 1 cup mushrooms for meat, use vegetable broth
- Low-sodium option: Use no-salt-added tomatoes and replace salt with 2 tbsp nutritional yeast
- Extra protein boost: Stir in ½ cup quinoa during final simmer for complete amino acid profile
Serving and Storage Best Practices
For restaurant-quality presentation, top with contrasting textures: cool sour cream swirls, crunchy tortilla strips, and fresh cilantro. Store leftovers in airtight containers for up to 5 days—chili flavors actually improve overnight as spices fully integrate. When reheating, add 1-2 tbsp water per cup to restore ideal consistency, as pressure cooking causes more liquid absorption than traditional methods.

Why This Recipe Works Every Time
The science behind this foolproof instant pot chili recipe lies in controlled moisture management. Unlike slow cookers that evaporate liquid, the Instant Pot's sealed environment maintains consistent moisture levels while accelerating flavor development. The precise 15-minute pressure cooking time is calibrated to tenderize meat without overcooking beans added later in the process. This balance creates complex flavors in a fraction of traditional cooking times while maintaining ideal texture throughout.
Frequently Asked Questions
How much chili can I safely make in a 6-quart Instant Pot?
For optimal results without burn errors, limit chili to 4 quarts (½ full) in a 6-quart Instant Pot. The ⅔ fill line is maximum for liquid-heavy dishes like chili due to expansion during pressure cooking. Exceeding this risks triggering the burn sensor and inconsistent cooking.
Can I use frozen ground beef directly in my instant pot chili recipe?
Yes, but with modifications. Add ½ cup extra liquid and skip the initial sauté step. Cook frozen beef with 1 cup broth on high pressure for 8 minutes, then proceed with recipe. Note that browning will be less developed, so consider adding 1 tsp instant espresso powder to compensate for reduced Maillard reaction.
Why does my instant pot chili recipe trigger the burn message?
Burn errors typically occur from insufficient liquid-to-solid ratio or food particles stuck to the pot bottom. Always deglaze thoroughly after sautéing by scraping the bottom with broth until no browned bits remain. Maintain at least 1 cup liquid for every 2 cups solid ingredients, and never exceed the ⅔ fill line for chili recipes.
How do I thicken instant pot chili without affecting texture?
After cooking, use the "Sauté" function uncovered for 8-10 minutes, stirring occasionally. For quicker thickening, mix 1 tbsp cornstarch with 2 tbsp cold water and stir in during the last 5 minutes of simmering. Avoid flour directly in the pot as it can cause clumping and trigger burn sensors.
Can I double this instant pot chili recipe for meal prep?
Doubling requires significant adjustments. Use an 8-quart pot maximum, increase liquid by 1.5x (not 2x), and extend pressure cooking time by 5 minutes. Stir carefully during natural release to ensure even heat distribution. For best results, cook two separate batches rather than doubling, as ingredient crowding affects pressure consistency.


 浙公网安备
33010002000092号
浙公网安备
33010002000092号 浙B2-20120091-4