
Unlock the full potential of your Instant Pot with this comprehensive guide designed for both beginners and experienced cooks. Pressure cooking transforms meal preparation, cutting cooking times by up to 70% while preserving nutrients and enhancing flavors. Whether you're preparing weeknight dinners or planning weekend feasts, understanding proper Instant Pot operation ensures consistent, delicious results while maintaining kitchen safety.
Your First Instant Pot Experience: Setting Up for Success
Before using your Instant Pot for the first time, complete these essential setup steps. Wash the inner pot, silicone sealing ring, and steam rack with warm soapy water. Most models come with two sealing rings—one for savory dishes and another for sweet recipes to prevent flavor transfer. Proper installation of these components is critical for safe operation.
The evolution of pressure cooking technology spans centuries, from Denis Papin's 1679 'steam digester' to today's smart appliances. Modern Instant Pots incorporate nine safety mechanisms including lid lock, pressure release valve, and overheat protection that make contemporary pressure cooking significantly safer than early models. This technological progression has transformed pressure cooking from a specialized technique to an accessible kitchen staple.
Safety First: Understanding Pressure Cooking Fundamentals
Pressure cooking works by trapping steam to increase internal pressure, raising the boiling point of water from 212°F (100°C) to approximately 250°F (121°C). This higher temperature cooks food significantly faster while tenderizing tough cuts of meat. The Instant Pot's digital controls maintain precise pressure levels, eliminating the guesswork of traditional stovetop pressure cookers.
| Food Type | Traditional Cooking Time | Instant Pot Time | Water/Liquid Ratio |
|---|---|---|---|
| Chicken Breast | 25-30 minutes | 8-10 minutes | 1 cup |
| Beef Stew | 2-3 hours | 35-40 minutes | 1.5 cups |
| Dried Beans | 1-2 hours | 25-30 minutes | 3 cups |
| Hard-Boiled Eggs | 12 minutes | 5 minutes | 1 cup |
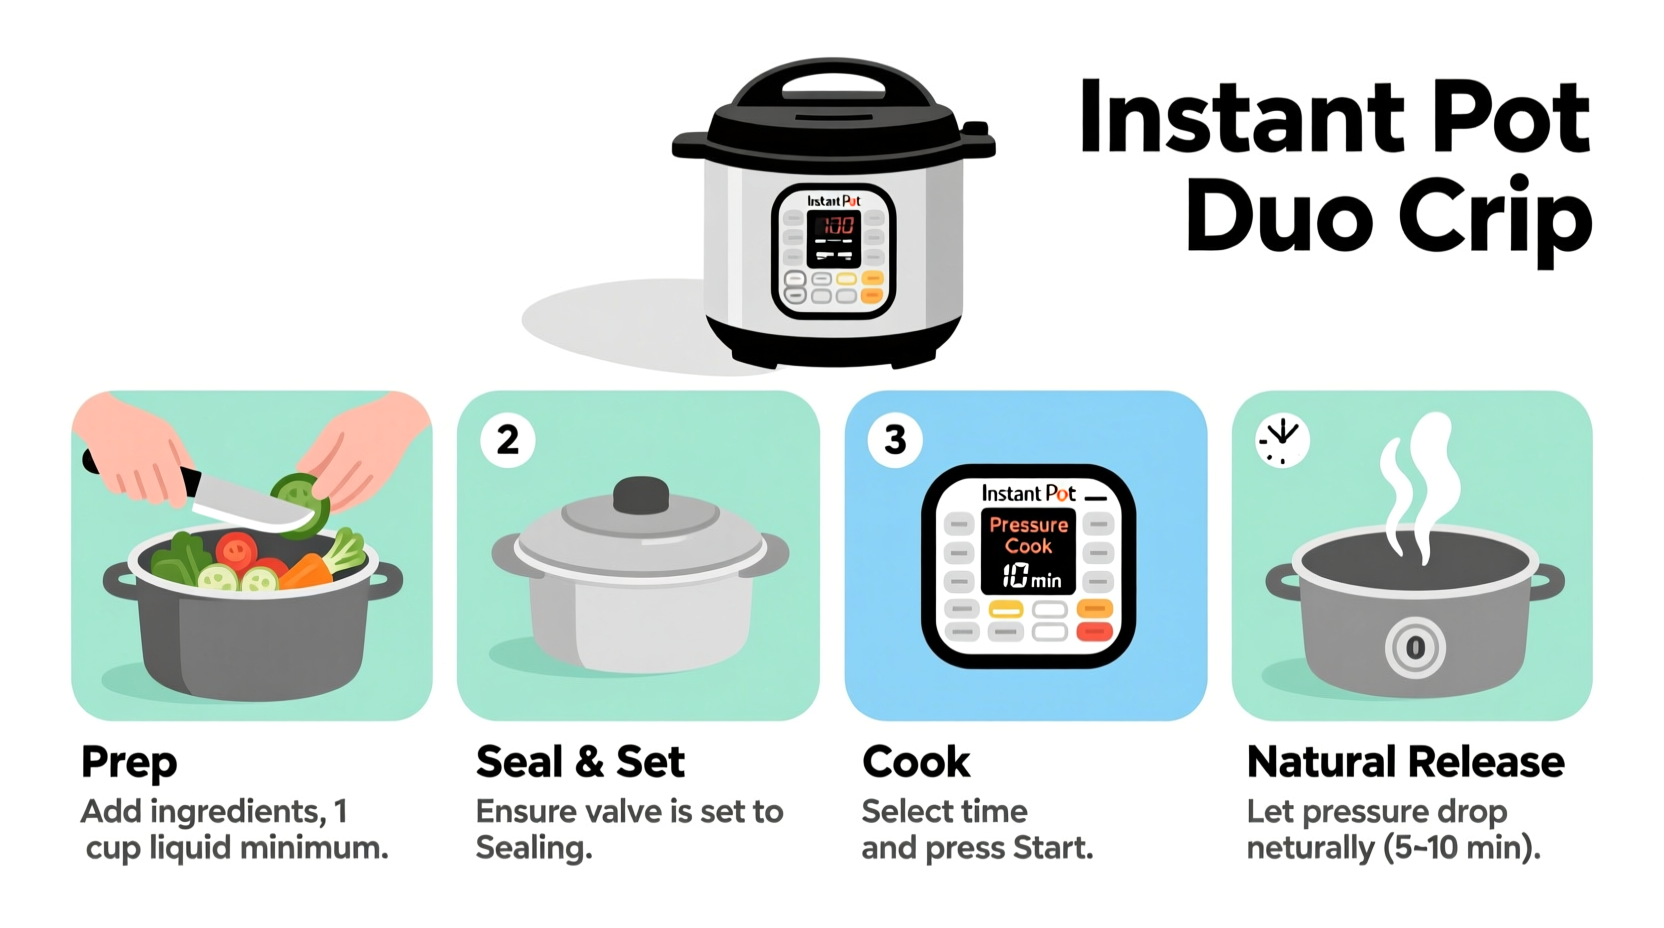
Step-by-Step Operation Guide
1. Proper Ingredient Loading
Never fill your Instant Pot more than two-thirds full with liquids or half full with foods that expand during cooking like rice or beans. The USDA Food Safety and Inspection Service recommends maintaining adequate headspace to prevent clogging the steam release valve. Always include the minimum liquid required—typically 1 to 1.5 cups—depending on your model and cooking time.
2. Securing the Lid Correctly
Align the lid arrows with the pot handles, then twist clockwise until it locks. The float valve should be in the down position before starting. A properly sealed lid is essential for building pressure—most models won't start if the lid isn't secured correctly. Check that the silicone sealing ring is properly seated in the lid groove.
3. Selecting Cooking Programs
Modern Instant Pots offer specialized programs like Soup, Meat/Stew, Bean/Chili, and Rice. Each program automatically sets optimal pressure levels and cooking times. For manual control, use the Pressure Cook/Manual button to set custom times. Remember that cooking time begins only after the pot reaches full pressure, which typically takes 10-15 minutes.
4. Natural vs. Quick Pressure Release
After cooking completes, you have two release options:
- Natural Release (NR): Allows pressure to decrease gradually over 10-20 minutes. Essential for foods with high liquid content or foam-prone ingredients like beans and soups to prevent messy eruptions.
- Quick Release (QR): Manually move the steam release valve to 'Venting' position. Use for vegetables and delicate proteins that might overcook with prolonged heat. Always shield your hand with a towel and keep your face away from the steam.
When Pressure Cooking Isn't Appropriate
Understanding context boundaries prevents kitchen disasters. Avoid pressure cooking for:
- Fried foods requiring dry heat
- Delicate dishes like custards or flans
- Foods with high fat content that could clog valves
- Recipes requiring precise browning before pressure cooking (use 'Sauté' function first)
The National Center for Home Food Preservation advises against pressure canning in electric pressure cookers like the Instant Pot due to insufficient temperature control for safe preservation. Always use dedicated canning equipment for preserving foods.
Troubleshooting Common Issues
'Burn' Message: Indicates food sticking to the bottom. Always deglaze the pot after sautéing by scraping the bottom with liquid before pressure cooking. Ensure adequate liquid and avoid thick sauces that can scorch.
Failure to Reach Pressure: Check that the sealing ring is properly installed, the float valve moves freely, and you've added sufficient liquid. Most models require at least 1 cup of liquid for proper operation.
Excessive Foaming: Common with beans, grains, and starchy foods. Reduce liquid slightly, avoid overfilling, and use natural release to prevent blockages in the steam valve.
Maintenance and Care
After each use, remove and wash the sealing ring separately to prevent odor retention. Clean the steam release valve regularly according to manufacturer instructions—typically by soaking in warm soapy water. Never submerge the main unit in water. The inner pot is dishwasher safe, but hand washing preserves its non-stick coating longer.
For optimal performance, replace the sealing ring every 12-18 months or when it shows signs of wear. Check the anti-block shield monthly for food particles that could interfere with proper steam release. Proper maintenance extends your Instant Pot's lifespan and ensures consistent cooking results.
Expanding Your Pressure Cooking Skills
Once comfortable with basics, experiment with layered cooking techniques. Many experienced users employ the 'pot-in-pot' method to cook multiple components simultaneously—like rice at the bottom with a protein suspended above on a trivet. This approach maximizes your Instant Pot's versatility while minimizing cleanup.
Remember that altitude affects pressure cooking times. The University of Wyoming Cooperative Extension notes that for every 1,000 feet above sea level, cooking times should increase by approximately 5%. Adjust accordingly if you live in mountainous regions.


 浙公网安备
33010002000092号
浙公网安备
33010002000092号 浙B2-20120091-4