
Learning how to draw food items like cinnamon rolls builds essential artistic skills while creating visually satisfying results. Cinnamon rolls offer the perfect subject for practicing organic shapes, texture rendering, and food illustration techniques that translate to many other drawing projects. This comprehensive guide breaks down the process into manageable steps anyone can follow, whether you're a complete beginner or looking to refine your food drawing abilities.
Essential Materials for Drawing Cinnamon Rolls
Before starting your cinnamon roll drawing, gather these basic supplies:
- HB or 2B pencil (versatile for both light sketching and darker shading)
- Eraser (kneaded eraser works best for subtle corrections)
- Blending stump or tissue (for smooth shading transitions)
- Sketch paper (smooth surface works best for detailed food drawings)
- Optional: colored pencils for adding realistic cinnamon and icing details
| Material | Beginner Recommendation | Advanced Option |
|---|---|---|
| Pencil | HB or 2B | Range from 4H to 6B |
| Eraser | Standard vinyl eraser | Kneaded eraser + precision eraser |
| Shading Tool | Cotton swab | Blending stumps set |
Step-by-Step Guide to Drawing a Cinnamon Roll
Step 1: Establish Basic Shapes
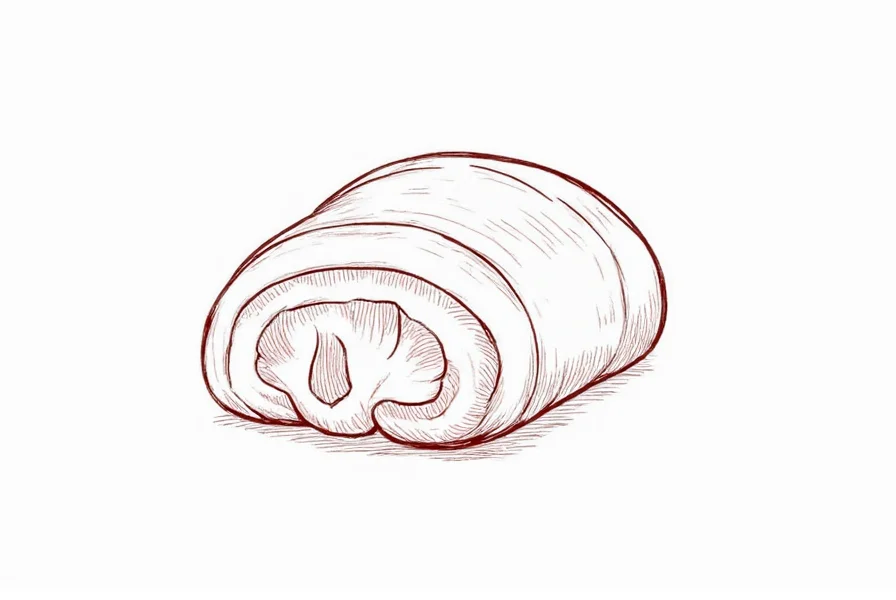
Start with a simple oval shape to represent the outer boundary of your cinnamon roll. This foundational shape determines your roll's perspective. For a classic top-down view, draw a perfect circle. For a more dynamic side view, create an elongated oval. The key to mastering how to draw a cinnamon roll realistically begins with proper proportions in this initial stage.

Step 2: Create the Spiral Pattern
Draw a smaller circle in the center of your oval, then connect it with a continuous curved line that spirals outward. This represents the layers of dough. Keep the spacing between each layer relatively even, but allow for slight variations to create a natural, handmade appearance. The spiral should complete 2-3 full rotations before reaching the outer edge. This technique for drawing the cinnamon roll spiral pattern separates amateur attempts from professional-looking results.
Step 3: Define the Roll Structure
Add subtle curves to your spiral lines to suggest the three-dimensional form of the rolled dough. Imagine how the layers would compress slightly where they overlap. Darken the lines where layers overlap to create depth. The bottom layers should appear slightly compressed while the top layers maintain more consistent spacing. This attention to detail transforms a flat drawing into a convincing cinnamon roll illustration.
Step 4: Add Texture Details
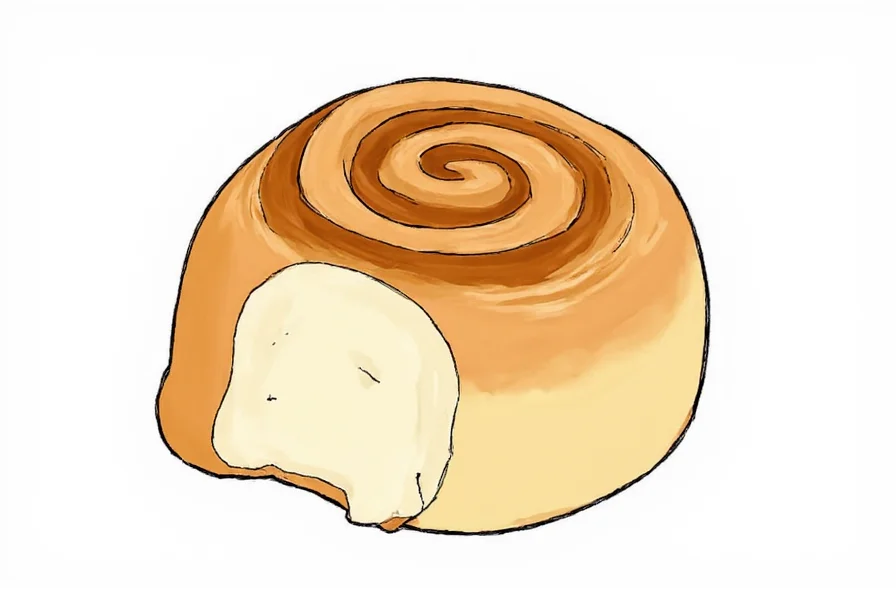
Cinnamon rolls feature distinctive textures that make them recognizable. Add small, irregular lines along the spiral to suggest the separation between dough layers. Include subtle cracks and imperfections in the dough surface to avoid a plastic, artificial appearance. For the cinnamon filling, add tiny specks throughout the spiral pattern using short, curved strokes. Learning how to draw realistic cinnamon roll texture elevates your artwork from basic to impressive.
Step 5: Apply Shading and Highlights
Determine your light source direction (typically upper left for right-handed artists). Darken areas where layers overlap and on the opposite side from your light source. Use gradual shading to suggest the rounded form of the roll. Leave small white spaces for highlights on the top surfaces. The icing deserves special attention—add irregular drips with varying thickness, then shade the underside of each drip for dimension. Proper shading techniques for cinnamon roll drawing create the illusion of soft, fresh-baked pastry.
Common Mistakes to Avoid When Drawing Cinnamon Rolls
Many beginners struggle with these common issues when attempting to draw cinnamon rolls:
- Overly perfect spirals - Real cinnamon rolls have irregular spacing between layers
- Flat appearance - Without proper shading, your roll will look like a flat circle
- Uniform icing - Real icing has varying thickness and drips naturally
- Missing texture - Dough has subtle cracks and imperfections
- Incorrect proportions - The spiral should complete 2-3 rotations, not more
Variations for Different Skill Levels
Once you've mastered the basic cinnamon roll drawing, experiment with these variations:
Simple Cartoon Version (Beginner)
For an easy cinnamon roll drawing suitable for beginners or children's illustrations, simplify the spiral pattern and use bold outlines. Exaggerate the icing swirls and minimize shading. This approach works well for logos, stickers, or simple illustrations where realism isn't necessary.
Realistic Bakery Style (Intermediate)
Add detailed texture to the dough surface, create subtle color variations in the cinnamon layers, and render the icing with translucent properties. Include small details like flour dusting or melted butter sheen for professional results. This style works well for food bloggers or culinary artists.
Stylized Art Interpretation (Advanced)
Experiment with perspective, dramatic lighting, or abstract elements while maintaining the essential cinnamon roll characteristics. Try cross-section views, extreme close-ups of texture, or incorporating the roll into larger food illustrations. This approach develops your personal artistic style while practicing fundamental drawing skills.
Practice Techniques for Improvement
To master how to draw cinnamon rolls consistently well, implement these practice strategies:
- Draw from real life - photograph an actual cinnamon roll from multiple angles
- Practice the spiral pattern separately before incorporating it into full drawings
- Create a series of drawings focusing on different elements (icing, texture, shape)
- Time yourself to complete quick 5-minute sketches for gesture practice
- Compare your drawings to reference photos to identify areas for improvement
Remember that consistent practice yields better results than occasional marathon sessions. Even 15 minutes of focused drawing practice daily will significantly improve your ability to draw realistic cinnamon rolls and other food subjects.


 浙公网安备
33010002000092号
浙公网安备
33010002000092号 浙B2-20120091-4