
Why Homemade Soy Milk Beats Store-Bought Every Time
Creating your own soy milk isn't just a kitchen experiment—it's a game-changer for your health and budget. Unlike commercial versions loaded with additives and stabilizers, homemade soy milk contains only what you put in it: pure soybeans and water. You control the freshness, texture, and flavor profile while avoiding unnecessary preservatives.
According to the FDA's food labeling guidelines, many store-bought soy milks contain added sugars, thickeners, and synthetic nutrients. When you make your own, you eliminate these additives while preserving the natural isoflavones and complete protein profile that make soy nutritionally valuable.
Your Essential Soy Milk Equipment Checklist
Forget expensive soy milk makers—most households already have what's needed:
- Blender (any standard model works)
- Fine-mesh strainer or nut milk bag
- Cheesecloth (optional for ultra-smooth texture)
- Medium saucepan with heavy bottom
- Measuring cups and spoons
| Equipment Type | Minimum Requirement | Pro Upgrade |
|---|---|---|
| Blending | Standard blender | High-speed blender |
| Straining | Fine-mesh strainer | Nut milk bag + cheesecloth |
| Cooking | Stainless steel pot | Double boiler setup |
Ingredient Selection: Beans, Water, and Beyond
The quality of your soybeans directly impacts your final product. Choose:
- Organic, non-GMO soybeans (yellow variety preferred)
- Fresh beans (avoid those with dark spots or musty smell)
- Filtered water (chlorine affects flavor development)
For every 1 cup of dried soybeans, you'll need 3 cups of water for soaking and 4 cups for blending. This precise ratio prevents weak or overly concentrated milk.
The Science-Backed Preparation Process
Traditional soy milk preparation follows a specific sequence that maximizes nutrition while eliminating undesirable compounds. The National Institutes of Health confirms that proper processing reduces trypsin inhibitors and oligosaccharides that cause digestive discomfort.
| Preparation Stage | Time Required | Critical Success Factors |
|---|---|---|
| Soaking | 8-12 hours | Room temperature, water changed every 4 hours |
| Blending | 3-5 minutes | High speed, cold water, 1:4 bean-to-water ratio |
| Cooking | 15-20 minutes | Maintain 160°F (71°C) minimum for 15 minutes |
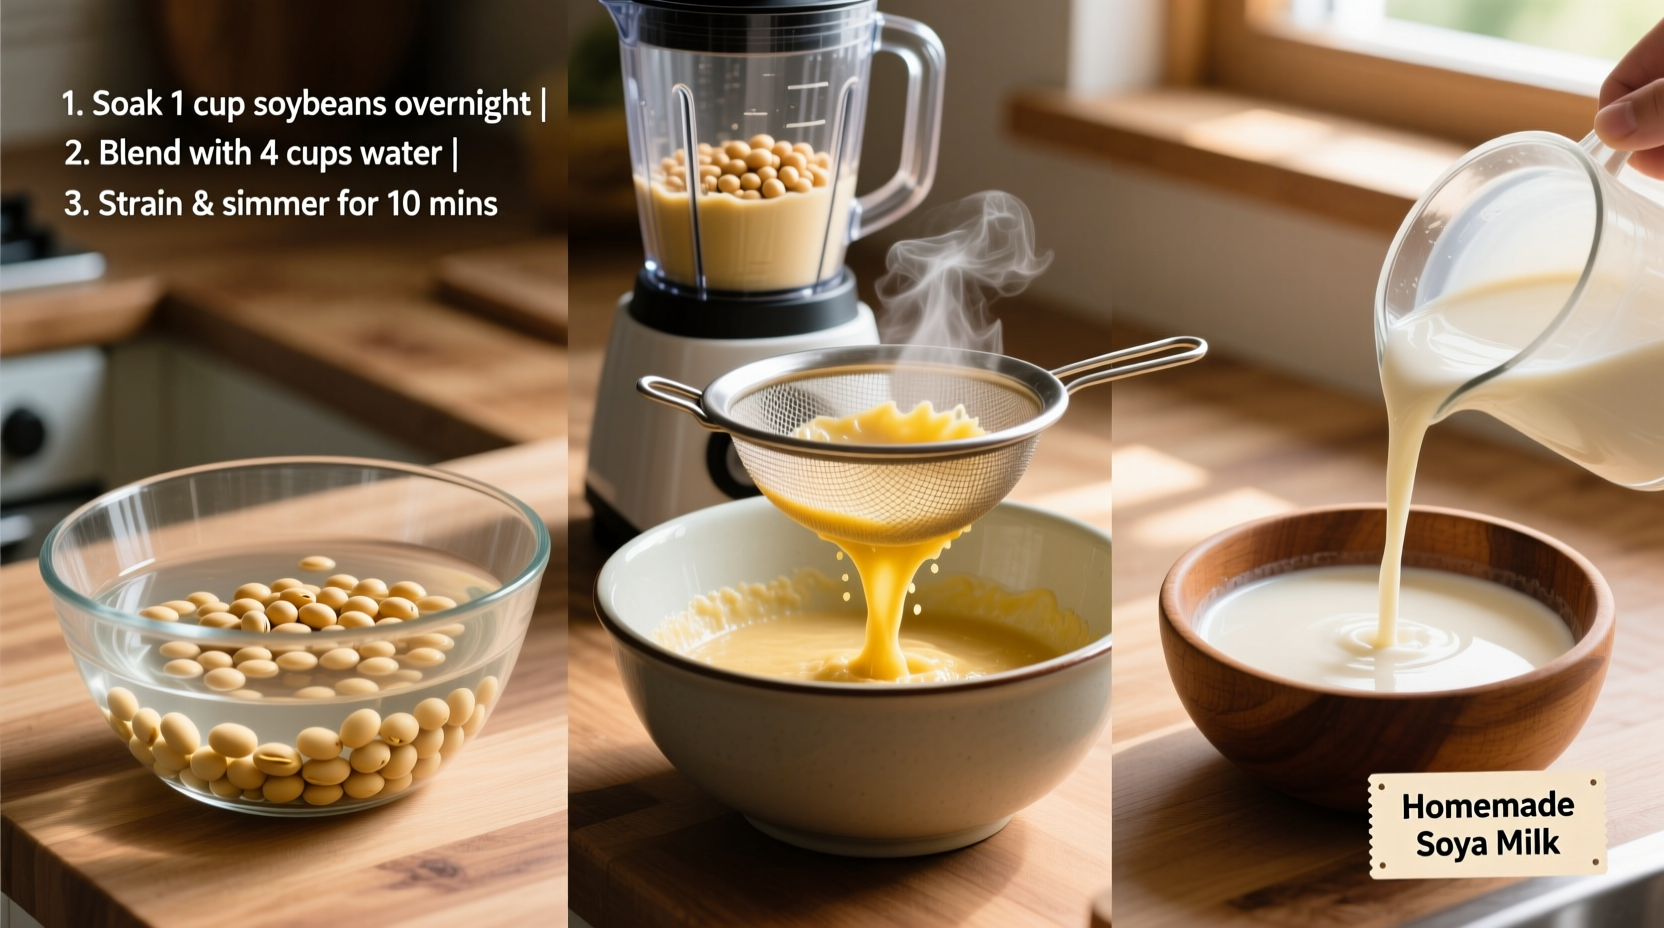
Step-by-Step Cooking Instructions
Phase 1: Perfect Soaking Technique
Place 1 cup dried soybeans in a large bowl and cover with 3 cups cool water. Soak at room temperature for 8-12 hours. Change the water every 4 hours to prevent fermentation and reduce phytic acid content. Properly soaked beans will double in size and split easily when pressed.
Phase 2: Blending for Maximum Yield
Drain and rinse soaked beans thoroughly. Combine with 4 cups fresh, cold water in your blender. Blend on high speed for 3-5 minutes until completely smooth—no visible bean particles should remain. The mixture should resemble thick, creamy batter.
Phase 3: Straining for Silky Texture
Pour the blended mixture through your strainer or nut milk bag into a large bowl. Use a spoon to press all liquid through, then squeeze the remaining pulp firmly. For restaurant-quality smoothness, strain a second time through cheesecloth.
Phase 4: Cooking for Safety and Flavor
Pour the strained milk into a saucepan and bring to 160°F (71°C), maintaining this temperature for 15 minutes. This critical step destroys trypsin inhibitors and improves digestibility. Stir constantly to prevent scorching. The milk will foam significantly—reduce heat if foaming becomes excessive.
Troubleshooting Common Soy Milk Problems
Beany Flavor
Cause: Incomplete cooking or poor straining
Solution: Ensure cooking reaches minimum 160°F for 15 minutes. Add a pinch of salt during cooking to neutralize bitterness.
Thin or Watery Texture
Cause: Incorrect bean-to-water ratio
Solution: Use precise 1:4 ratio for blending. Reduce cooked milk by simmering uncovered for 5 minutes if too thin.
Separation Issues
Cause: Temperature fluctuations or improper straining
Solution: Maintain consistent cooking temperature. Strain twice for optimal particle removal.
Storage and Usage Recommendations
Store cooled soy milk in airtight glass containers in the refrigerator for up to 5 days. Shake well before use as natural separation occurs. For longer storage, freeze in ice cube trays then transfer to freezer bags—ideal for smoothies.
Homemade soy milk works perfectly in:
- Coffee and tea (adds natural creaminess)
- Smoothies and protein shakes
- Baking recipes (substitute 1:1 for dairy milk)
- Cereal and oatmeal
Flavor Variations to Try
Enhance your basic soy milk with these professional variations:
- Vanilla Bean: Add 1 split vanilla bean during cooking
- Chocolate: Whisk in 2 tbsp cocoa powder and sweetener after cooking
- Matcha: Blend 1 tsp ceremonial grade matcha into cooled milk
- Cardamom: Infuse with 6 crushed cardamom pods during cooking
When Homemade Makes Sense (And When It Doesn't)
While homemade soy milk offers superior freshness and ingredient control, it's not always practical. Consider these context boundaries:
- Choose homemade when: You have dietary restrictions, want additive-free product, or need specific flavor profiles
- Choose store-bought when: You need calcium-fortified versions, want shelf-stable options, or require immediate use
- Best compromise: Make homemade base then fortify with nutritional yeast for B vitamins
Frequently Asked Questions
Can I make soy milk without cooking it?
No, cooking is essential for safety. Raw soybeans contain trypsin inhibitors that can cause digestive issues. The FDA recommends heating soy milk to at least 160°F (71°C) for 15 minutes to destroy these compounds and improve digestibility.
What's the best way to use leftover soy pulp?
Don't throw away the okara (soy pulp)! Spread it on a baking sheet and dry in a 200°F oven for 2 hours to make soy flour. Alternatively, add fresh pulp to baked goods, veggie burgers, or compost it for garden use. One cup of dried beans yields about 1.5 cups of usable pulp.
Why does my homemade soy milk taste bitter?
Bitterness usually indicates incomplete cooking or poor quality beans. Ensure you maintain 160°F for the full 15 minutes during cooking. Adding a pinch of salt during cooking neutralizes bitterness. Using fresh, high-quality organic soybeans also prevents off-flavors that develop in stale beans.
How does homemade soy milk compare nutritionally to store-bought?
Homemade soy milk contains more natural isoflavones and complete protein without added sugars or thickeners. However, commercial versions are often fortified with calcium and vitamins. One cup of homemade soy milk provides approximately 8g protein, 4g fat, and 4g carbs, while store-bought versions vary widely based on added ingredients.


 浙公网安备
33010002000092号
浙公网安备
33010002000092号 浙B2-20120091-4