
If you've ever wondered how to pickle ginger at home, you're in the right place. Pickled ginger, known as gari in Japanese cuisine, is that delicate pink accompaniment served with sushi that cleanses the palate between different fish varieties. While store-bought versions are available, making your own pickled ginger at home gives you complete control over ingredients, flavor intensity, and texture.
Why Make Your Own Pickled Ginger
Commercial pickled ginger often contains artificial coloring and preservatives. When you prepare homemade pickled ginger, you can avoid unnecessary additives while customizing the sweet-tart balance to your preference. Freshly pickled ginger has a brighter flavor and more vibrant texture than many store-bought alternatives. This easy ginger pickling recipe requires just a few simple ingredients and basic kitchen equipment.
Essential Ingredients for Perfect Pickled Ginger
The beauty of this traditional Japanese pickled ginger recipe lies in its simplicity. You'll need:
- 4 ounces (about 1 cup) fresh young ginger root (with pinkish skin)
- ½ cup rice vinegar (unseasoned)
- ½ cup water
- 3 tablespoons sugar
- 1 teaspoon salt
- Optional: small beet slice for natural pink color
Young ginger is preferred for pickling because it's more tender with a milder flavor and thinner skin. If you can't find young ginger, regular mature ginger works too—just expect a stronger, spicier result.
| Ingredient | Substitution Options | Notes |
|---|---|---|
| Rice vinegar | Apple cider vinegar, white wine vinegar | Avoid distilled white vinegar—it's too harsh |
| Sugar | Honey, maple syrup | Adjust to taste; traditional recipes use white sugar |
| Young ginger | Mature ginger | Young ginger yields more tender results |
Equipment You'll Need
Don't be intimidated—this homemade pickled ginger instructions require minimal equipment:
- Vegetable peeler or spoon for ginger
- Sharp knife or mandoline slicer
- Small saucepan
- Heatproof bowl
- 8-ounce sterilized glass jar with lid
Step-by-Step Pickling Process
Preparing the Ginger
Proper ginger preparation for pickling is crucial for the best texture:
- Peel the ginger using a vegetable peeler or the edge of a spoon (which removes less flesh)
- Slice ginger paper-thin (about 1/16 inch thick) using a sharp knife or mandoline
- Place slices in a bowl of cold water for 10 minutes to remove excess starch
- Drain and pat dry with clean kitchen towel
Creating the Pickling Liquid
The balance of vinegar, sugar, and salt determines your quick pickled ginger for sushi flavor profile:
- Combine rice vinegar, water, sugar, and salt in a small saucepan
- Add optional beet slice if you want natural pink color
- Bring to a gentle simmer over medium heat, stirring until sugar dissolves
- Remove from heat immediately—don't boil vigorously
Combining and Storing
Now for the simple but critical final steps in your ginger pickling recipe:
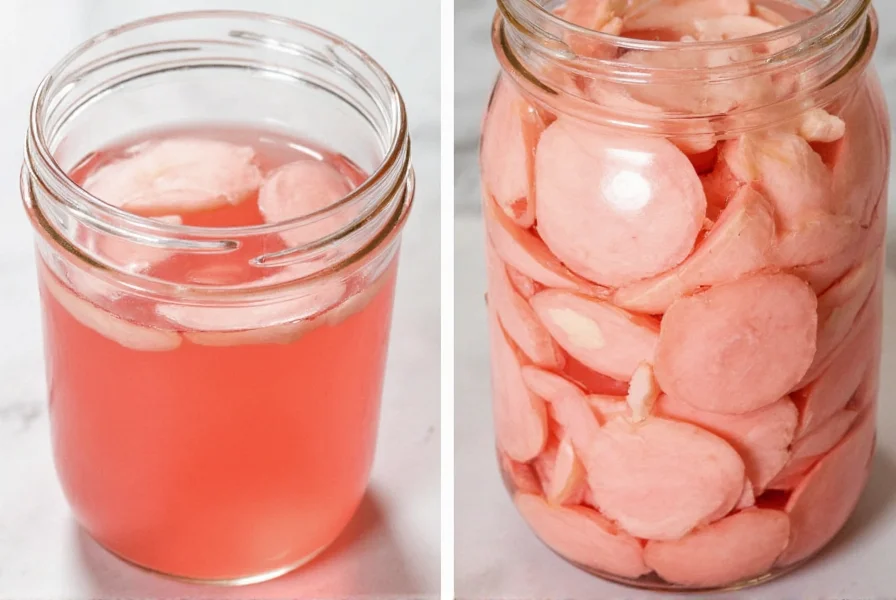
- Pack ginger slices tightly into sterilized glass jar
- Pour hot pickling liquid over ginger, ensuring complete coverage
- Cool to room temperature with lid slightly ajar
- Seal tightly and refrigerate for at least 24 hours before using
Common Mistakes to Avoid
Even with this straightforward how to make beni shoga at home process, certain pitfalls can affect your results:
- Using old, fibrous ginger—Fresh ginger should feel firm with smooth skin
- Slicing too thick—Thin slices absorb flavors better and have superior texture
- Boiling the pickling liquid too long—This can make ginger tough
- Using non-sterilized containers—Risk of contamination shortens shelf life
- Impatience—Ginger needs at least 24 hours to properly pickle
Storage Guidelines for Homemade Pickled Ginger
Proper storage ensures your pickled ginger maintains quality:
- Always keep refrigerated in airtight container
- Use clean utensils when removing ginger to prevent contamination
- Consume within 3-4 weeks for best flavor and texture
- Ensure ginger remains submerged in liquid at all times
Over time, the ginger will gradually lose its vibrant color and become more translucent. The flavor will mellow and become less sharp as it continues to pickle in the refrigerator.
Creative Uses Beyond Sushi
While traditionally served with sushi, your homemade pickled ginger has many applications:
- Add to rice bowls for a flavor boost
- Chop finely and mix into salad dressings
- Serve alongside grilled fish or chicken
- Add to stir-fries during the last minute of cooking
- Use as a garnish for Asian-inspired cocktails
- Finely dice and mix into tuna or salmon salad
Troubleshooting Your Pickled Ginger
Encountering issues with your ginger pickling recipe? Try these solutions:
- Ginger too spicy: Soak slices in cold water for 30 minutes before pickling
- Not pink enough: Use young ginger with pinkish skin or add beet slice
- Too sweet: Reduce sugar by 1 tablespoon next time
- Too vinegary: Increase water ratio slightly in pickling liquid
- Mushy texture: Don't simmer ginger in liquid—just pour hot liquid over raw ginger
Perfecting Your Technique
Mastering this how do you pickle ginger process takes practice. Your first batch might not be perfect, but each attempt will improve your results. The key is maintaining the proper vinegar-to-sugar ratio while using fresh ingredients. Over time, you'll develop a feel for the exact balance that suits your palate.
Remember that authentic Japanese pickled ginger (gari) is meant to be delicate and subtle—not overpowering. It should complement, not dominate, the flavors of your meal. With these storage tips for homemade pickled ginger and proper technique, you'll create a condiment that elevates your culinary creations.
How long does homemade pickled ginger last in the refrigerator?
Properly stored in a sterilized, airtight container with the ginger fully submerged in liquid, homemade pickled ginger will maintain optimal quality for 3-4 weeks. Always use clean utensils when removing ginger to prevent contamination that could shorten its shelf life.
Why isn't my pickled ginger turning pink naturally?
Young ginger with pinkish skin naturally develops a pale pink hue when pickled in vinegar. If your ginger isn't turning pink, you're likely using mature ginger with yellow skin. For traditional pink color without artificial dyes, add a thin slice of raw beet to the pickling liquid—it will impart a beautiful natural pink color as it pickles.
Can I use this pickled ginger recipe with mature ginger instead of young ginger?
Yes, you can use mature ginger, but the results will differ. Mature ginger has a stronger, spicier flavor and thicker fibers. If using mature ginger, consider soaking the slices in cold water for 30 minutes before pickling to reduce sharpness, and expect a more robust final product that works well in heartier dishes rather than delicate sushi pairings.
What's the best vinegar for pickling ginger?
Rice vinegar is traditionally used for pickling ginger as it has a mild, slightly sweet flavor that complements rather than overwhelms the ginger. Unseasoned rice vinegar works best—avoid seasoned varieties that contain added sugar and salt. If rice vinegar isn't available, apple cider vinegar makes a good substitute, but avoid harsh vinegars like distilled white vinegar which can overpower the delicate ginger flavor.


 浙公网安备
33010002000092号
浙公网安备
33010002000092号 浙B2-20120091-4