

Nothing warms the soul quite like a steaming bowl of homemade chili, especially when crafted with care and attention to detail. While quick versions exist, true chili mastery comes from understanding the interplay of ingredients and patience in the cooking process. This guide reveals the secrets to creating restaurant-quality chili in your own kitchen, whether you prefer meaty Texas-style or vegetarian-friendly variations.
The Foundation of Authentic Homemade Chili
Authentic chili isn't just about throwing ingredients into a pot—it's a culinary tradition with roots in Texas and the American Southwest. The best homemade chili recipes share several critical elements that transform ordinary ingredients into extraordinary comfort food.
First, quality matters. Using fresh, whole spices rather than pre-mixed chili powder makes a dramatic difference in flavor complexity. Toast dried chilies like ancho, guajillo, and chipotle before grinding them for maximum aroma. For meat-based versions, select well-marbled chuck roast rather than lean ground beef—the fat carries flavor and creates a richer texture.
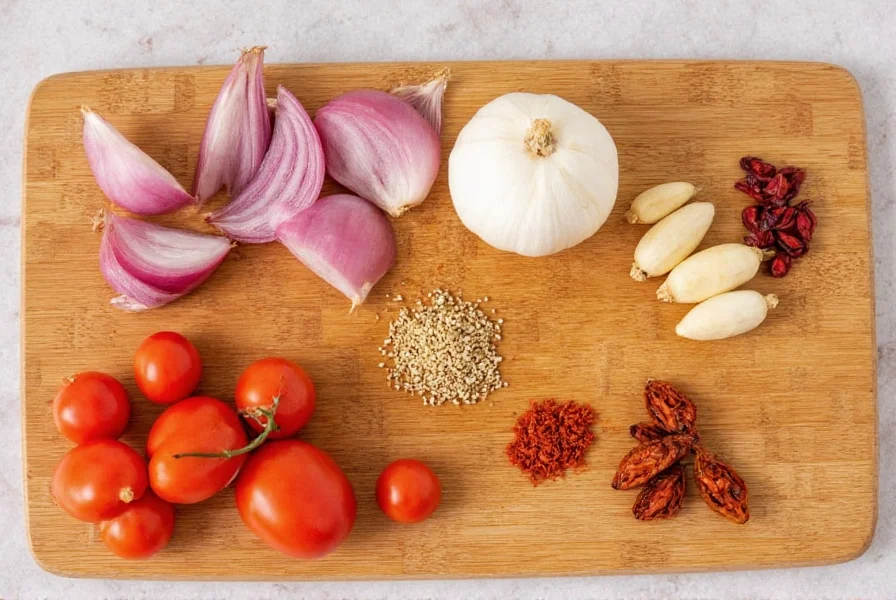
Essential Homemade Chili Ingredients
While regional variations exist, these components form the backbone of any exceptional chili recipe:
| Category | Key Ingredients | Professional Tips |
|---|---|---|
| Base | Meat (chuck roast, ground beef) or plant-based alternative | Brown meat in batches for proper caramelization |
| Aromatics | Onions, garlic, bell peppers | Sauté until deeply golden, not just translucent |
| Chilies | Ancho, guajillo, chipotle (dried or canned) | Toast dried chilies before rehydrating for deeper flavor |
| Liquid | Broth, beer, or coffee | Use dark beer or cold brew coffee for complexity |
| Thickener | Tomato paste, masa harina | Add tomato paste early to cook out raw flavor |
Step-by-Step Homemade Chili Instructions
Follow these professional techniques for chili that develops maximum flavor:
- Prepare your chilies: For dried varieties, remove stems and seeds, then toast in a dry skillet for 30 seconds per side until fragrant. Soak in hot water for 20 minutes, then blend into smooth paste.
- Sear the meat: Cut chuck roast into 1-inch cubes and sear in batches until deeply browned. Remove and set aside—don't rush this critical flavor-building step.
- Sauté aromatics: In the same pot, cook onions, garlic, and peppers until caramelized (about 15 minutes), scraping up browned bits from the meat.
- Bloom spices: Add your chili paste or freshly ground spices to the aromatics and cook for 2 minutes to release essential oils.
- Combine and simmer: Return meat to pot with broth, tomatoes, and any additional ingredients. Bring to gentle simmer, then reduce heat to low.
- Slow cook: Cover partially and simmer for 2-3 hours for meat chili, or 1-2 hours for vegetarian versions, stirring occasionally.
Perfecting Your Homemade Chili Technique
The difference between good and exceptional homemade chili often comes down to technique rather than ingredients alone. Consider these professional insights:
Temperature control is crucial—your chili should maintain a bare simmer, not a rolling boil. High heat breaks down proteins too quickly, resulting in stringy meat and muted flavors. The ideal temperature range is 180-200°F (82-93°C).
Layering flavors creates depth. Add acidic components like tomatoes early to mellow during cooking, then finish with a splash of vinegar or lime juice just before serving to brighten the flavors. Similarly, add delicate herbs like cilantro at the end rather than during the long simmer.
The resting period makes a surprising difference. Let your chili sit off heat for 20-30 minutes before serving. This allows flavors to marry and the texture to stabilize. Many chili experts even recommend making it a day ahead—reheating gently the next day often produces superior results.
Customizing Your Homemade Chili
Personalize your chili while maintaining authentic flavor balance:
- Heat level control: Adjust spiciness by varying the ratio of mild (ancho) to hot (cayenne, habanero) chilies. Remember that heat intensifies over time, so err on the mild side initially.
- Bean debate: Traditional Texas chili contains no beans, but many home cooks prefer them. If using, add cooked beans during the last 30 minutes to prevent mushiness.
- Vegetarian adaptation: Replace meat with portobello mushrooms, lentils, or textured vegetable protein. Use mushroom broth and a tablespoon of soy sauce for umami depth.
- Thickening techniques: If too thin, create a slurry with masa harina and water. If too thick, add small amounts of warm broth.

Troubleshooting Common Homemade Chili Problems
Even experienced cooks encounter issues with homemade chili. Here's how to fix them:
- Too spicy: Add dairy (sour cream, cheese), acid (lime juice), or sweetness (a pinch of sugar). Stir in cooked rice or extra beans to dilute heat.
- Bland flavor: Boost with umami elements like soy sauce, fish sauce, or Worcestershire. Add acid with vinegar or citrus. Consider toasting additional spices separately and stirring in.
- Meat too tough: Continue simmering until tender, but avoid boiling. For future batches, ensure proper searing and use appropriate cuts with connective tissue.
- Excess fat: Chill chili completely, then skim solidified fat from the surface. Alternatively, use a fat separator when adding broth.
- Acidic taste: Balance with a pinch of baking soda (¼ teaspoon at a time) or natural sweetness from roasted vegetables.
Serving and Storage Recommendations
Proper presentation enhances your homemade chili experience. Serve in pre-warmed bowls with traditional toppings arranged in small dishes: shredded cheese, sour cream, diced onions, fresh cilantro, and lime wedges. Cornbread or saltine crackers provide the perfect accompaniment.
For storage, chili actually improves with time as flavors continue to meld. Cool completely before transferring to airtight containers. Properly stored homemade chili keeps for 3-4 days in the refrigerator or up to 6 months in the freezer. When reheating, do so gently over low heat to preserve texture and flavor integrity.
Frequently Asked Questions
How long should homemade chili simmer for optimal flavor?
For meat-based chili, simmer for 2-3 hours at a gentle temperature (180-200°F). Vegetarian versions require 1-2 hours. The extended cooking time allows collagen in meat to break down into gelatin and flavors to fully develop. Avoid boiling, which can make meat tough and flavors harsh.
Can I make authentic homemade chili without beans?
Yes, traditional Texas-style chili contains no beans. Authentic meat chili relies on the natural thickness from reduced liquid and meat breakdown. If you prefer beans, add them during the last 30 minutes of cooking to prevent mushiness. Many chili competitions actually prohibit beans in the 'chili' category.
What's the secret to making chili less acidic?
To reduce acidity in homemade chili, add a small pinch of baking soda (¼ teaspoon at a time) which neutralizes acid. Alternatively, balance with natural sweetness from roasted vegetables, a teaspoon of honey, or a diced sweet potato. Remember that acidity often mellow during extended cooking, so wait until the end before adjusting.
How do I store homemade chili for best results?
Cool chili completely before transferring to airtight containers. Refrigerate for up to 4 days or freeze for up to 6 months. For freezing, leave 1-inch headspace for expansion. When reheating, do so gently over low heat to preserve texture. Many cooks find chili tastes even better after 24 hours as flavors continue to meld.


 浙公网安备
33010002000092号
浙公网安备
33010002000092号 浙B2-20120091-4