

Creating the perfect chili with chili beans requires balancing flavors, textures, and cooking techniques. While traditional Texas-style chili often omits beans, many home cooks prefer the heartiness and fiber that chili beans add to this beloved comfort food. This comprehensive guide delivers a foolproof recipe that honors both tradition and modern preferences.
Why This Chili Recipe Works
Unlike many simplified versions, this recipe builds flavor through multiple cooking stages. The secret lies in properly browning the meat, sautéing aromatics, and allowing sufficient simmering time for flavors to meld. Using both dried spices and fresh ingredients creates complexity that instant chili mixes can't match.
Essential Ingredients for Chili with Beans
The quality of your ingredients directly impacts your final dish. Here's what you'll need for authentic chili with beans:
| Ingredient | Quantity | Notes |
|---|---|---|
| Ground beef (80/20) | 1 pound | Provides rich flavor; can substitute ground turkey |
| Chili beans (kidney) | 2 cans (15 oz each) | Drained and rinsed; pinto beans work too |
| Yellow onion | 1 large, diced | Yellow offers best flavor balance |
| Garlic cloves | 3, minced | Fresh is essential for depth |
| Crushed tomatoes | 1 can (28 oz) | San Marzano preferred |
| Chili powder | 2 tablespoons | Use pure chili powder, not seasoning mix |
Step-by-Step Cooking Instructions
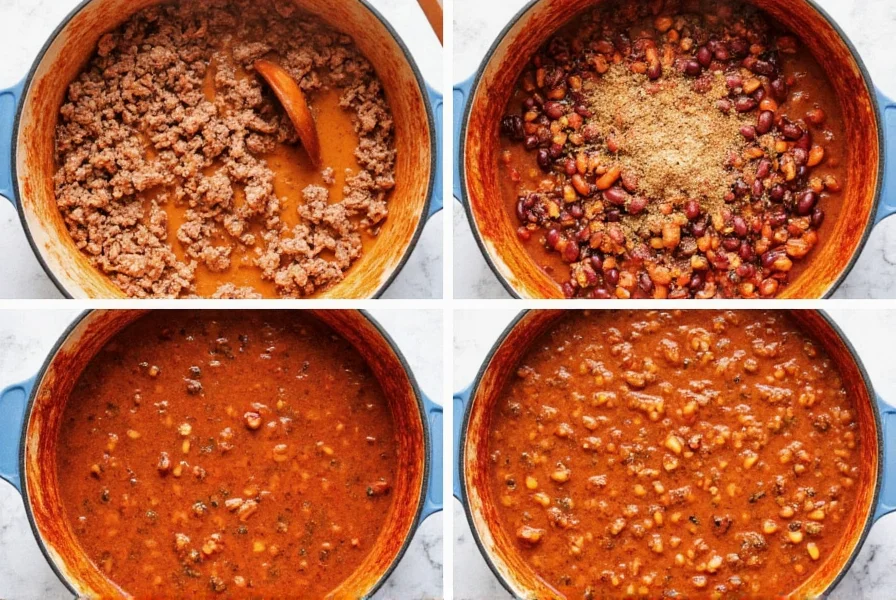
- Brown the meat: In a large pot over medium-high heat, cook ground beef until well-browned (not gray). Drain excess fat but retain about 1 tablespoon for flavor.
- Sauté aromatics: Add diced onion and cook until translucent (5-7 minutes). Stir in minced garlic and cook for 1 minute until fragrant.
- Add spices: Incorporate chili powder, cumin, paprika, oregano, salt, and black pepper. Cook for 2 minutes to toast the spices.
- Build the base: Pour in crushed tomatoes, tomato paste, and beef broth. Stir well to combine.
- Add beans: Stir in drained and rinsed chili beans. Bring to a gentle simmer.
- Simmer: Reduce heat to low, cover partially, and simmer for 45 minutes, stirring occasionally.
- Final adjustments: Taste and adjust seasoning. For thicker chili, simmer uncovered for additional 10-15 minutes.
Pro Tips for Perfect Chili Every Time
Professional chefs and experienced home cooks agree on these techniques for superior chili with beans:
- Bean preparation: Always drain and rinse canned beans to remove excess sodium and the starchy liquid that can make chili gluey
- Layering flavors: Add dried spices early to toast them in the fat, then add fresh herbs like cilantro at the end
- Acidity balance: A splash of apple cider vinegar or lime juice at the end brightens flavors
- Texture control: Mash about 1/4 of the beans before adding for a thicker, heartier consistency
- Resting time: Let chili sit for 15-20 minutes off heat before serving to allow flavors to meld
Customization Options for Your Chili Recipe
This versatile chili recipe with chili beans adapts beautifully to different preferences and dietary needs:
- Vegetarian version: Omit meat and use vegetable broth. Add 1 cup cooked lentils for protein
- Spice adjustments: For milder chili, reduce chili powder to 1 tbsp; for hotter, add 1 diced jalapeño with onions
- Bean variations: Combine kidney beans with black beans or pinto beans for complex texture
- Smoky depth: Add 1-2 tsp chipotle powder or 1 tbsp adobo sauce from canned chipotles
- Sweet contrast: A teaspoon of brown sugar balances acidity in tomato-based chili
Serving Suggestions and Storage
Chili with beans shines when paired thoughtfully. Consider these serving options:
- Top with fresh cilantro, diced red onion, and a dollop of sour cream
- Pair with cornbread or crusty bread for dipping
- For a hearty meal, serve over baked potatoes or rice
- Store leftovers in airtight container for up to 4 days in refrigerator
- Freeze portions for up to 3 months; thaw overnight before reheating
Chili actually improves in flavor after sitting, making it perfect for meal prep. The flavors continue developing as it rests, creating an even more complex taste profile the next day.
Common Mistakes to Avoid in Bean Chili Recipes
Even experienced cooks can fall into these chili pitfalls:
- Boiling instead of simmering: Vigorous boiling breaks down beans too much, creating mushy texture
- Adding beans too early: Delicate beans can become overly soft if added at the beginning
- Skipping the bloom step: Not cooking spices in fat first results in flat, one-dimensional flavor
- Overlooking acidity: Proper acid balance (tomatoes, vinegar) is crucial for brightening rich flavors
- Underseasoning: Chili needs more salt than you might expect to balance all components
Frequently Asked Questions
Can I use dried beans instead of canned in this chili recipe?
Yes, you can use dried beans. Soak 1 cup dried kidney beans overnight, then cook separately until tender before adding to the chili during the last 30 minutes of simmering. Dried beans provide superior texture and less sodium than canned options.
How can I make my chili less spicy without losing flavor?
To reduce spiciness while maintaining flavor, add a small amount of sugar or honey (1-2 tsp), a splash of dairy like sour cream or milk, or increase the tomato content. You can also add more beans or meat to dilute the heat while increasing portion size.
Why does my chili with beans turn out watery?
Chili becomes watery when there's too much liquid relative to solids. To fix this, simmer uncovered to evaporate excess liquid, mash some beans to thicken the base, or add a small amount of tomato paste. Remember that chili thickens as it cools, so don't overcorrect while hot.
What's the difference between chili beans and regular kidney beans?
Chili beans are kidney beans pre-cooked in a seasoned tomato sauce, while regular kidney beans are plain. For homemade chili, use plain canned kidney beans and add your own seasoning for better flavor control. The term 'chili beans' in recipes typically refers to using kidney beans in chili, not the pre-seasoned variety.


 浙公网安备
33010002000092号
浙公网安备
33010002000092号 浙B2-20120091-4