
Yes, you can absolutely make delicious chili using dry beans instead of canned. The key is proper preparation: soak dry beans overnight (or use the quick-soak method), then simmer them until tender before adding to your chili. This traditional approach yields superior texture and deeper flavor compared to canned beans, with better cost savings and no preservatives.
Making chili with dry beans connects you to the dish's authentic roots while offering complete control over texture and flavor development. Unlike canned beans that can be mushy or overly salty, dry beans absorb the rich spices of your chili broth perfectly. This comprehensive guide walks you through every step of creating exceptional chili from scratch using dry beans, including preparation methods, timing considerations, and professional cooking techniques that guarantee perfect results every time.
Why Choose Dry Beans for Your Chili
Dry beans provide distinct advantages over canned alternatives for serious chili makers. They're significantly more economical—typically costing 60-70% less per serving. More importantly, they deliver superior culinary results. When properly prepared, dry beans maintain their structure during the long simmering process required for authentic chili, creating that ideal balance of tender-but-intact texture that canned beans rarely achieve.
Using dry beans also eliminates unwanted additives. Most canned beans contain preservatives and excess sodium that can interfere with your carefully balanced chili seasoning. By starting with dry beans, you control every element of flavor development, resulting in a more complex, layered final product that showcases your cooking skills.
Best Bean Varieties for Chili
Not all beans perform equally in chili. The following varieties deliver optimal texture and flavor absorption:
| Bean Type | Soaking Time | Cooking Time | Flavor Profile |
|---|---|---|---|
| Pinto Beans | 8-12 hours | 1.5-2 hours | Earthy, creamy texture ideal for traditional Texas chili |
| Kidney Beans | 6-8 hours | 1-1.5 hours | Robust flavor that holds shape well in hearty chili |
| Black Beans | 6 hours | 1-1.5 hours | Slightly sweet with firm texture for Southwestern styles |
| Navy Beans | 8 hours | 1.5 hours | Mild flavor that absorbs spices beautifully |
Dry Bean Preparation Methods
Proper bean preparation is critical for perfect chili. Follow these methods to ensure your beans cook evenly without becoming mushy or remaining undercooked.
Traditional Overnight Soak
Place 1 pound dry beans in a large bowl and cover with 3 inches of cold water. Let soak at room temperature for 8-12 hours. Drain and rinse thoroughly before cooking. This method yields the most consistent results and reduces digestive discomfort.
Quick-Soak Method
For time-pressed cooks: Place beans in a large pot, cover with 2 inches of water, and bring to a boil. Boil for 2 minutes, then remove from heat, cover, and let stand for 1 hour. Drain and rinse before proceeding. This reduces total preparation time while still improving texture.
Pressure Cooker Method
For fastest results: Skip soaking and place rinsed beans directly in your pressure cooker with 4 cups water per 1 cup beans. Cook at high pressure for 25-35 minutes depending on bean variety, then allow natural release for 15 minutes. This method cuts cooking time dramatically while maintaining excellent texture.

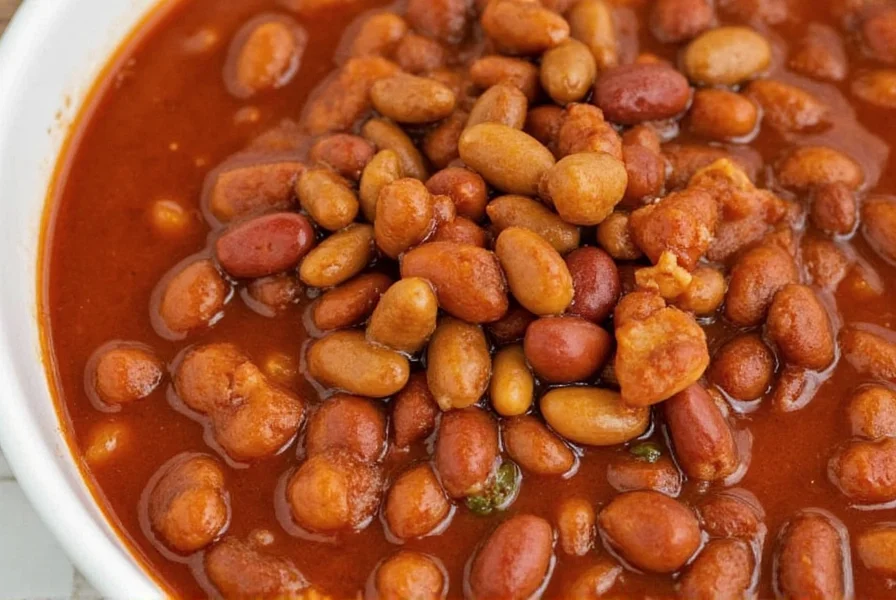
Authentic Dry Bean Chili Recipe
This traditional recipe yields 6 generous servings and requires approximately 3 hours from start to finish (mostly hands-off cooking time).
Ingredients
- 1 pound dry pinto beans (or kidney beans), sorted and rinsed
- 2 tablespoons vegetable oil
- 1 large yellow onion, finely diced
- 4 cloves garlic, minced
- 1.5 pounds ground chuck (80% lean)
- 2 jalapeños, seeds removed, finely diced
- 3 tablespoons chili powder
- 2 teaspoons ground cumin
- 1.5 teaspoons smoked paprika
- 1 teaspoon dried oregano
- 0.5 teaspoon cayenne pepper (adjust to taste)
- 1 (28-ounce) can crushed tomatoes
- 2 cups beef broth (low sodium)
- 2 bay leaves
- Salt and freshly ground black pepper to taste
Step-by-Step Instructions
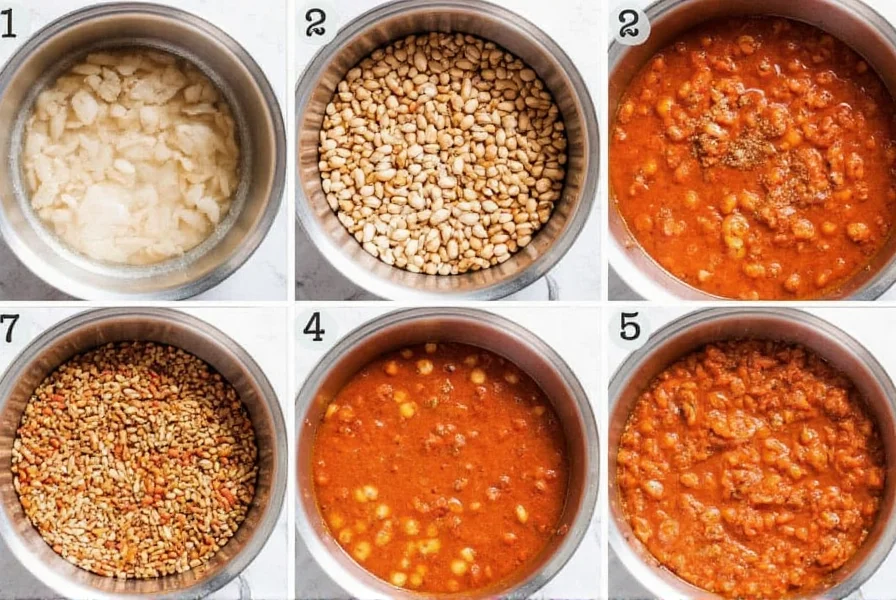
- Prepare beans using your preferred method (soak overnight or quick-soak). Drain and rinse thoroughly.
- In a 6-quart Dutch oven, heat oil over medium-high heat. Add onions and cook until translucent (5 minutes).
- Add garlic and jalapeños, cooking for 1 minute until fragrant.
- Add ground chuck, breaking up with a spoon, and cook until browned (8-10 minutes).
- Stir in chili powder, cumin, paprika, oregano, and cayenne. Cook for 2 minutes to toast the spices.
- Add crushed tomatoes, beef broth, bay leaves, and prepared beans. Bring to a gentle simmer.
- Reduce heat to low, cover partially, and simmer for 1.5-2 hours, stirring occasionally, until beans are tender and chili has thickened.
- Remove bay leaves. Season with salt and pepper to taste. For deeper flavor, let chili rest off heat for 30 minutes before serving.
Pro Tips for Perfect Dry Bean Chili
- Acidity balance: Add a small amount of acid (1 tablespoon cider vinegar or lime juice) at the end of cooking to brighten flavors.
- Texture control: Mash 1 cup of cooked beans against the pot side to naturally thicken your chili without flour or cornstarch.
- Flavor development: For richer taste, brown the meat in two batches to avoid overcrowding the pot.
- Salt timing: Add salt after beans have softened (about 1 hour into simmering) to prevent toughening.
- Make-ahead advantage: Chili tastes better the next day as flavors continue to meld—ideal for meal prep.
Storage and Reheating Guidelines
Properly stored, your dry bean chili will maintain quality for up to 5 days in the refrigerator or 3 months in the freezer. Cool completely before storing in airtight containers. When reheating, add a splash of broth or water to restore ideal consistency. For best results, reheat gently over medium-low heat, stirring occasionally.
Frequently Asked Questions
Can I skip soaking dry beans for chili?
Yes, but with trade-offs. Skipping soaking increases cooking time by 30-50% and may result in unevenly cooked beans. The pressure cooker method works best for unsoaked beans, requiring 35-45 minutes at high pressure. For traditional stovetop cooking, soaking remains recommended for optimal texture.
How do I prevent dry beans from becoming mushy in chili?
Add beans to the chili after they've been partially cooked (about 75% done). Avoid vigorous boiling—maintain a gentle simmer. Never add acidic ingredients (tomatoes, vinegar) until beans are nearly tender, as acid prevents softening. For best results, cook beans separately until just tender before adding to the chili mixture.
What's the ideal cooking time for dry beans in chili?
Total cooking time varies by bean type and preparation method. For soaked beans added to chili: 60-90 minutes simmering. Unsoaked beans require 90-120 minutes. The beans should be tender but still hold their shape when pressed between fingers. Check periodically after 45 minutes to prevent overcooking.
Can I use a mix of different dry beans in chili?
Absolutely. Combining pinto, kidney, and black beans creates complex texture and flavor. However, since different beans cook at different rates, either: 1) Start harder beans (like kidney) first, adding quicker-cooking varieties later, or 2) Cook each bean type separately until tender, then combine in the chili during the final 30 minutes of cooking.
Why does my dry bean chili taste flat?
Flat flavor usually indicates insufficient seasoning layers. Ensure you properly toast your spices before adding liquids, season in stages (not just at the end), and finish with a touch of acid (vinegar or lime juice). The long cooking time of dry beans requires more aggressive seasoning than canned bean recipes—taste and adjust seasoning at multiple stages during cooking.


 浙公网安备
33010002000092号
浙公网安备
33010002000092号 浙B2-20120091-4