

Nothing brings people together like a warm bowl of chili cheese dip at game day gatherings or casual get-togethers. Rooted in Texan culinary tradition, this dish has evolved from street food to a national party staple. This crowd-pleasing appetizer combines the rich comfort of melted cheese with the bold kick of chili for a flavor combination that keeps guests coming back for more. While store-bought versions exist, homemade chili cheese dip offers superior texture, freshness, and customization options that elevate this classic party food.
The Evolution of Chili Cheese Dip: A Cultural Timeline
Understanding the historical context reveals how regional traditions shaped this modern favorite:
- 1880s: Originated with "chili queens" in San Antonio plazas, where chili con carne was sold as affordable street food (Texas State Historical Association, Chili History).
- 1940s: Texans began combining chili with melted cheese in diners, creating early versions of chili con queso as documented in regional cookbooks.
- 1970s: Gained nationwide popularity through televised sports events, particularly Super Bowl parties, becoming synonymous with casual American gatherings (Smithsonian National Museum of American History, Convenience Foods Timeline).
- Today: Modern variations reflect diverse dietary needs while maintaining core elements of melted cheese and chili.
Essential Ingredients for Authentic Chili Cheese Dip
The magic of great chili cheese dip lies in ingredient quality and proper ratios. Unlike processed cheese dip alternatives, authentic versions use real cheese that melts smoothly without becoming greasy or grainy.
| Ingredient | Quantity | Why It Matters |
|---|---|---|
| Sharp cheddar cheese | 2 cups, freshly grated | Pre-grated cheese contains anti-caking agents that prevent smooth melting |
| Canned chili (no beans) | 1 cup | Provides authentic chili flavor without textural interference from beans |
| Milk or evaporated milk | ¼ cup | Creates creamier texture and prevents cheese from becoming too thick |
| Butter | 2 tablespoons | Enhances richness and helps emulsify the cheese mixture |
| All-purpose flour | 2 tablespoons | Prevents cheese separation and creates stable emulsion |
Homemade vs. Store-Bought: Quality Comparison
Food science analysis reveals significant differences in texture and composition:
| Characteristic | Homemade Dip | Store-Bought Dip |
|---|---|---|
| Texture stability | Smooth emulsion when using roux method; may separate if overheated | Relies on sodium citrate for stability but often develops gummy texture after 30 minutes (University of Wisconsin-Madison, Cheese Melting Study) |
| Ingredient integrity | 100% real cheese; no preservatives | Typically contains processed cheese food with whey protein concentrate and emulsifiers |
| Customization potential | Adjustable spice levels and dietary modifications | Fixed formulations with limited flavor variations |
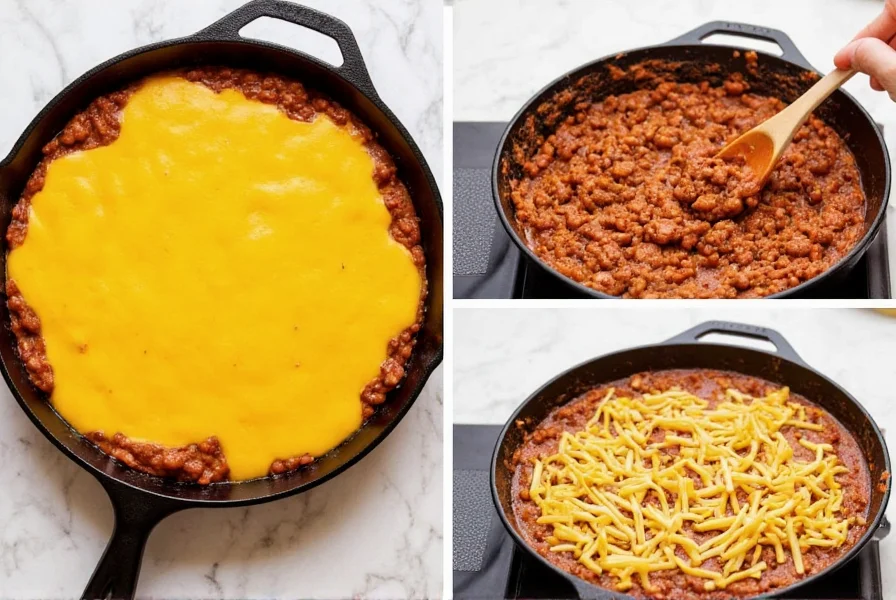
Step-by-Step Preparation Guide
Creating restaurant-quality chili cheese dip at home requires attention to technique. The roux method produces the smoothest results by preventing cheese separation.
- Prepare your cheese: Grate 2 cups of sharp cheddar cheese from a block (avoid pre-shredded varieties)
- Create the roux: Melt butter in a saucepan over medium heat, whisk in flour, and cook for 1 minute until golden
- Add liquid: Gradually whisk in milk until smooth, cooking until slightly thickened (about 3 minutes)
- Incorporate cheese: Reduce heat to low and gradually add cheese, stirring constantly until melted
- Add chili: Stir in 1 cup of canned chili (no beans), mixing thoroughly
- Season: Add ½ teaspoon garlic powder, ¼ teaspoon cumin, and salt to taste
- Final adjustment: If too thick, add milk one tablespoon at a time; if too thin, cook gently for 2-3 more minutes
Pro Tips for Perfect Texture Every Time
Avoiding the most common pitfalls ensures your chili cheese dip maintains that desirable creamy consistency from first bite to last.
- Temperature control: Never boil cheese dip—high heat causes proteins to tighten and release fat, creating a grainy texture
- Cheese selection: Sharp cheddar provides the best flavor, but adding ¼ cup of Monterey Jack improves meltability
- Acid balance: A teaspoon of beer or a squeeze of lime juice can help maintain emulsion stability
- Reheating properly: When warming leftovers, add a splash of milk and heat gently over low temperature
Serving Suggestions That Elevate Your Dip
While tortilla chips are the classic pairing, creative serving options transform chili cheese dip from simple snack to memorable appetizer experience.
- Chip selection: Use thick, restaurant-style tortilla chips that won't break under the dip's weight
- Vegetable dippers: Bell pepper strips, celery sticks, and jicama offer refreshing contrast to the rich dip
- Protein pairings: Serve alongside grilled chicken skewers or mini beef sliders for a complete appetizer spread
- Garnish ideas: Top with sliced jalapeños, chopped cilantro, or a sprinkle of smoked paprika before serving
Context Boundaries: When and How to Serve
Understanding limitations ensures optimal enjoyment and safety:
- Food safety threshold: Must be held above 140°F (60°C) during service; USDA FSIS confirms perishable dips enter the "danger zone" (40-140°F) within 2 hours, risking bacterial growth (Temperature Guidelines)
- Dietary restrictions: Unsuitable for lactose intolerance without substitution; almond milk and nutritional yeast can mimic creaminess but alter traditional flavor profiles
- Event appropriateness: Ideal for casual gatherings but too heavy for formal dinners; reduce cheese quantity by 25% for lighter brunch events
Storage and Reheating Guidelines
Proper storage extends your chili cheese dip's shelf life while maintaining quality. Understanding the science behind cheese emulsions helps prevent common reheating problems.
Store cooled dip in an airtight container in the refrigerator for up to 4 days. For longer storage, freeze portions in freezer-safe containers for up to 2 months. When reheating, the key is gentle warming with additional liquid to restore the emulsion. Microwave in 30-second intervals at 50% power, stirring between intervals and adding milk as needed. Alternatively, warm slowly in a double boiler on the stove for the smoothest results.

Popular Variations to Try
Customizing your chili cheese dip allows you to match flavors to your audience's preferences while maintaining the essential characteristics of authentic preparation.
- Spicy jalapeño version: Add 2-3 finely diced jalapeños (seeds removed for milder heat) during the final cooking stage
- White cheese dip variation: Substitute white cheddar and pepper jack cheeses with green chili peppers for a different flavor profile
- Smoked chipotle option: Replace regular chili with chipotle peppers in adobo sauce for a smoky depth of flavor
- Vegetarian adaptation: Use bean-free vegetarian chili as the base ingredient
Troubleshooting Common Issues
Even experienced cooks encounter challenges with cheese-based dips. Understanding the food science behind these problems leads to effective solutions.
Problem: Grainy or curdled texture
Solution: This occurs when cheese proteins tighten from excessive heat. Remove from heat immediately, add 1-2 tablespoons of milk or beer, and whisk vigorously. A small amount of sodium citrate (¼ teaspoon) can also rescue separated cheese dip.
Problem: Oily separation
Solution: This happens when fat separates from proteins. Create a slurry of 1 tablespoon cornstarch mixed with 2 tablespoons cold milk, then whisk into the dip while heating gently.
Problem: Too thick consistency
Solution: Gradually add warm milk or beer, one tablespoon at a time, until desired consistency is reached. Avoid adding cold liquid to hot cheese dip.


 浙公网安备
33010002000092号
浙公网安备
33010002000092号 浙B2-20120091-4