

Planting ginger at home offers a rewarding gardening experience that yields fresh, flavorful rhizomes for culinary and medicinal use. This tropical perennial, Zingiber officinale, thrives in warm, humid conditions but can be successfully cultivated in various climates with proper technique. Understanding the complete growth cycle and specific requirements ensures a bountiful harvest of this versatile spice.
Understanding Ginger Growth Requirements
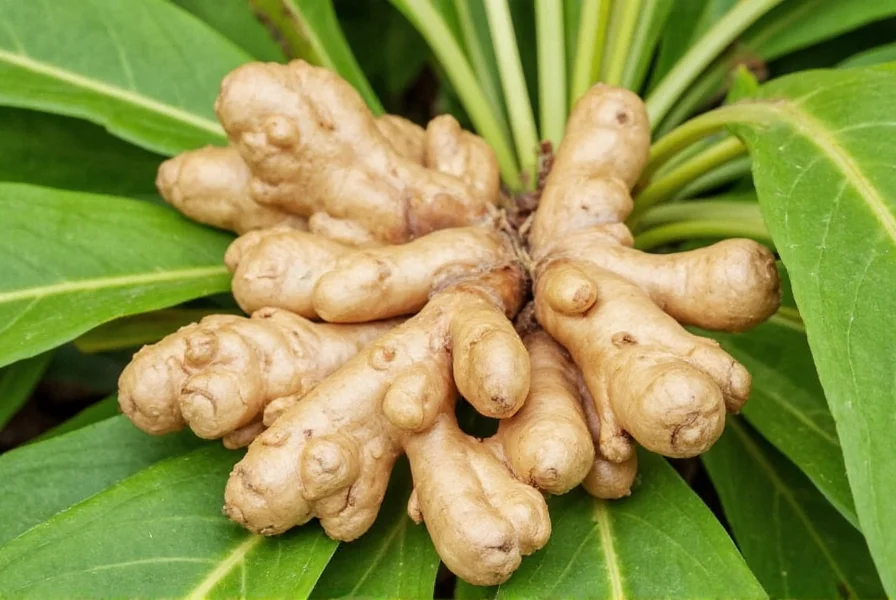
Ginger originates from Southeast Asia and grows as a herbaceous perennial reaching 2-3 feet in height. Unlike many plants, ginger grows horizontally through rhizomes rather than vertically. These underground stems store nutrients and produce new shoots, making them the planting material rather than seeds. Successful ginger cultivation for beginners requires attention to temperature, moisture, and soil conditions that mimic its natural tropical habitat.
Best Time to Plant Ginger
The optimal when to plant ginger outdoors depends on your climate zone. In tropical regions (zones 9-12), ginger can be planted year-round but performs best at the beginning of the rainy season. For temperate climates, plant ginger rhizomes 2-4 weeks after your last expected frost date when soil temperatures consistently reach 70°F (21°C) or higher. This typically falls between March and May in the Northern Hemisphere.
For gardeners in cooler climates, starting ginger indoors 6-8 weeks before the last frost provides a head start. Use large pots that allow for horizontal rhizome expansion, then transplant outdoors after temperatures stabilize. Remember that ginger requires 8-10 months of warm growing conditions to reach full maturity.
Selecting Quality Ginger Rhizomes
The foundation of successful how to grow ginger from store-bought rhizomes begins with selecting healthy planting material. Look for plump, firm rhizomes with smooth skin and visible 'eyes' (buds) that appear plump and yellowish. Avoid shriveled, moldy, or dried-out pieces.
While grocery store ginger can work, it's often treated with growth inhibitors. For better results, source organic ginger or obtain rhizomes specifically intended for planting from gardening suppliers. Before planting, cut rhizomes into 1-2 inch pieces, each containing 1-2 healthy eyes. Allow cut surfaces to dry for 24-48 hours to form a protective callus that prevents rot.
Soil Preparation for Optimal Growth
Ginger thrives in rich, well-draining soil that retains moisture without becoming waterlogged. The ideal best soil for planting ginger contains:
| Soil Component | Percentage | Purpose |
|---|---|---|
| Compost or well-rotted manure | 30-40% | Provides nutrients and improves structure |
| Peat moss or coconut coir | 20-30% | Retains moisture while improving aeration |
| Garden soil | 30-40% | Provides mineral content and stability |
| Perlite or coarse sand | 10-15% | Enhances drainage to prevent rhizome rot |
Maintain a slightly acidic to neutral pH between 6.0 and 6.5. Test your soil and amend as needed with lime to raise pH or sulfur to lower it. For container growing, use a high-quality potting mix rather than garden soil.
Step-by-Step Planting Instructions
Follow these detailed steps for proper ginger planting technique that maximizes growth potential:
- Prepare planting area by loosening soil to 12 inches deep and incorporating organic matter
- Create shallow trenches 4-6 inches deep, spaced 12-15 inches apart
- Place rhizome pieces horizontally with eyes facing upward
- Cover with 2-4 inches of soil (deeper in sandy soils, shallower in clay)
- Water thoroughly but avoid creating standing water
- Apply 2-3 inches of organic mulch to retain moisture and regulate temperature
- Mark planting locations as sprouts may take 2-4 weeks to emerge

Caring for Ginger Plants
Proper ginger plant care after planting ensures healthy growth and maximum yield:
- Watering: Maintain consistent moisture without saturation. Water when top inch of soil feels dry. Increase frequency during hot, dry periods but reduce as harvest approaches.
- Light: Provide partial shade (2-5 hours of morning sun). In hot climates, 70-80% shade protection prevents leaf scorch.
- Fertilizing: Apply balanced organic fertilizer (10-10-10) monthly during active growth. Compost tea every 2-3 weeks provides excellent nutrition.
- Weeding: Hand-pull weeds carefully to avoid damaging shallow roots. Mulch helps suppress weeds.
- Pest management: Watch for aphids, spider mites, and root knot nematodes. Neem oil applications control most pests organically.
Common Planting Mistakes to Avoid
Many gardeners encounter challenges with troubleshooting ginger planting problems. Avoid these common errors:
- Planting too deep (causes delayed emergence or rot)
- Using cold soil (below 65°F/18°C slows growth significantly)
- Overwatering (leads to rhizome rot, especially in heavy soils)
- Planting in full sun (causes leaf burn in most climates)
- Using rhizomes without visible eyes (won't sprout)
- Harvesting too early (results in small, underdeveloped rhizomes)
Harvesting Your Ginger Crop
Determine when is ginger ready for harvest by watching for these signs:
- Leaves begin to yellow and die back naturally (typically 8-10 months after planting)
- Stems fall over and dry out
- Rhizomes feel firm and have developed their characteristic shape
To harvest, carefully dig around the plant perimeter and lift the entire rhizome cluster. Brush off excess soil (don't wash) and allow to cure in a shaded, well-ventilated area for 2-3 days before storage. For continuous harvest, you can carefully dig around the edges of the plant and remove only the mature outer rhizomes while leaving the center to continue growing.
Storing Your Harvested Ginger
Proper storage extends the shelf life of your freshly harvested ginger preservation:
- Refrigerate in a paper bag with dry soil for 2-3 weeks
- Freeze whole or sliced in airtight containers for 6+ months
- Dry and powder for long-term spice storage
- Store in a cool, dark place with high humidity (85-90%) for several months


 浙公网安备
33010002000092号
浙公网安备
33010002000092号 浙B2-20120091-4