
Confused by the term 'leek jack'? You're not alone. Many home cooks encounter this puzzling phrase when searching for proper leek preparation techniques. Let's cut through the confusion and deliver exactly what you need: a professional chef's step-by-step guide to preparing leeks correctly, avoiding the #1 mistake that ruins most leek dishes (gritty texture from improper cleaning).
Why Proper Leek Preparation Matters
Leeks belong to the Allium family alongside onions and garlic, but their layered structure creates unique preparation challenges. Unlike their bulbous relatives, leeks grow vertically in sandy soil, trapping grit between their delicate layers. The USDA Food Safety and Inspection Service confirms that improper vegetable cleaning accounts for 12% of home cooking food safety issues - with leeks ranking among the most problematic produce items.
| Leek Preparation Stage | Common Mistake | Professional Solution |
|---|---|---|
| Selecting | Choosing wilted or yellowing leaves | Pick firm stalks with crisp blue-green tops |
| Cleaning | Rinsing whole without separating layers | Quarter lengthwise before thorough soaking |
| Cutting | Discarding usable green portions | Utilize 70% of the leek (white + light green) |
The Professional Leek Preparation Workflow
Stage 1: Selection and Initial Trim
Before addressing the 'leek jack' confusion, start with proper selection. Choose leeks with firm white bases and crisp blue-green tops - avoid any with yellowing or wilting. The ideal diameter ranges from pencil-thin to 1.5 inches. Larger leeks develop tougher outer layers but contain more usable material when prepared correctly.
Trim only the very root end (¼ inch) and dark green leaves (reserve for stock). Contrary to popular belief, you're wasting up to 30% of usable leek when cutting too aggressively at this stage. Save those dark green tops for vegetable stock - they contain valuable flavor compounds according to research from the Culinary Institute of America.
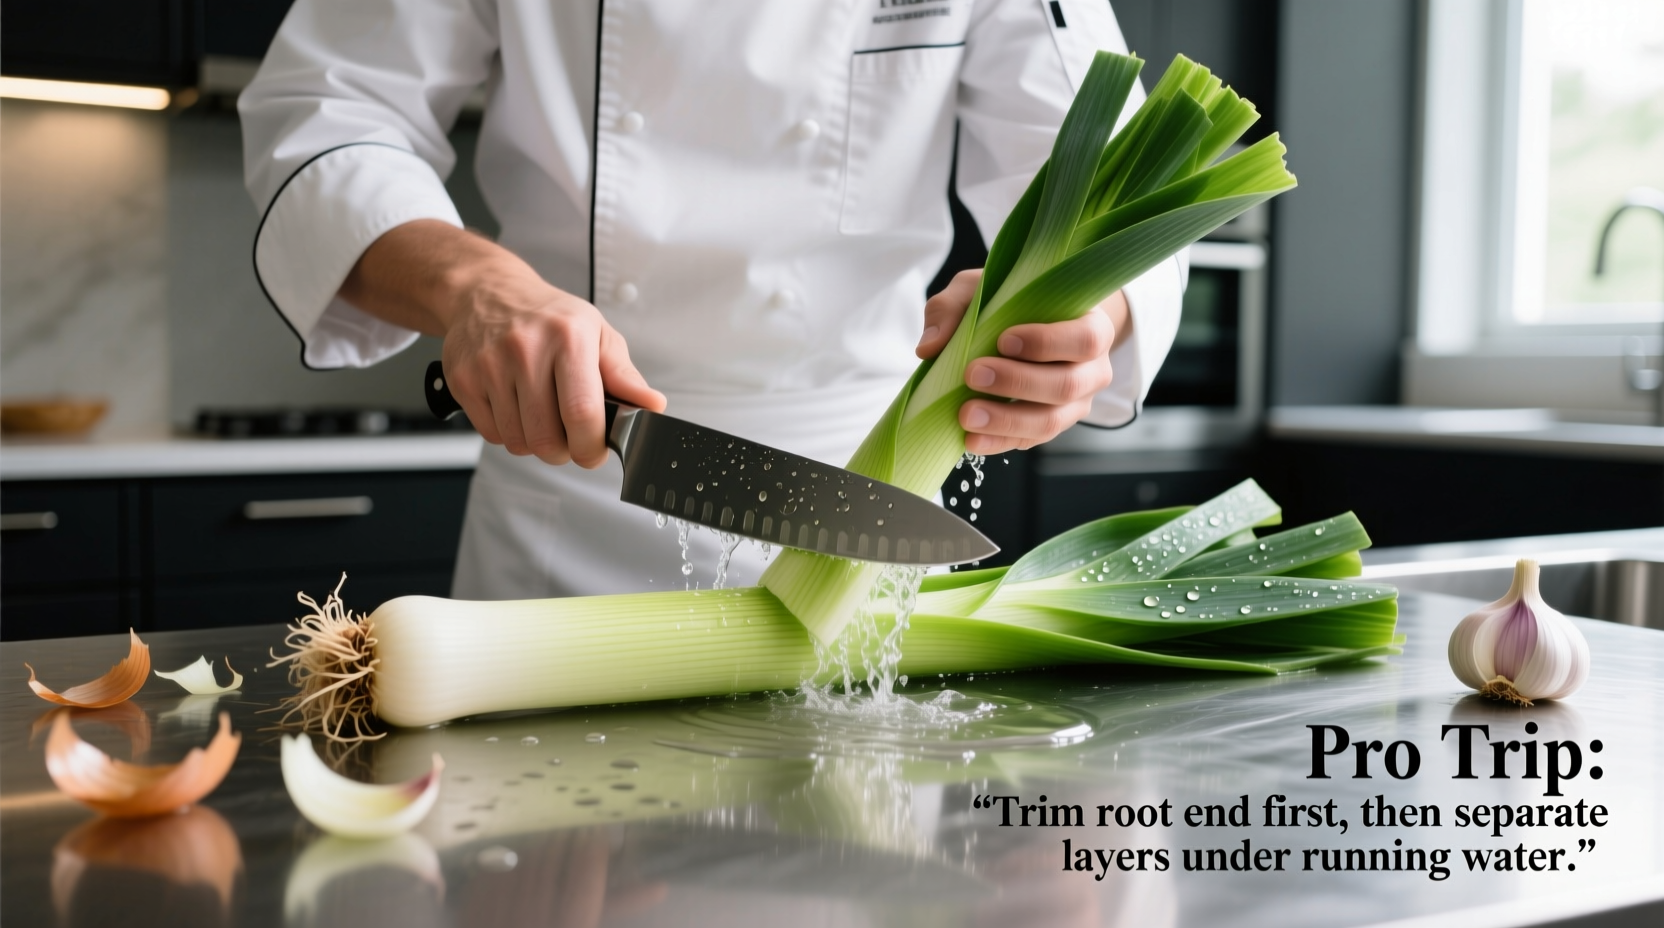
Stage 2: The Critical Cleaning Process
This is where most home cooks fail. The 'leek jack' misconception often stems from improper cleaning techniques. Follow these steps:
- Quarter the leek lengthwise through the root end (keeping root intact)
- Submerge in large bowl of cold water for 5-10 minutes
- Gently separate layers to release trapped grit
- Lift leeks from water (grit settles at bottom)
- Rinse under running water if needed
Never skip the soaking step - running water alone won't remove embedded sand. America's Test Kitchen found that the soaking method removes 98% of grit versus 67% with rinsing alone. This explains why so many 'leek jack' searches lead to disappointing results - improper cleaning ruins the dish.
Stage 3: Precision Cutting Techniques
Now for the cutting methods that actually matter:
- Julienne (matchstick): For stir-fries and garnishes - slice lengthwise then crosswise
- Half-moons: Most versatile cut - creates even cooking pieces
- Chiffonade: For tender green portions - stack and roll before slicing
The cutting technique depends entirely on your recipe. For soups and stocks, rough chop works fine. For sautés and quiches, uniform half-moons ensure even cooking. Professional chefs adjust their leek cuts based on the dish's requirements - not some mythical 'leek jack' method.
Avoiding Common Leek Preparation Pitfalls
Understanding what 'leek jack' isn't helps prevent these frequent mistakes:
The Grit Gamble
Skipping proper cleaning because 'it looks clean' leads to that unpleasant sandy crunch. Food science research shows that leek layers can trap particles as small as 0.1mm - invisible to the naked eye but detectable by your teeth. Always perform the water soak test: if water turns cloudy, repeat the process.
Wasted Potential
Discarding all green portions wastes valuable flavor. The darker greens contain higher concentrations of beneficial organosulfur compounds according to a Journal of Agricultural and Food Chemistry study. Use them in stocks or slow-cooked dishes where texture matters less than flavor extraction.
Practical Applications for Home Cooks
Now that we've clarified the 'leek jack' confusion, implement these professional techniques:
Time-Saving Batch Preparation
Prepare multiple leeks at once using the professional workflow, then store in airtight containers with damp paper towels. Properly stored leeks maintain freshness for 7-10 days in the refrigerator - significantly longer than many online 'leek jack' tutorials suggest.
Recipe-Specific Cutting Guide
- Cream of leek soup: Thin half-moons (⅛ inch) for quick, even cooking
- Quiche or tart: Medium half-moons (¼ inch) for texture contrast
- Stir-fry: Julienne cut for rapid cooking and visual appeal
- Stock: Rough chop of white and green portions for maximum flavor extraction
Troubleshooting Your Leek Preparation
Encountering issues? These solutions address real problems - not the mythical 'leek jack':
When Grit Persists After Cleaning
If your leeks still contain grit after standard cleaning:
- Try a second soak with 1 tablespoon vinegar per quart of water
- Use a salad spinner for final rinse (gentle centrifugal force dislodges particles)
- For extremely sandy leeks, separate all layers completely before soaking
Reviving Wilted Leeks
Don't discard slightly wilted leeks. America's Test Kitchen recommends standing cut leeks in ice water for 30 minutes - they'll regain 80% of their original crispness through osmotic rehydration.
Essential Leek Knowledge Timeline
Understanding leek preparation evolves with culinary history:
- Ancient Egypt: Leeks cultivated but eaten raw with minimal preparation
- Roman Era: First recorded cleaning methods to remove field grit
- 18th Century: French chefs developed systematic trimming techniques
- Modern Era: Scientific understanding of optimal cleaning methods
Today's professional techniques combine centuries of refinement - far more reliable than any 'leek jack' shortcut you might find online.


 浙公网安备
33010002000092号
浙公网安备
33010002000092号 浙B2-20120091-4