
To sprout lentils, rinse ½ cup of dried lentils, soak them in water for 8-12 hours, then drain and rinse twice daily for 2-4 days until sprouts appear. Keep them in a jar with a mesh lid or sprouting container at room temperature away from direct sunlight. The complete process typically takes 3-5 days from start to harvest. This simple method requires no special equipment and yields nutrient-dense sprouts ready for salads, sandwiches, or cooking.
The Complete Guide to Sprouting Lentils at Home
Sprouting lentils transforms ordinary dried legumes into nutrient-packed superfoods with enhanced digestibility and bioavailability of vitamins. This ancient food preparation technique requires minimal equipment and effort while delivering significant nutritional benefits. Whether you're a health enthusiast, budget-conscious shopper, or sustainability-minded cook, mastering lentil sprouting offers tangible advantages for your kitchen and wellbeing.
Why Sprout Lentils? Nutritional Benefits Explained
Lentil sprouts contain up to 30% more protein and significantly higher levels of vitamins C, B, and K compared to their unsprouted counterparts. The sprouting process activates enzymes that break down phytic acid and oligosaccharides—compounds that can cause digestive discomfort and inhibit mineral absorption. This natural process makes the nutrients in lentils more accessible to your body while improving flavor and texture.
Research shows sprouted lentils demonstrate increased antioxidant activity and improved amino acid profile, particularly higher concentrations of lysine—an essential amino acid often limited in plant-based diets. For those following vegetarian or vegan lifestyles, incorporating sprouted lentils provides a valuable protein boost with better absorption rates.
Essential Equipment for Successful Lentil Sprouting
You don't need specialized gear to sprout lentils effectively. The basic setup includes:
- Glass jar (quart-sized mason jar works perfectly)
- Breathable cover (mesh sprouting lid, cheesecloth, or paper towel secured with rubber band)
- Fresh, filtered water
- Colander for rinsing
- Dark location for initial sprouting phase
Avoid using metal containers or strainers as they can react with the sprouts. Plastic containers are acceptable but glass remains the preferred option for food safety and durability.
Step-by-Step Lentil Sprouting Process
Selecting the Right Lentils
Not all lentils sprout equally well. For best results, choose whole, unprocessed dried lentils without any polish or coating. Brown and green lentils typically sprout most reliably, while red lentils often split during soaking and may not produce consistent sprouts. Always inspect lentils for debris or damaged pieces before beginning the sprouting process.
| Lentil Type | Sprouting Success | Sprout Time | Best Uses |
|---|---|---|---|
| Brown Lentils | Excellent | 3-4 days | Salads, sandwiches, cooking |
| Green Lentils | Excellent | 3-4 days | Salads, sandwiches, cooking |
| Red Lentils | Fair | 2-3 days | Cooking only (split easily) |
| Black (Beluga) Lentils | Good | 4-5 days | Salads, garnishes |
Soaking Phase: The Critical First Step
Measure ½ cup of lentils and rinse thoroughly under cool running water. Place them in your glass jar and cover with 2-3 times their volume of filtered water. Soak for 8-12 hours at room temperature—overnight works perfectly for most schedules. Proper soaking initiates germination while removing enzyme inhibitors. After soaking, the lentils should have doubled in size and feel slightly soft when pressed.
Rinsing and Draining Cycle
After soaking, drain the water through your mesh lid or cheesecloth. Rinse the lentils thoroughly with fresh water, ensuring all surfaces are cleaned. Drain completely—this is crucial as standing water promotes bacterial growth. Position the jar at a 45-degree angle in a bowl or dish rack to allow complete drainage while maintaining airflow.
Repeat the rinsing process twice daily—morning and evening—with fresh, cool water. Each rinse removes metabolic byproducts and provides fresh oxygen to the developing sprouts. During the first 24-48 hours, keep the jar in a dark location to encourage proper sprout development. After visible sprouts appear, you can introduce indirect sunlight for chlorophyll development if desired.
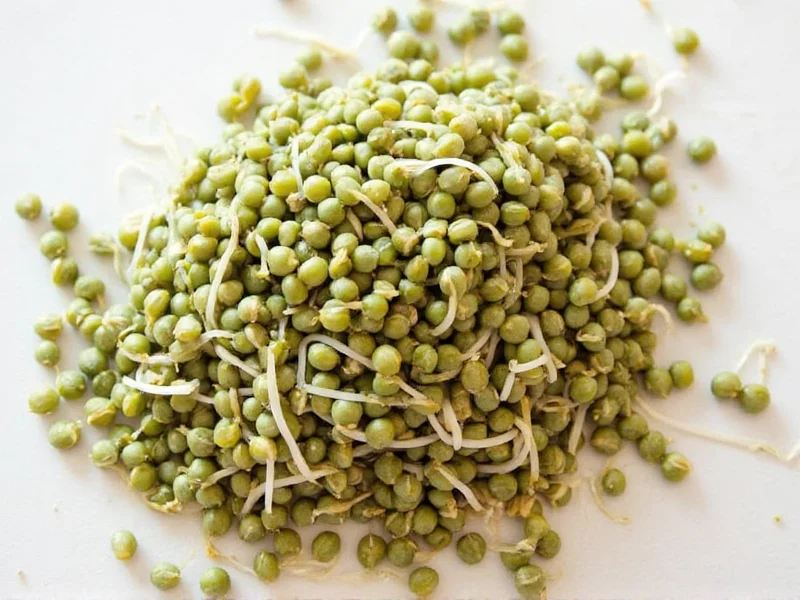
Harvesting Your Sprouts
Lentil sprouts are ready when the sprout tail measures approximately ¼ to ½ inch—typically after 3-5 days. For maximum nutritional benefit, harvest before the leaves fully develop. Give the sprouts a final thorough rinse, then spread them on a clean towel to air-dry for 8-12 hours. This drying step extends their refrigerator shelf life by reducing surface moisture.
Troubleshooting Common Sprouting Issues
Musty smell: Indicates bacterial growth from inadequate drainage. Increase rinse frequency and ensure complete drainage between rinses.
Mold development: Usually appears as fuzzy white, green, or black spots. Discard affected batches immediately. Prevent mold by using filtered water, maintaining proper airflow, and avoiding overcrowding in the jar.
Slow or no sprouting: Could indicate old lentils, improper temperature (ideal range: 65-75°F/18-24°C), or insufficient rinsing. Try a fresh batch of lentils from a different source.
Bitter taste: Results from over-sprouting or exposure to direct sunlight. Harvest sprouts earlier and keep them in indirect light during the final growth phase.
Storing Sprouted Lentils Properly
Properly dried sprouts will keep for 5-7 days in the refrigerator. Store them in an airtight container lined with a paper towel to absorb excess moisture. Check daily and remove any sprouts showing signs of spoilage. For longer storage, freeze sprouted lentils after blanching for 1 minute in boiling water—though this reduces some nutritional benefits, it preserves them for up to 6 months.
Culinary Uses for Sprouted Lentils
Sprouted lentils add crunch and nutrition to various dishes. Add them raw to salads for a protein boost, blend into smoothies for extra fiber, or use as sandwich toppings. Unlike unsprouted lentils, sprouted versions require minimal cooking—simmer for just 10-15 minutes to maintain maximum nutrient retention while achieving desired tenderness. They work particularly well in:
- Fresh spring rolls and wraps
- Grain bowls and Buddha bowls
- Vegetable stir-fries (added at the end)
- Raw vegetable platters
- Salad toppers for added protein
Safety Considerations for Home Sprouting
While sprouting is generally safe, follow these precautions for risk-free results:
- Always use potable, filtered water for rinsing
- Maintain proper drainage to prevent bacterial growth
- Wash hands thoroughly before handling sprouts
- Consume within one week of harvesting
- Those with compromised immune systems should cook sprouts before consumption
The FDA recommends cooking sprouts thoroughly for children, elderly individuals, and those with weakened immune systems, as raw sprouts can potentially harbor bacteria despite careful home preparation.
Maximizing Your Sprouting Success
For consistent results with your lentil sprouting journey, maintain a regular schedule for rinsing and draining. Keep your sprouting jar in a location with stable room temperature away from direct sunlight during the initial growth phase. Consider keeping a sprouting journal to track variables like water temperature, room conditions, and sprout development times—this helps identify optimal conditions for your specific environment.
Experiment with different lentil varieties to discover your preferred flavor and texture profiles. Many sprouters find that mixing lentil types creates interesting flavor combinations while ensuring consistent sprouting success. Remember that seasonal temperature changes may require adjustments to your rinsing schedule and storage locations.
Frequently Asked Questions
How long does it take to sprout lentils properly?
Lentils typically take 3-5 days to sprout fully. After an initial 8-12 hour soak, you'll need to rinse and drain them twice daily. Visible sprouts usually appear within 24-48 hours, and they're ready to harvest when the sprout tail measures ¼ to ½ inch in length. Brown and green lentils generally sprout faster than black varieties.
Can I sprout red lentils successfully at home?
Red lentils can be sprouted but with limitations. They often split during soaking due to their hulled nature, which affects sprouting consistency. If you attempt red lentil sprouting, expect a shorter sprouting time of 2-3 days, but be aware they're best used cooked rather than raw since they don't maintain structural integrity as well as brown or green varieties.
Why do my sprouted lentils smell sour or musty?
A sour or musty smell typically indicates bacterial growth from inadequate drainage. Ensure you're draining your sprouts completely after each rinse and storing the jar at a 45-degree angle to promote airflow. Increase rinsing frequency to three times daily if the problem persists, and always use fresh, filtered water for each rinse cycle.
Do sprouted lentils need to be cooked before eating?
Sprouted lentils can be eaten raw after proper rinsing, though cooking them for 10-15 minutes preserves most nutritional benefits while improving digestibility. Those with compromised immune systems, children, and elderly individuals should cook sprouted lentils thoroughly before consumption as a safety precaution against potential bacteria.
What's the best way to store sprouted lentils for maximum freshness?
After harvesting, thoroughly rinse sprouted lentils and spread them on a clean towel to air-dry for 8-12 hours. Store in an airtight container lined with a paper towel in the refrigerator, where they'll stay fresh for 5-7 days. Check daily and remove any sprouts showing signs of spoilage to prevent contamination of the entire batch.


 浙公网安备
33010002000092号
浙公网安备
33010002000092号 浙B2-20120091-4