
Why Water Propagation Works Best for Avocado Seeds
Water propagation gives you a front-row seat to your avocado seed's transformation. Unlike planting directly in soil, this method lets you monitor root development and catch problems early. Most avocado enthusiasts see their first roots emerge within 3-6 weeks when following these steps correctly. The visual progress keeps beginners motivated while providing valuable learning about plant biology.
Your Avocado Seed Growing Timeline
Understanding the realistic timeline prevents premature discouragement. Here's what verified horticultural research shows happens at each stage:
| Time Period | Visible Changes | Critical Actions |
|---|---|---|
| Weeks 1-3 | Seed cracks open at bottom; small taproot emerges | Change water weekly; ensure 1/3 of seed stays submerged |
| Weeks 4-6 | Root system expands; first stem appears | Move to indirect sunlight; maintain water level |
| Weeks 7-8 | Stem reaches 6-7 inches; develops leaves | Trim stem to 3 inches to encourage branching |
| Week 9+ | Secondary roots form; multiple leaves develop | Prepare for soil transplant when roots fill jar |
Materials You Actually Need (No Special Tools Required)
- Fresh avocado seed (preferably from ripe fruit)
- Clean glass or jar (mason jars work perfectly)
- Toothpicks (3-4 standard wooden ones)
- Filtered or distilled water (tap water with heavy chlorine may delay sprouting)
- Patience—no shortcuts here!
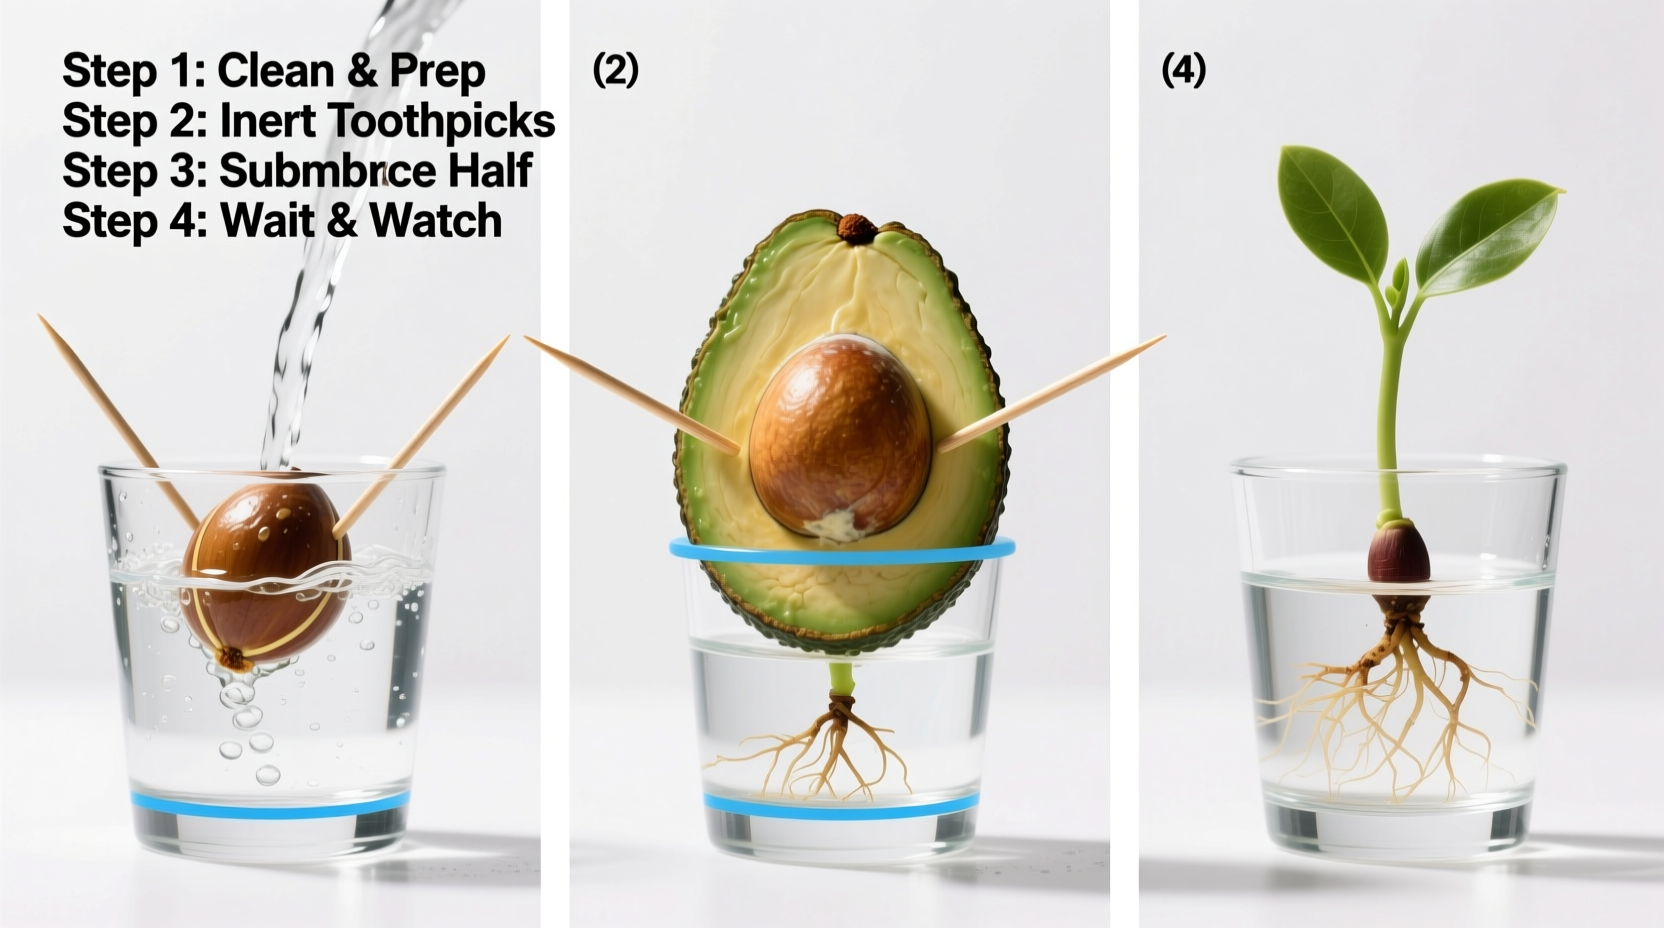
Step-by-Step Water Propagation Process
Preparing Your Avocado Seed Properly
Many beginners ruin their chances at this first step. Gently remove all fruit flesh using a soft cloth—never a knife which can damage the seed coat. Rinse under lukewarm water until completely clean. The brown outer skin must remain intact as it protects the embryo. Incorrect cleaning causes up to 40% of failed propagation attempts according to University of California Cooperative Extension research.
Suspending the Seed Correctly
Identify the seed's orientation: the slightly pointier end is top (where stem emerges), the flatter end is bottom (where roots grow). Insert three toothpicks evenly spaced around the seed's equator at a 45-degree angle. Rest the seed on your jar rim so exactly one-third sits below water level. Too much submersion causes rot; too little prevents proper hydration.
Water Maintenance That Actually Works
Change the water completely every 7 days without exception. Stagnant water breeds bacteria that attack delicate new roots. Use room-temperature water to avoid shocking the seed. During winter months, place the jar in a consistently warm spot (70-80°F / 21-27°C) since avocado seeds originate from tropical climates. The USDA notes that temperatures below 60°F significantly slow germination.
When Water Propagation Isn't the Right Choice
This method works perfectly for home growers wanting to observe the process, but has limitations. Commercial growers typically plant directly in soil because water-propagated roots sometimes struggle to adapt to soil later. If you live in USDA hardiness zones 9-11 with suitable outdoor conditions, planting directly in well-draining soil gives stronger root systems. Water propagation shines best for indoor growers or those wanting to verify seed viability before committing to soil.
Troubleshooting Common Problems
Mold Growth on Seed or Water
Surface mold indicates stagnant water. Immediately replace all water and gently wipe the seed with a soft cloth dampened with diluted hydrogen peroxide (1 part peroxide to 3 parts water). Going forward, change water twice weekly until mold disappears. The Royal Horticultural Society confirms this safe treatment won't harm developing roots.
Seed Rotting Instead of Sprouting
If the seed turns brown and mushy, it's likely over-submerged. Start again, ensuring only the bottom third contacts water. Some avocado varieties have lower germination rates—Hass seeds typically sprout more reliably than Fuerte according to agricultural studies from the University of Florida.
Stem Growing But No Leaves
Insufficient light causes leggy growth. Move to a bright spot with indirect sunlight. If the stem exceeds 12 inches without leaves, cut it back to 3 inches to stimulate leaf production. This pruning technique, documented in Texas A&M horticultural research, triggers hormonal changes that encourage branching.
Transitioning to Soil: The Make-or-Break Step
Don't rush this critical phase. Wait until roots fill the jar and the stem has produced multiple sets of leaves. Choose a pot 2-3 times wider than the root system with drainage holes. Use cactus/succulent mix for optimal drainage—regular potting soil retains too much moisture. Plant with the seed's top still slightly exposed. Water thoroughly but allow top inch of soil to dry between waterings. This transition method, recommended by the American Horticultural Society, prevents the most common cause of post-transplant failure: root rot.
Long-Term Care for Your Avocado Plant
Once established in soil, your avocado will grow rapidly. Pinch off the top leaves when the plant reaches 12 inches to encourage bushier growth. Rotate the pot weekly for even sunlight exposure. Feed with balanced liquid fertilizer every 4-6 weeks during growing season. Remember that homegrown avocado trees rarely fruit indoors, but make stunning houseplants with proper care.


 浙公网安备
33010002000092号
浙公网安备
33010002000092号 浙B2-20120091-4