
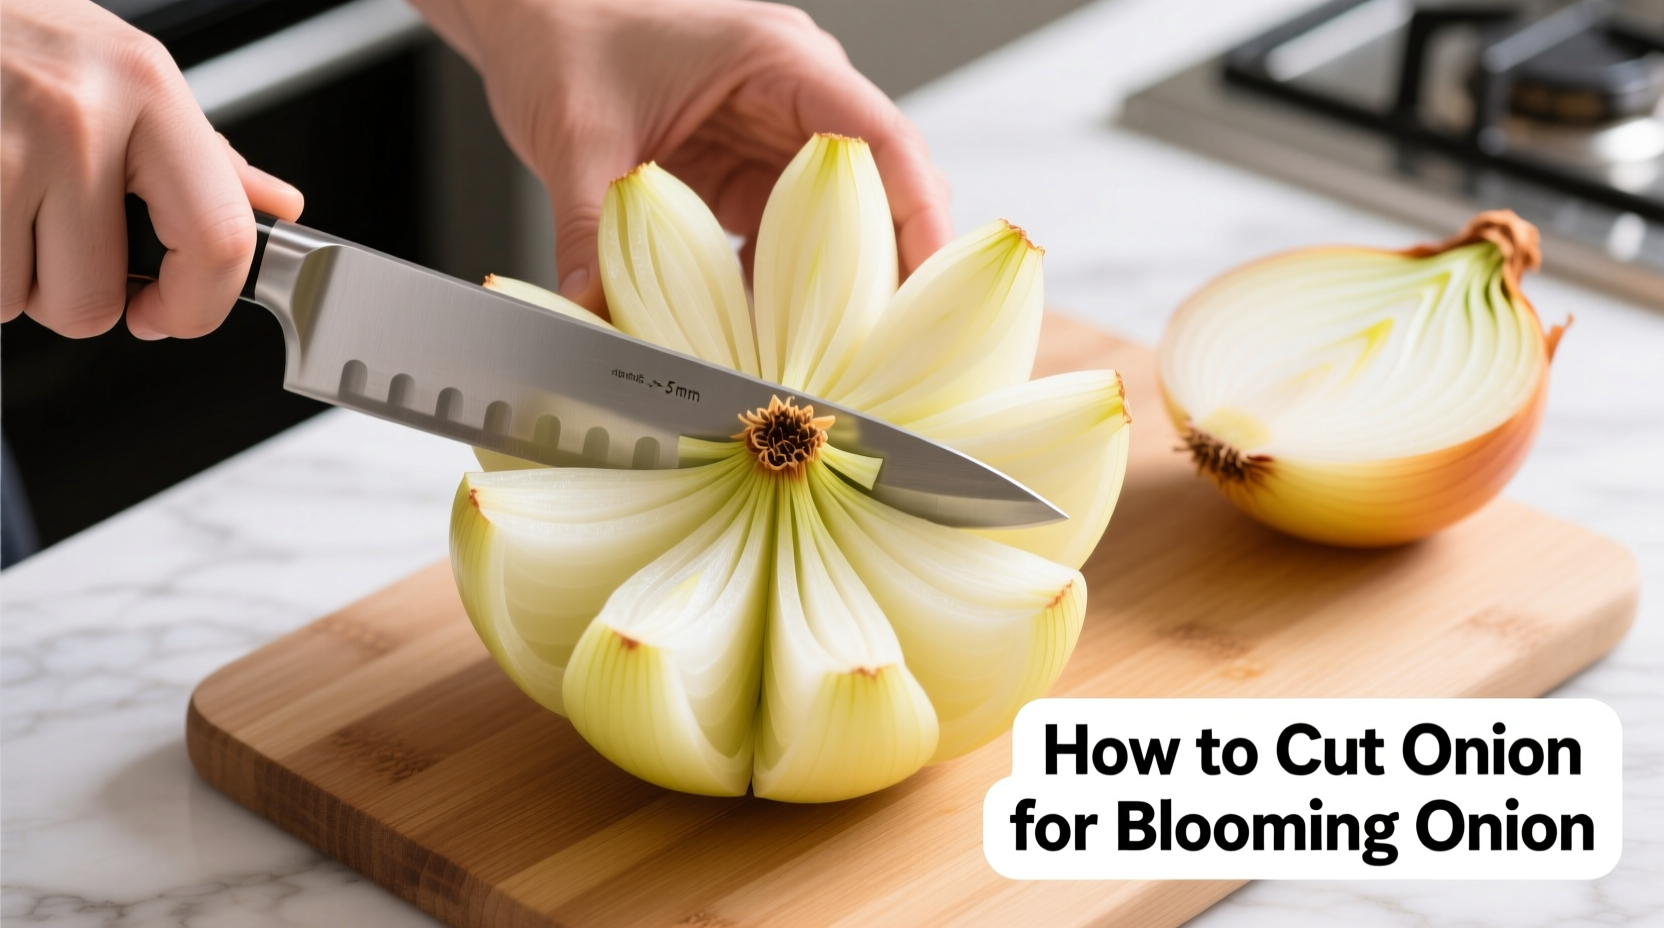
Here's the direct answer: To cut an onion for a blooming onion, start with a firm yellow onion. Cut off the top 1/2 inch while preserving the root end. Make 16-20 precise radial cuts from the top down to (but not through) the root, spacing them evenly around the onion. The root must remain intact to hold the "petals" together when fried.
Master the Art of Blooming Onion Cutting: Your Complete Guide
Creating a perfect blooming onion starts with precise cutting technique. This iconic restaurant appetizer transforms a simple onion into a stunning edible flower through careful preparation. Whether you're hosting a special dinner or just want to impress your family, mastering this cutting method unlocks professional results at home.
Why Proper Cutting Technique Matters
The magic of a blooming onion happens during frying when the carefully cut "petals" separate and bloom outward. If your cuts are too shallow, the onion won't open properly. Too deep, and the petals will separate completely. The right technique creates that perfect balance between structure and expansion.
Essential Tools You'll Need
- 1 firm yellow onion (8-10 oz size works best)
- Sharp chef's knife (8-10 inch)
- Cutting board
- Measuring tape or ruler
- Bowl of ice water
- Optional: toothpicks for securing
Step-by-Step Cutting Process
1. Onion Selection and Preparation
Choose a firm, round yellow onion with tight skin and no soft spots. The USDA classifies yellow onions as having "thick, papery skins and strong flavor" ideal for frying applications. Remove the outer skin and any loose layers, then trim the top 1/2 inch while keeping the root end completely intact.
| Onion Type | Best For Blooming? | Why |
|---|---|---|
| Yellow Onion | ✓ Best choice | Firm texture holds shape, ideal flavor when fried |
| Red Onion | ✓ Acceptable | Softer texture, may not hold shape as well |
| White Onion | ✗ Not recommended | Too soft, falls apart easily during cutting |
| Sweet Onion | ✗ Avoid | Excessive moisture causes structural failure |
2. Positioning and Securing the Onion
Place the onion root-side down on your cutting board. This stable position prevents rolling and gives you better control. Professional chefs recommend using your non-dominant hand to hold the onion firmly but gently, curling your fingers to protect them from the knife.
3. Making the Critical Radial Cuts
This is where most home cooks go wrong. Here's the professional technique:
- Starting from the top (cut end), insert your knife straight down toward the root
- Cut approximately 3/4 of the way through the onion
- Space each cut evenly around the onion (aim for 16-20 cuts total)
- Maintain consistent depth for uniform blooming
- Never cut all the way through to the root
"The root end is your anchor," explains culinary expert Antonio Rodriguez. "It's what holds the entire structure together during frying. Sacrifice the root for deeper cuts, and your blooming onion will fall apart."

4. Checking Your Work
After completing your cuts, gently separate the layers to check your work. The onion should fan out slightly but maintain its overall shape. If petals separate completely, you've cut too deep. If they barely move, your cuts aren't deep enough. The ideal cut allows the onion to open into a perfect flower shape when soaked and fried.
Common Cutting Mistakes and How to Fix Them
Even experienced cooks make these errors when learning how to cut onion for blooming onion:
Mistake: Uneven Spacing Between Cuts
Solution: Visualize the onion as a clock face. Make your first cut at 12 o'clock, then space subsequent cuts at consistent intervals (like 1:30, 3:00, 4:30, etc.).
Mistake: Cutting Too Deep and Severing the Root
Solution: Stop cutting when you feel slight resistance from the root. The USDA Food Safety and Inspection Service recommends keeping at least 1/4 inch of root intact for structural stability.
Mistake: Using a Dull Knife
Solution: A sharp knife creates clean cuts without crushing the onion layers. Dull knives require more force, increasing the risk of cutting too deep.
Post-Cutting Process: Soaking and Frying
After perfecting your cuts, follow these professional steps:
Soaking for Optimal Bloom
Place the cut onion in a bowl of ice water for 30-60 minutes. This crucial step:
- Relaxes the onion layers
- Helps the "petals" separate evenly
- Removes excess sugars that could burn during frying
Frying Temperature Guide
For best results when frying your cut onion:
- Oil temperature: 350-375°F (175-190°C)
- Frying time: 2-3 minutes
- Doneness indicator: Golden brown color
"The National Restaurant Association's culinary guidelines emphasize that proper oil temperature prevents sogginess while ensuring even cooking," notes Rodriguez. "Too cool, and the onion absorbs excess oil. Too hot, and the exterior burns before the interior cooks."
Troubleshooting Your Blooming Onion
Even with perfect cutting technique, issues can arise. Here's how to fix them:
Problem: Onion Doesn't Bloom Properly
Causes: Cuts too shallow, insufficient soaking time, or oil temperature too low
Solution: Ensure cuts reach 3/4 depth, soak for full 60 minutes, and verify oil temperature with a thermometer
Problem: Petals Separate Completely
Causes: Cutting too deep and severing the root connection
Solution: Next time, stop cutting when you feel resistance from the root end
Pro Tips for Restaurant-Quality Results
- Chill onions in the refrigerator for 30 minutes before cutting for cleaner slices
- Use a ruler to measure consistent cut depth around the onion
- For extra stability, insert a toothpick horizontally through the root end after cutting
- Pat the onion dry thoroughly before coating to prevent oil splatter
Why This Technique Works: The Science Behind Blooming
When properly cut and fried, the onion's structure transforms due to three key factors:
- Moisture conversion: Water inside the onion turns to steam, pushing petals apart
- Starch gelatinization: Heat causes starches to swell, creating structure
- Maillard reaction: Browning creates a crispy exterior that holds the shape
Understanding these processes helps you troubleshoot when your blooming onion doesn't turn out perfectly. The American Chemical Society's food chemistry research confirms that proper cutting technique maximizes these reactions for optimal bloom.
Final Thoughts
Mastering how to cut onion for blooming onion transforms a simple vegetable into an impressive culinary showpiece. With practice, you'll develop the precision needed to create that perfect bloom every time. Remember that the cutting technique is just the first step—proper soaking and frying complete the transformation. Start with these professional methods, and you'll be creating restaurant-quality blooming onions in no time.
Frequently Asked Questions
What's the best onion variety for making blooming onions?
Yellow onions are the best choice for blooming onions. Their firm texture holds shape during cutting and frying, and they have the ideal flavor profile. Avoid sweet onions like Vidalia, which contain too much moisture and will fall apart during the cutting process.
How many cuts should I make when preparing a blooming onion?
Make 16-20 evenly spaced radial cuts from the top of the onion down toward (but not through) the root end. This number provides the perfect balance between structure and bloom. Too few cuts won't create enough separation, while too many cuts weaken the structure.
Why does my blooming onion fall apart when I fry it?
This usually happens when you've cut too deep and severed the root connection. The root end must remain intact to hold the "petals" together during frying. Aim to cut only 3/4 of the way through the onion, stopping when you feel slight resistance from the root.
How long should I soak the cut onion before frying?
Soak the cut onion in ice water for 30-60 minutes. This crucial step relaxes the onion layers, helps the "petals" separate evenly, and removes excess sugars that could burn during frying. Don't skip this step, as it significantly improves the final bloom.


 浙公网安备
33010002000092号
浙公网安备
33010002000092号 浙B2-20120091-4