

Creating authentic homemade chili oil requires heating neutral oil to 250°F (121°C), then slowly pouring it over a blend of chili flakes, Sichuan peppercorns, and aromatics like garlic and ginger. The key is controlling oil temperature to extract maximum flavor without burning ingredients. Properly made chili oil should have vibrant red color, complex aroma, and balanced heat that enhances dishes without overwhelming them.
Making exceptional chili oil at home is simpler than many believe, but requires attention to temperature control and ingredient quality. This traditional condiment elevates noodles, dumplings, and stir-fries with its complex layers of heat and fragrance. Unlike store-bought versions, homemade chili oil allows you to customize spice levels and ingredients while avoiding preservatives.
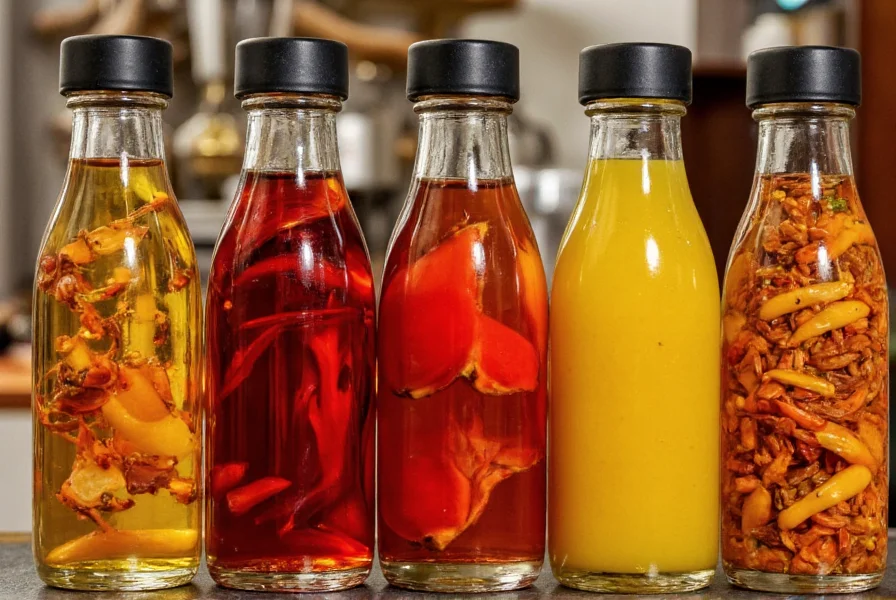
Essential Ingredients for Authentic Chili Oil
The foundation of great chili oil lies in carefully selected components. Each ingredient contributes distinct flavor notes that combine to create the final product's complexity.
| Ingredient | Recommended Type | Quantity (Per Cup Oil) | Flavor Contribution |
|---|---|---|---|
| Neutral Oil | Avocado, grapeseed, or peanut | 1 cup | Clean carrier for flavors |
| Chili Flakes | Tobago Scotch Bonnet + Korean | 3 tbsp | Primary heat and color |
| Sichuan Peppercorns | Lightly toasted | 1 tsp | Citrusy numbing sensation |
| Aromatics | Fresh ginger, garlic, scallion | 2 tbsp each | Depth and complexity |
Equipment Checklist
Having the right tools ensures safety and optimal results when cooking chili oil:
- Heavy-bottomed saucepan (prevents scorching)
- Candy or deep-fry thermometer (critical for temperature control)
- Heatproof glass or ceramic bowl (metal can react)
- Fine-mesh strainer (for removing solids if desired)
- Amber glass bottles (protects from light degradation)
Step-by-Step Cooking Process
Follow these precise steps to create restaurant-quality chili oil at home:
- Prepare ingredients: Finely slice ginger and garlic. Toast Sichuan peppercorns in dry pan until fragrant (about 1 minute), then coarsely grind.
- Heat the oil: Combine neutral oil and aromatics in saucepan. Heat slowly to 250°F (121°C), watching carefully as temperature approaches target. Remove aromatics when oil reaches 225°F (107°C) to prevent burning.
- Temper the chili mixture: In heatproof bowl, combine chili flakes, ground Sichuan peppercorns, 1 tsp salt, and 1 tsp sugar. Create a well in center.
- Pour oil in stages: Slowly pour 1/3 of hot oil into well, stirring constantly. Wait 2 minutes for temperature to stabilize, then add another 1/3. After 2 more minutes, add final portion.
- Rest and mature: Cover and let sit at room temperature for 12-24 hours before using. This allows flavors to fully develop.
Critical Safety Considerations
Working with hot oil requires careful attention to prevent accidents:
- Never leave heating oil unattended - it can reach combustion point rapidly
- Maintain oil temperature below 275°F (135°C) to prevent smoking point
- Keep a lid nearby to smother potential oil fires (never use water)
- Use oven mitts when handling hot containers
- Cool oil completely before transferring to storage containers
Proper Storage Techniques
Maximize shelf life and flavor preservation with these storage methods:
- Store in amber glass bottles with tight-sealing lids to block light
- Keep in cool, dark place away from heat sources
- Refrigeration extends shelf life to 6 months (room temperature: 3 months)
- Always use clean, dry utensils when scooping to prevent contamination
- Check for off smells or mold before each use
Troubleshooting Common Issues
Solve these frequent chili oil problems:
- Bitter taste: Oil was too hot when poured. Next time reduce temperature to 230°F (110°C).
- Dull color: Chili flakes were old or low quality. Use fresh, brightly colored flakes.
- Weak flavor: Insufficient resting time. Allow full 24 hours for flavor development.
- Separation: Normal occurrence. Stir gently before each use.
- Mold growth: Moisture contamination. Ensure all equipment is completely dry.
Flavor Variations to Explore
Customize your chili oil with these authentic regional adaptations:
- Sichuan style: Double Sichuan peppercorns for pronounced mala (numbing-spicy) effect
- Garlic-forward: Increase garlic to 3 tbsp and add 1 star anise for depth
- Smoky version: Include 1/2 tsp smoked paprika with chili flakes
- Sweet-spicy: Add 1 tbsp brown sugar and 1 cinnamon stick to oil while heating
- Vegetarian umami: Steep 2 dried shiitake mushrooms in oil before removing
Final Tips for Perfect Chili Oil
Professional chefs recommend these finishing touches:
- Use a combination of chili varieties for complex heat profile
- Add 1/4 tsp sesame oil after cooling for nutty finish
- For restaurant-style sediment, skip straining and use as flavorful topping
- Label bottles with date and ingredients for tracking preferences
- Start with milder chili ratio and adjust in subsequent batches
Frequently Asked Questions
Can I use olive oil for making chili oil?
While possible, extra virgin olive oil has a low smoke point and strong flavor that competes with chili notes. Refined olive oil works better than extra virgin, but neutral oils like avocado or grapeseed are superior choices for authentic chili oil that won't burn or overpower the spices.
How do I prevent my chili oil from becoming too bitter?
Bitterness occurs when oil temperature exceeds 275°F (135°C). Use a thermometer to maintain 240-250°F (115-121°C), pour oil in stages with cooling intervals, and remove aromatics before they brown. High-quality chili flakes that haven't been exposed to light or heat also prevent bitterness.
Why does my homemade chili oil separate after cooling?
Separation is normal and indicates no emulsifiers were added. The oil rises while chili solids settle. This doesn't affect quality - simply stir gently before each use. If you prefer a uniform texture, blend briefly with immersion blender before bottling, though traditional recipes maintain this natural separation.
What's the difference between chili oil and chili crisp?
Chili oil is primarily infused oil with chili flakes, while chili crisp contains larger solid ingredients like fried garlic, onions, and chili pieces suspended in oil. Chili crisp has more texture and requires longer cooking to crisp the solids, whereas chili oil focuses on extracting flavors into the oil itself with minimal solids remaining.
Can I make chili oil without heating the oil?
Cold-infused chili oil lacks the depth and complexity of properly heated versions. The heat extraction process releases essential oils and compounds that create authentic flavor. While you can steep ingredients in room-temperature oil for weeks, the result will be significantly milder and one-dimensional compared to the quick hot-infusion method.


 浙公网安备
33010002000092号
浙公网安备
33010002000092号 浙B2-20120091-4