
Making authentic chili beans from scratch is simpler than most home cooks realize. This traditional preparation method yields tender beans with deep, complex flavors that canned versions can't match. Whether you're preparing a weeknight dinner or cooking for a crowd, understanding the fundamentals of bean preparation ensures consistently delicious results.
Essential Ingredients for Perfect Chili Beans
The foundation of great chili beans starts with quality ingredients. While regional variations exist, these core components create a balanced flavor profile:
- 1 pound dried pinto or kidney beans (soaked overnight)
- 2 tablespoons vegetable oil or bacon fat
- 1 large yellow onion, finely diced
- 4 cloves garlic, minced
- 2 tablespoons chili powder (adjust to taste)
- 1 teaspoon cumin
- 1 teaspoon smoked paprika
- 2 bay leaves
- 1 (14.5 oz) can fire-roasted tomatoes
- 4 cups broth or water
- Salt to taste
For authentic flavor development, avoid canned beans as your base—they often contain preservatives that interfere with proper texture and taste absorption. The soaking process removes oligosaccharides that cause digestive discomfort while allowing beans to cook evenly.
Equipment Checklist
Before starting your easy homemade chili beans recipe, gather these essentials:
- 6-quart heavy-bottomed pot or Dutch oven
- Wooden spoon for stirring
- Colander for rinsing beans
- Sharp chef's knife
- Cutting board
- Measuring cups and spoons
Step-by-Step Cooking Instructions
Follow these detailed steps for the best way to cook chili beans from scratch:
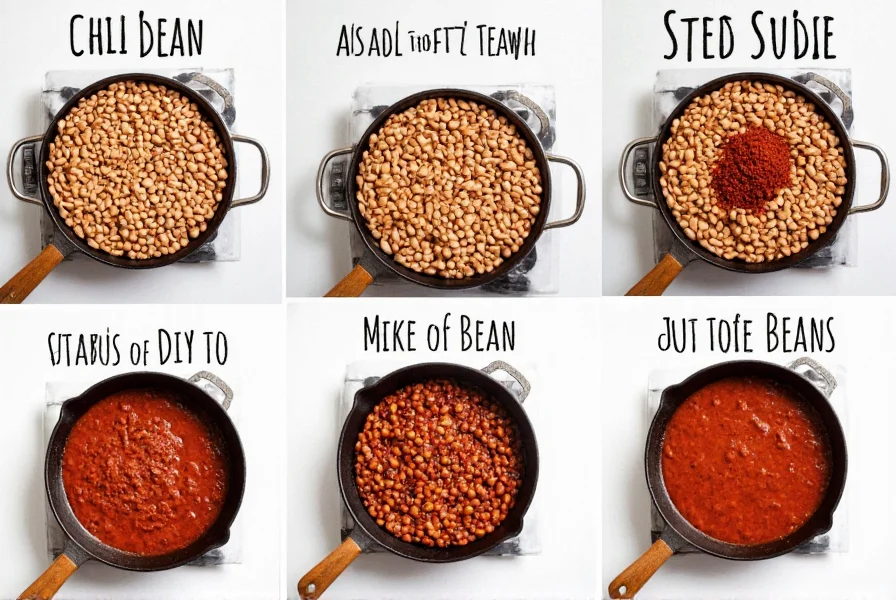
- Prepare the beans: Rinse soaked beans thoroughly and pick through to remove any debris. Drain well.
- Sauté aromatics: Heat oil in your pot over medium heat. Add onions and cook until translucent (5-7 minutes). Stir in garlic and cook for 1 minute until fragrant.
- Bloom spices: Add chili powder, cumin, and paprika to the onions. Cook for 1-2 minutes to release essential oils and deepen flavors.
- Add beans and liquid: Pour in soaked beans, broth, and bay leaves. Bring to a gentle boil, then reduce heat to low.
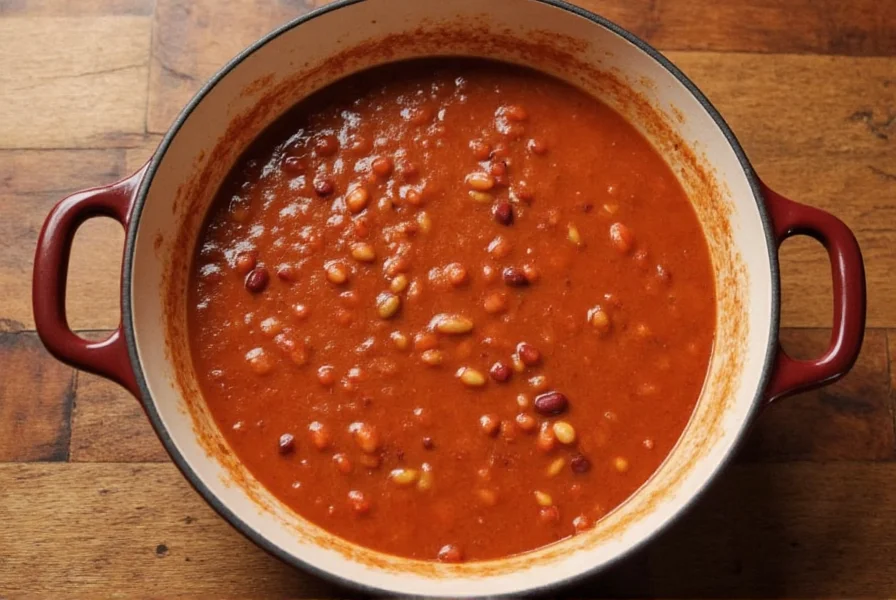
- Simmer patiently: Cover partially and simmer for 1.5-2 hours, stirring occasionally. Skim off foam that forms on the surface.
- Incorporate tomatoes: Add fire-roasted tomatoes during the last 30 minutes of cooking to maintain their bright flavor.
- Season properly: Add salt during the final 20 minutes (adding too early can toughen beans). Taste and adjust seasonings.
- Rest before serving: Remove from heat and let sit for 15 minutes to allow flavors to meld.
| Cooking Method | Time Required | Bean Texture | Flavor Development |
|---|---|---|---|
| Stovetop (Traditional) | 1.5-2 hours | Tender but intact | Excellent depth |
| Slow Cooker | 6-8 hours on low | Very tender | Superb melding |
| Instant Pot | 25 minutes pressure cook | Firm-tender | Good but less complex |
Pro Tips for Flavorful Chili Beans
Master the traditional chili beans cooking method with these professional techniques:
- Acidity balance: Add 1 tablespoon of apple cider vinegar during the last 10 minutes to brighten flavors without making the beans mushy.
- Texture control: Mash 1 cup of cooked beans and stir back into the pot for natural thickening without altering flavor.
- Flavor layering: For authentic chili beans ingredients list complexity, add a small piece of unsweetened chocolate during the last 15 minutes.
- Heat management: Keep simmer at a gentle bubble—rolling boils can cause beans to split and become mushy.
Common Mistakes to Avoid
Even experienced cooks make these errors when preparing how long to simmer chili beans for best flavor:
- Skipping the soak: Unsoaked beans take significantly longer to cook and may remain unevenly textured.
- Adding salt too early: This can prevent proper softening—wait until beans are nearly tender.
- Over-stirring: Excessive stirring breaks beans apart, creating a mushy consistency.
- Rushing the process: Proper flavor development requires adequate simmering time—don't shortcut the cooking process.
Variations for Different Dietary Needs
Adapt this basic recipe for various preferences while maintaining authentic flavor:
Vegetarian chili beans preparation: Use vegetable broth and replace bacon fat with olive oil. For meaty depth without animal products, add 1 cup of finely chopped mushrooms when sautéing onions.
Spice adjustments: For milder chili, remove seeds from fresh peppers. For extra heat, add a pinch of cayenne during the last 15 minutes of cooking.
Regional twist: For Texas-style chili beans, omit tomatoes and add 2 ounces of dark chocolate and 1 dried ancho pepper (soaked and blended).
Serving and Storage Recommendations
Chili beans taste best when served with complementary sides that enhance their rich flavor:
- Top with fresh cilantro, diced onions, and a dollop of sour cream
- Pair with cornbread or warm tortillas for a complete meal
- For meal prep, chili beans freeze exceptionally well for up to 3 months
For optimal flavor development, refrigerate chili beans overnight before serving. The resting period allows flavors to meld and intensify significantly. When reheating, add a splash of broth to restore ideal consistency.
Understanding the authentic chili beans cooking method transforms this humble dish into something extraordinary. By following these time-tested techniques, you'll create chili beans with balanced flavors and perfect texture every time—no matter which variation you choose.
Can I make chili beans without soaking overnight?
Yes, but results will be less optimal. For unsoaked beans, use the quick-soak method: cover beans with water, bring to boil for 2 minutes, then remove from heat and let sit covered for 1 hour. Expect longer cooking time (up to 3 hours) and potentially uneven texture compared to properly soaked beans.
Why do my chili beans keep splitting during cooking?
Beans split primarily from rapid temperature changes or excessive stirring. Always add beans to already simmering liquid (not cold), maintain a gentle simmer rather than rolling boil, and stir minimally. Using older beans (over 1 year) also contributes to splitting—fresh beans hold their shape better.
How can I thicken my chili beans if they're too watery?
Create a natural thickener by removing 1-2 cups of beans, mashing them thoroughly, then returning them to the pot. Alternatively, simmer uncovered for 15-20 minutes to reduce liquid. Avoid flour or cornstarch thickeners as they alter the authentic texture and flavor profile of traditional chili beans.
What's the best way to store leftover chili beans?
Cool chili beans completely, then store in airtight containers with some cooking liquid to prevent drying. Refrigerate for up to 5 days or freeze for up to 3 months. For best flavor development, many chefs recommend making chili beans 1-2 days ahead—flavors deepen significantly during refrigeration.
Can I use canned beans for a quicker chili beans recipe?
While not traditional, you can use canned beans for time savings. Drain and rinse 3 cans of beans, then add during the last 30 minutes of cooking. Note that canned beans have different texture and may break down more easily. For best results with canned beans, use a combination of whole and partially mashed beans to maintain some texture.
Frequently Asked Questions
Can I make chili beans without soaking overnight?
Yes, but results will be less optimal. For unsoaked beans, use the quick-soak method: cover beans with water, bring to boil for 2 minutes, then remove from heat and let sit covered for 1 hour. Expect longer cooking time (up to 3 hours) and potentially uneven texture compared to properly soaked beans.
Why do my chili beans keep splitting during cooking?
Beans split primarily from rapid temperature changes or excessive stirring. Always add beans to already simmering liquid (not cold), maintain a gentle simmer rather than rolling boil, and stir minimally. Using older beans (over 1 year) also contributes to splitting—fresh beans hold their shape better.
How can I thicken my chili beans if they're too watery?
Create a natural thickener by removing 1-2 cups of beans, mashing them thoroughly, then returning them to the pot. Alternatively, simmer uncovered for 15-20 minutes to reduce liquid. Avoid flour or cornstarch thickeners as they alter the authentic texture and flavor profile of traditional chili beans.
What's the best way to store leftover chili beans?
Cool chili beans completely, then store in airtight containers with some cooking liquid to prevent drying. Refrigerate for up to 5 days or freeze for up to 3 months. For best flavor development, many chefs recommend making chili beans 1-2 days ahead—flavors deepen significantly during refrigeration.
Can I use canned beans for a quicker chili beans recipe?
While not traditional, you can use canned beans for time savings. Drain and rinse 3 cans of beans, then add during the last 30 minutes of cooking. Note that canned beans have different texture and may break down more easily. For best results with canned beans, use a combination of whole and partially mashed beans to maintain some texture.


 浙公网安备
33010002000092号
浙公网安备
33010002000092号 浙B2-20120091-4