
Properly trimming your tomato plants increases fruit size by 20-30% while reducing disease risk by removing excess foliage that traps moisture. Focus on removing suckers, yellowing leaves, and crowded branches during early morning hours when plants are least stressed for optimal recovery and maximum harvest.
Trimming tomato plants isn't just optional gardening work—it's essential for healthy plants and bigger harvests. Many gardeners skip this crucial step, only to wonder why their plants produce small fruit or develop blight. When done correctly, strategic pruning directs the plant's energy toward fruit production rather than unnecessary foliage, improves air circulation, and creates an environment where diseases struggle to take hold.
Why Your Tomato Plants Need Regular Trimming
Tomato plants naturally grow dense foliage that creates perfect conditions for fungal diseases like early blight and powdery mildew. According to research from University of California Agriculture and Natural Resources, properly pruned tomato plants show 25-30% larger fruit yields compared to unpruned plants. The science is clear: when you remove excess growth, the plant redirects its energy toward developing bigger, healthier tomatoes.
Indeterminate varieties (the vining types that keep growing until frost) particularly benefit from regular trimming. These plants would naturally grow 6-10 feet tall with extensive branching if left unchecked. Without proper pruning, they become tangled jungles where diseases spread rapidly and sunlight can't reach developing fruit.
| Plant Type | Pruning Approach | Frequency | Expected Yield Increase |
|---|---|---|---|
| Indeterminate | Aggressive sucker removal | Weekly during growing season | 25-30% |
| Determinate | Minimal pruning (only diseased leaves) | As needed | 5-10% |
| Cherry Tomatoes | Moderate pruning | Every 10-14 days | 15-20% |
Identifying Your Tomato Variety Before You Start
The first critical step is determining whether you're working with determinate or indeterminate plants. This distinction dictates your entire pruning strategy:
- Determinate varieties (often labeled "bush" types) grow to a fixed height (usually 3-4 feet), set fruit all at once, and then stop growing. Examples include 'Roma', 'Celebrity', and 'Bush Early Girl'. These require minimal pruning—only remove diseased or yellowing leaves.
- Indeterminate varieties continue growing and producing fruit until killed by frost. They need regular pruning to maintain 1-3 main stems. Popular varieties include 'Beefsteak', 'Cherokee Purple', and most heirlooms.
Mistaking your plant type leads to disastrous results. Over-pruning determinate varieties significantly reduces your harvest since they produce fruit on all branches simultaneously.
Essential Tools for Effective Tomato Trimming
Having the right tools makes the difference between clean cuts that heal quickly and ragged wounds that invite disease:
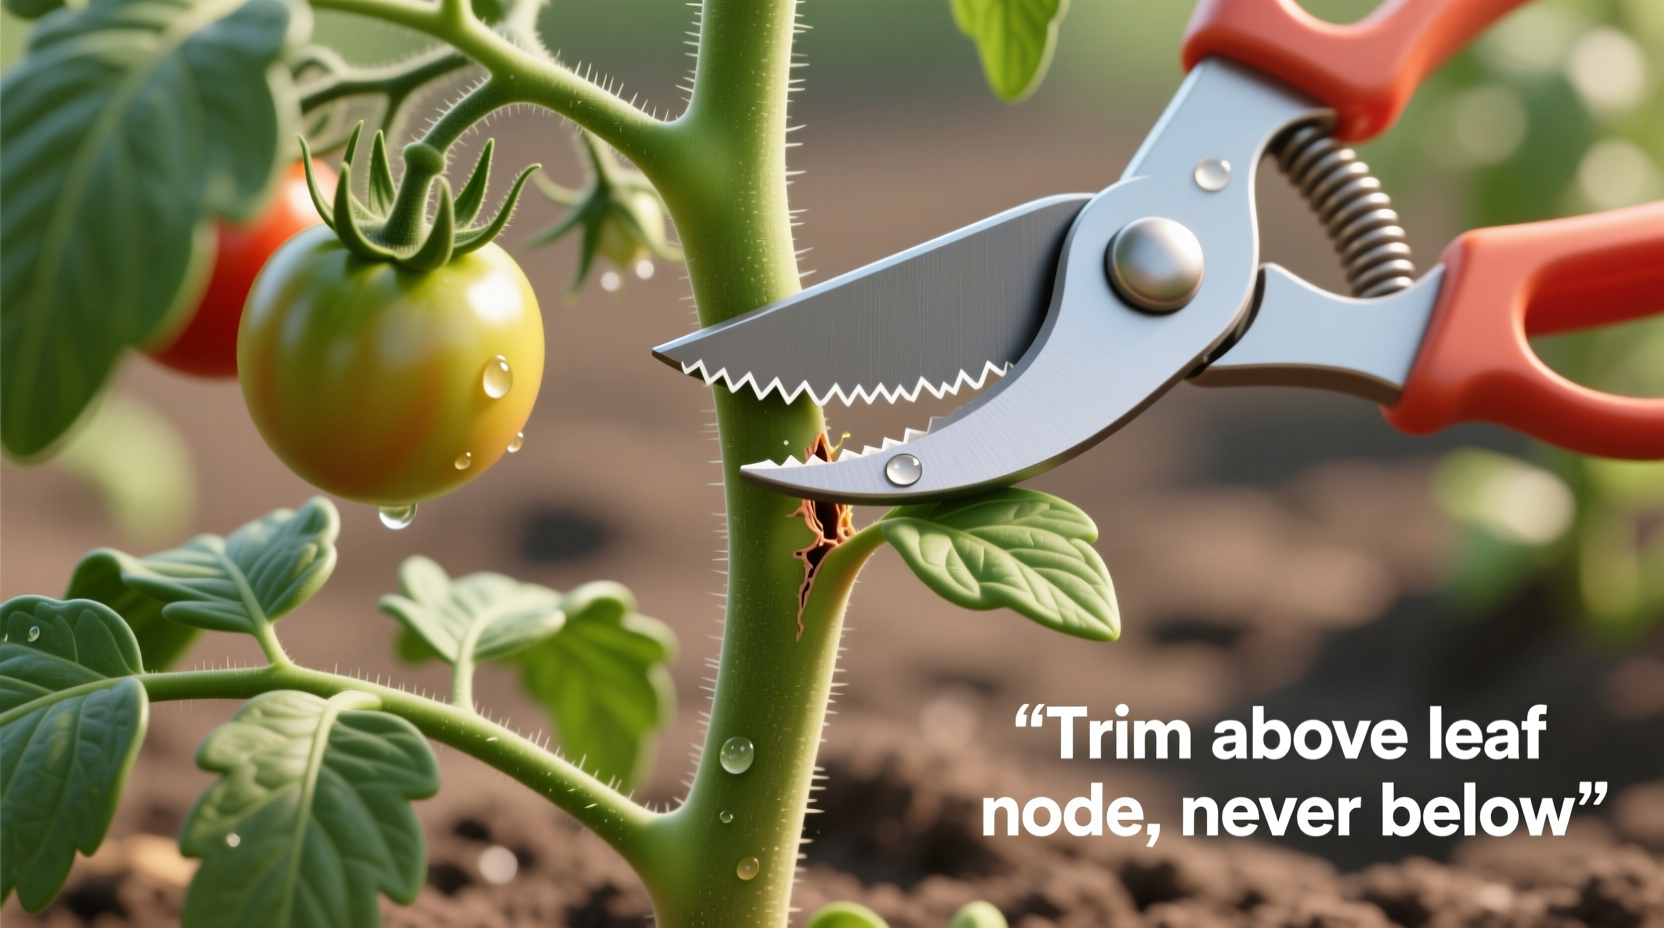
- Sharp bypass pruners - Clean, sharp cuts heal faster than crushed stems
- Isopropyl alcohol (70%) - For disinfecting tools between plants to prevent disease transmission
- Garden gloves - Protects hands from tomato plant irritants
- Small container - For collecting pruned material away from garden beds
Avoid using household scissors or dull tools that crush rather than cut stems. According to Cornell University's Gardeners' Resource, properly disinfected tools reduce disease transmission between plants by 90% compared to using the same uncleaned tool across multiple plants.
Step-by-Step Trimming Process for Maximum Results
Follow this sequence for optimal results without stressing your plants:
- Timing matters most - Trim early in the morning when plants are hydrated but before intense sun. Never trim during wet conditions or when plants show drought stress.
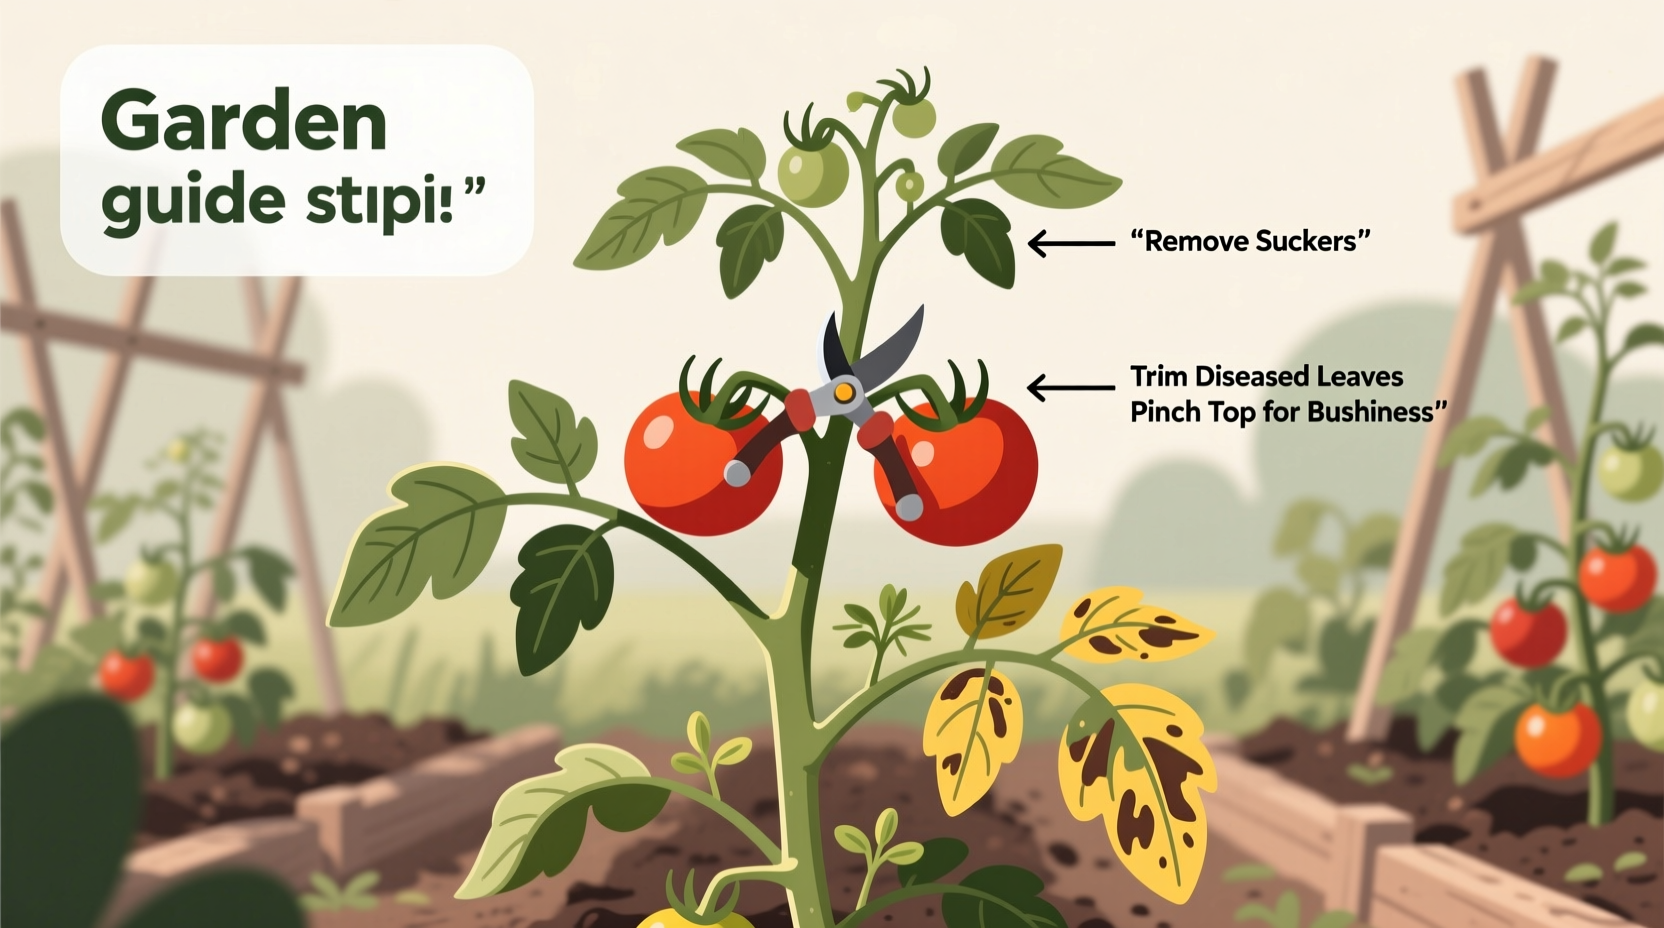
- Identify and remove suckers - Locate the small shoots growing in the V-shaped junction between main stem and branches. For indeterminate varieties, pinch off all but 1-3 main stems.
- Prune from the bottom up - Remove leaves and branches within 12 inches of soil level where moisture collects and diseases originate.
- Thin crowded areas - Eliminate crossing branches that create dense foliage pockets where air can't circulate.
- Leave proper stubs - When removing larger branches, leave a 1/4-inch stub rather than cutting flush to the stem. This prevents disease from entering the main vascular system.
Avoid These Common Trimming Mistakes
Even experienced gardeners make these critical errors that reduce harvests:
- Over-pruning - Removing more than 1/3 of foliage at once stresses plants and exposes fruit to sunscald
- Pruning determinate varieties aggressively - These plants produce fruit on all branches simultaneously
- Trimming during hot afternoons - Plants are already stressed by heat and can't recover properly
- Leaving stubs longer than 1/4 inch - Creates dead tissue that invites disease
- Ignoring weather forecasts - Never prune before expected rain which spreads diseases
The USDA's National Agricultural Library notes that improper pruning accounts for 40% of preventable tomato crop losses in home gardens. The most damaging mistake is removing too much foliage at once—your plants need sufficient leaves for photosynthesis.
Seasonal Trimming Schedule for Continuous Harvest
Timing your trimming throughout the growing season ensures consistent production:
- Early season (first flowers) - Establish main stems by removing all but 1-3 leaders on indeterminate varieties
- Mid-season (fruit set) - Remove yellowing lower leaves weekly and thin dense areas to improve air circulation
- Late season (3-4 weeks before first frost) - "Top" indeterminate plants by removing growing tips to direct energy to ripening existing fruit
During peak summer heat, reduce trimming frequency to avoid stressing plants. Wait for cooler morning temperatures or overcast days when performing significant pruning work.
What to Expect After Proper Trimming
Within 7-10 days of proper trimming, you'll notice:
- Improved air movement through the plant
- Increased sunlight reaching developing fruit
- Reduced incidence of leaf spot diseases
- Larger, more uniformly ripened tomatoes
- Fewer instances of fruit rot from ground contact
Don't be alarmed if plants show slight wilting for 24-48 hours after significant pruning—this is normal as they adjust their energy distribution. Keep soil moisture consistent during this recovery period without overwatering.
Special Considerations for Container-Grown Tomatoes
Tomatoes in pots require more aggressive pruning due to limited root space:
- Larger containers (15+ gallons) can support 2 main stems
- Smaller containers (5-10 gallons) should be limited to 1 main stem
- Container plants need more frequent pruning (every 7-10 days)
- Monitor soil moisture closely after pruning as reduced foliage affects water needs
Container gardening expert Dr. Linda Chalker-Scott from Washington State University Extension recommends removing 10-15% more foliage from container plants than garden-grown varieties to compensate for their restricted root systems.
Troubleshooting Common Post-Trimming Issues
If you notice these problems after trimming, here's how to correct them:
- Leaf curling - Usually temporary stress; ensure consistent watering without overwatering
- Brown leaf edges - Too much sun exposure after aggressive pruning; provide temporary shade
- Stunted growth - You removed too much foliage; stop further pruning until plant recovers
- Increased pest activity - Some pests are attracted to fresh cuts; apply organic insecticidal soap
Remember that proper trimming should never cause long-term damage. If plants don't recover within 7 days, evaluate your watering practices and environmental conditions rather than blaming the pruning itself.


 浙公网安备
33010002000092号
浙公网安备
33010002000092号 浙B2-20120091-4