
Cinnamon roll drawings capture the spiral shape, gooey icing, and textured surface of this beloved pastry through various artistic techniques. Professional illustrators use layered shading to depict the rolled dough layers, strategic highlights for glossy icing, and careful attention to the distinctive coiled structure that defines cinnamon rolls.
Creating authentic-looking cinnamon roll illustrations requires understanding both the physical structure of the pastry and effective drawing techniques. Whether you're a beginner artist or an experienced illustrator, mastering cinnamon roll drawings involves capturing three key elements: the spiral formation, the sticky icing drizzle, and the soft, pillowy texture of the baked dough. This guide provides professional methods for rendering these elements across different artistic styles and mediums.
Understanding Cinnamon Roll Structure for Accurate Drawings
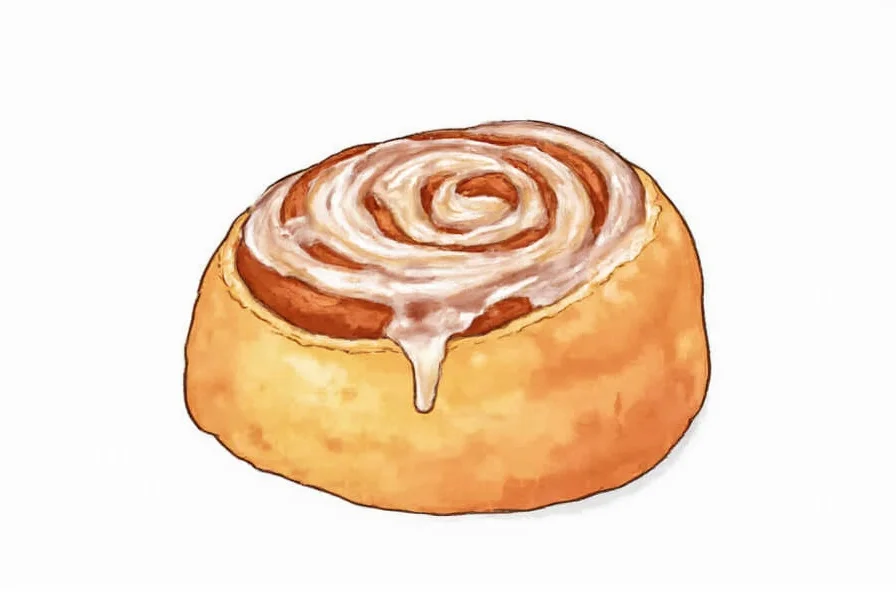
Before putting pencil to paper, study the distinctive anatomy of a cinnamon roll. The spiral pattern created by the rolled dough forms concentric circles when viewed from above, while the side profile reveals layered dough with visible separation between coils. The icing typically pools in the center and drips down the sides, creating irregular patterns that add visual interest to your drawing.
Essential Materials for Cinnamon Roll Illustration
Your choice of materials significantly impacts your ability to capture the texture and depth of cinnamon rolls. Traditional artists often combine graphite pencils (ranging from 2H for light sketching to 6B for deep shadows) with blending stumps for smooth transitions. Digital artists benefit from textured brushes that mimic charcoal or pencil strokes, particularly when rendering the uneven surface of baked dough.
| Medium | Best For | Recommended Tools |
|---|---|---|
| Pencil/Graphite | Realistic detail work | 2H-6B pencil set, kneaded eraser, blending stumps |
| Colored Pencil | Vibrant icing details | Premium wax-based pencils, sharpener, colorless blender |
| Digital | Quick iterations and corrections | Textured brushes, layer opacity control, reference image panel |
| Watercolor | Soft, gooey icing effects | Round brushes, granulating paints, salt for texture |
Step-by-Step Cinnamon Roll Drawing Tutorial
Follow these professional techniques to create convincing cinnamon roll illustrations, whether you're working on simple cinnamon roll sketches for beginners or detailed professional illustrations.
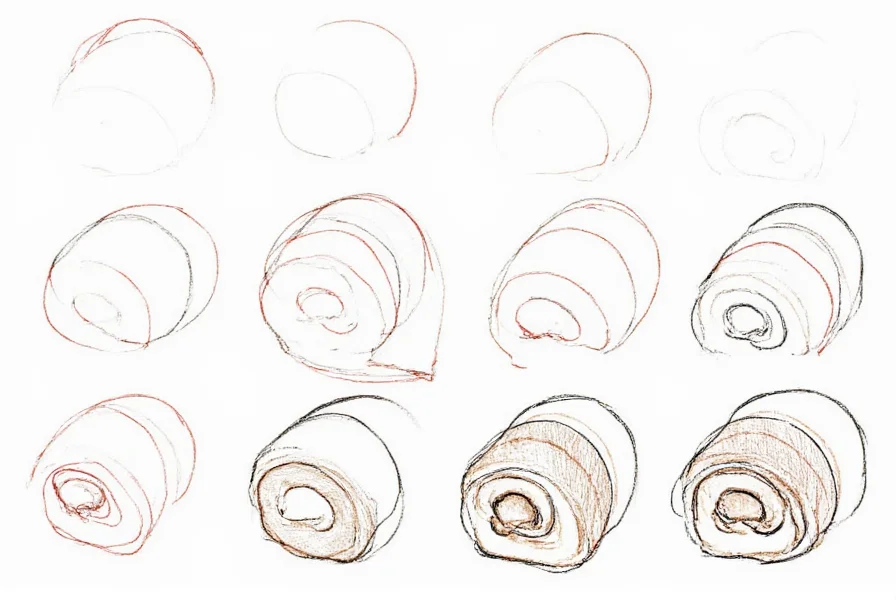
Basic Shape Construction
Start with a light circular guide for the outer edge, then add concentric circles representing the spiral layers. The center circle should be smaller than you might expect—many beginners make the cinnamon swirl too large. Draw a slightly irregular outer edge to avoid a mechanical appearance; real baked goods have subtle imperfections.
Defining the Spiral Pattern
Using a 2H pencil, lightly sketch the spiral pattern by drawing curved lines that follow the concentric circles but vary slightly in spacing. The lines should be closer together at the bottom (where the roll sits on the surface) and slightly more separated at the top. This creates the illusion of depth and the natural expansion that occurs during baking.
Adding Dimension with Shading
Identify your light source direction before beginning shading. Apply gradual shading along the edges of each dough layer, with the darkest values where layers meet. Use a blending stump to create smooth transitions between light and shadow, particularly on the rounded surfaces of the dough. For realistic cinnamon roll texture drawing, leave small unshaded areas to suggest the slightly uneven surface of baked dough.
Advanced Techniques for Realistic Cinnamon Roll Illustrations
Professional food illustrators employ several specialized techniques to make cinnamon rolls appear mouthwateringly real in their drawings. These methods work equally well for detailed cinnamon roll illustrations for commercial use or personal art projects.
Capturing Icing Realism
The glossy, viscous quality of icing presents unique challenges. Create the illusion of thickness by drawing irregular edges where icing meets the roll. Add subtle highlights using a white gel pen or by carefully erasing small areas in traditional media. For digital artists, use a low-opacity white brush with texture to simulate the translucent quality of real icing.
Rendering Different Styles
Adapt your technique based on the desired artistic style:
- Realistic: Focus on precise lighting, subtle color variations, and detailed texture
- Cartoon: Exaggerate the spiral pattern and icing drips while simplifying shading
- Minimalist: Reduce to essential shapes with limited color palette and clean lines
- Watercolor: Embrace bleed effects to suggest the moist quality of fresh rolls
Common Mistakes to Avoid in Cinnamon Roll Drawings
Even experienced artists make errors when illustrating this deceptively complex pastry. Watch for these frequent issues in your cinnamon roll sketching process:
- Overly perfect spirals: Real cinnamon rolls have irregular spacing between layers
- Flat icing: Icing has volume and follows gravity—show thickness and pooling
- Uniform shading: Dough has varying texture with some areas smoother than others
- Ignoring perspective: The spiral pattern changes dramatically based on viewing angle
Creative Applications for Cinnamon Roll Illustrations
Once you've mastered basic cinnamon roll drawings, explore these creative applications that showcase your skills:
- Create a series showing cinnamon rolls at different stages (dough before baking, fresh from oven, cooled with icing)
- Develop seasonal variations with appropriate toppings and backgrounds
- Design educational materials showing the cross-section of a cinnamon roll
- Illustrate step-by-step baking guides with clear visual instructions
Improving Your Food Illustration Skills
Mastering cinnamon roll drawings is part of developing broader food illustration expertise. Study real pastries whenever possible—observe how light interacts with different textures, how shadows form in the crevices, and how colors shift in various lighting conditions. Keep a dedicated sketchbook for food studies, focusing on one element at a time (shiny surfaces, soft textures, liquid properties) before combining them in complete illustrations.
Final Thoughts on Cinnamon Roll Illustration
Crafting convincing cinnamon roll drawings combines technical drawing skills with careful observation of real pastries. By focusing on the distinctive spiral structure, capturing the interplay of light on glossy icing, and rendering the soft texture of baked dough, you can create illustrations that feel authentic and appetizing. Remember that practice with direct observation yields better results than working solely from reference images—when possible, sketch real cinnamon rolls to develop your understanding of their three-dimensional structure and surface qualities.


 浙公网安备
33010002000092号
浙公网安备
33010002000092号 浙B2-20120091-4