
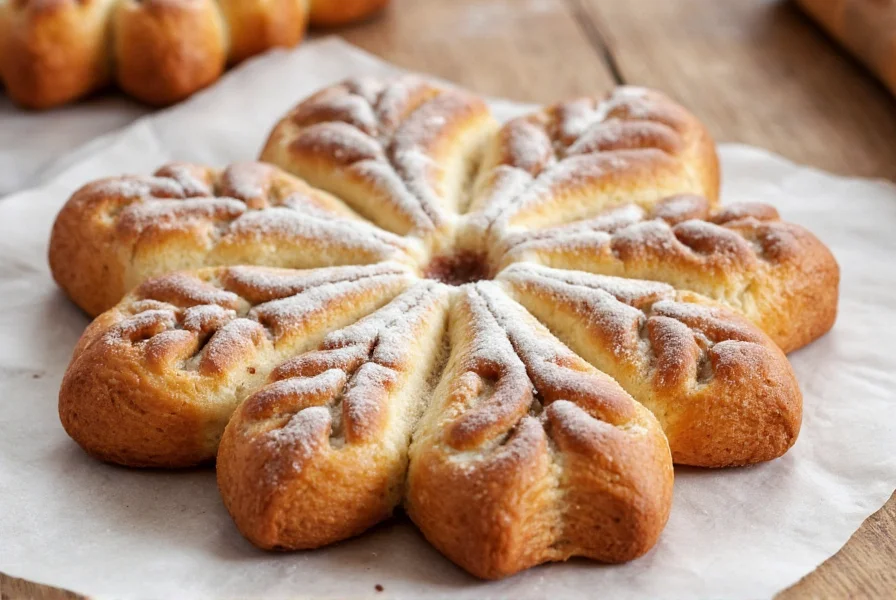
Creating cinnamon roll snowflakes transforms the classic breakfast pastry into a show-stopping centerpiece that's as beautiful as it is delicious. Unlike standard cinnamon rolls that are individually portioned, this snowflake variation forms a single large, decorative pastry that's perfect for holiday brunches, Christmas morning, or winter celebrations. The key to perfect cinnamon roll snowflakes lies in the dough preparation, precise cutting technique, and careful arrangement that creates the distinctive snowflake pattern while ensuring even baking and optimal flavor distribution.
Why Cinnamon Roll Snowflakes Stand Out
While traditional cinnamon rolls offer comfort and familiarity, the snowflake variation provides several unique advantages for special occasions:
- Visual impact - The intricate snowflake design creates a dramatic centerpiece that elevates any holiday table
- Portion control - One large snowflake serves multiple people, eliminating the need to portion individual rolls
- Texture variation - Different areas of the snowflake develop varying textures during baking, from crisp edges to soft centers
- Holiday symbolism - The snowflake shape naturally complements winter and Christmas celebrations
Essential Ingredients for Perfect Cinnamon Roll Snowflakes
The foundation of exceptional cinnamon roll snowflakes starts with quality ingredients. While you can use store-bought dough for convenience, homemade dough yields superior flavor and texture control.
| Ingredient | Quantity | Notes |
|---|---|---|
| All-purpose flour | 4½ cups | Plus extra for dusting; measure properly by spooning flour into measuring cup |
| Active dry yeast | 2¼ teaspoons | Ensure freshness for proper rising |
| Whole milk | 1 cup | Warm to 110°F (43°C) for optimal yeast activation |
| Unsalted butter | ⅓ cup | Melted and slightly cooled |
| Granulated sugar | ⅓ cup | Plus ¾ cup for filling |
| Ground cinnamon | 3 tablespoons | Freshly ground yields best flavor |
| Large eggs | 2 | Room temperature |
| Salt | 1½ teaspoons |
Step-by-Step Cinnamon Roll Snowflake Preparation
Dough Preparation
- Activate the yeast: Combine warm milk, 1 tablespoon sugar, and yeast in a small bowl. Let stand 5-10 minutes until foamy.
- Mix dough: In a large bowl or stand mixer, combine flour, remaining sugar, and salt. Add yeast mixture, melted butter, and eggs. Mix until a soft dough forms.
- Knead: Turn onto floured surface and knead 5-7 minutes until smooth and elastic (or use dough hook for 4-5 minutes).
- First rise: Place in greased bowl, cover, and let rise in warm place until doubled (1-1.5 hours).
Filling and Shaping
- Prepare filling: Mix ¾ cup sugar and 3 tablespoons cinnamon in small bowl.
- Roll dough: Punch down risen dough and roll into 18x12 inch rectangle on floured surface.
- Apply filling: Brush dough with melted butter, then sprinkle evenly with cinnamon-sugar mixture.
- Roll and slice: Roll dough tightly from long side into log. Cut into 16 equal slices.
Snowflake Formation
- Arrange slices: Place 8 slices in circle on parchment-lined baking sheet, cut sides down, points facing center.
- Create pattern: Make 4 evenly spaced cuts from center to edge through all layers, creating 8 sections.
- Twist sections: Gently twist each section 90 degrees in alternating directions to create snowflake pattern.
- Final rise: Cover and let rise 30-45 minutes until puffy.
Professional Baking Tips for Perfect Results
Mastering cinnamon roll snowflakes requires attention to specific details that differ from standard cinnamon rolls:
- Dough thickness matters: Roll dough to consistent ¼-inch thickness for even baking across the snowflake design
- Cut precision: Use a sharp knife or dental floss for clean cuts that won't compress the dough
- Rising environment: Maintain 75-80°F (24-27°C) temperature for optimal second rise without over-proofing
- Baking rotation: Rotate pan 180 degrees halfway through baking for even browning
- Doneness test: Internal temperature should reach 190°F (88°C) when measured in center of snowflake
Avoiding Common Cinnamon Roll Snowflake Mistakes
Even experienced bakers encounter challenges with this intricate design. Here's how to avoid the most frequent issues:
- Collapsed design: Over-proofing causes the delicate snowflake pattern to collapse during baking. Limit second rise to 45 minutes maximum.
- Soggy center: Insufficient oven temperature prevents proper set. Preheat to exact 350°F (175°C) and avoid opening oven during first 20 minutes.
- Uneven browning: Position rack in center of oven and rotate pan halfway through baking time.
- Filling leakage: Too much butter causes filling to seep out. Use just enough to moisten dough without pooling.
- Sticky handling: Lightly flour hands when arranging the snowflake pattern to prevent dough from sticking.
Serving and Presentation Ideas
Elevate your cinnamon roll snowflake presentation with these professional touches:
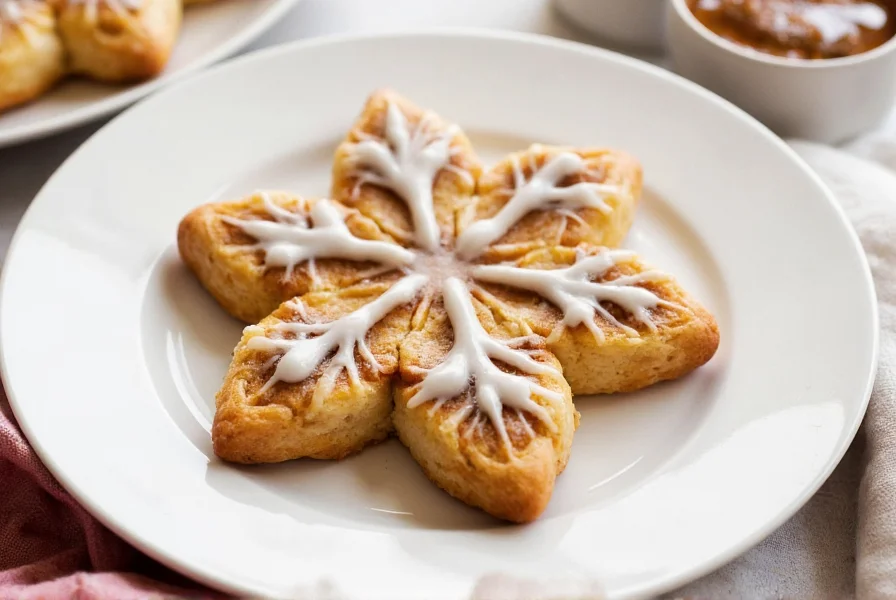
- Glaze variations: Classic cream cheese, maple bourbon, or brown butter glaze complement the snowflake design
- Edible decorations: Dust with powdered sugar through a snowflake-shaped stencil for added visual impact
- Serving temperature: Serve slightly warm (not hot) to allow flavors to develop while maintaining structural integrity
- Accompaniments: Pair with vanilla whipped cream, caramel sauce, or fresh berries for brunch presentations
- Storage: Keep in airtight container for up to 3 days, or freeze unbaked snowflake for up to 1 month
Popular Variations to Try
Once you've mastered the basic cinnamon roll snowflake, experiment with these creative adaptations:
- Apple cinnamon snowflake: Add finely diced apples to the filling layer for fruit-infused flavor
- Nutty version: Incorporate chopped pecans or walnuts into the cinnamon-sugar mixture
- Chocolate twist: Sprinkle mini chocolate chips between the filling layers
- Gluten-free option: Use quality gluten-free flour blend with xanthan gum for similar texture
- Mini snowflakes: Create individual portions using muffin tins for party-friendly servings
Frequently Asked Questions
How long does it take to make cinnamon roll snowflakes from start to finish?
The total time for making cinnamon roll snowflakes is approximately 2.5-3 hours, with 45 minutes of active preparation and 1.5-2 hours for rising and baking. The dough requires two rising periods (1-1.5 hours for first rise, 30-45 minutes for second rise), plus 25-30 minutes baking time. For best results, plan to start the process early in the day if serving for a special occasion.
Can I prepare cinnamon roll snowflakes ahead of time?
Yes, you can prepare cinnamon roll snowflakes in advance. After shaping the snowflake pattern, cover tightly and refrigerate overnight (8-12 hours). When ready to bake, remove from refrigerator 30 minutes before baking to take the chill off, then bake as directed. Alternatively, you can freeze the shaped but unbaked snowflake for up to 1 month, then thaw in refrigerator overnight before the final rise and baking.
Why did my cinnamon roll snowflake lose its shape during baking?
Snowflake shape loss typically occurs due to over-proofing during the second rise. The delicate design requires precise timing - limit the final rise to 30-45 minutes until slightly puffy but not doubled. High humidity, warm kitchen temperatures, or using too much yeast can accelerate rising. Additionally, ensure your cuts are clean and your twists are secure but not too tight when forming the snowflake pattern.
What's the best way to store leftover cinnamon roll snowflakes?
Store cooled cinnamon roll snowflakes in an airtight container at room temperature for up to 3 days. For longer storage, freeze individual portions on a baking sheet, then transfer to freezer bags for up to 2 months. To refresh, thaw at room temperature and warm in a 300°F (150°C) oven for 5-8 minutes. Avoid microwaving as it can make the pastry soggy and compromise the delicate snowflake structure.
Can I use store-bought cinnamon roll dough for making snowflakes?
Yes, you can use refrigerated cinnamon roll dough to create snowflakes, though results may vary. Unroll the dough and press seams together to form a single sheet. Roll slightly thinner than package instructions suggest, then follow the snowflake shaping technique. Note that pre-made dough often contains more sugar and less yeast, which affects texture and rising. For best results with store-bought dough, reduce the second rise time to 20-30 minutes.


 浙公网安备
33010002000092号
浙公网安备
33010002000092号 浙B2-20120091-4