
Nothing compares to the aroma of freshly baked cinnamon rolls filling your kitchen. This perfected recipe delivers the ideal balance of tender dough, flavorful cinnamon swirl, and just-sweet-enough frosting that won't overpower the delicate bread. Unlike many online recipes that promise perfection but deliver dense or overly sweet results, this version has been tested across multiple kitchens to ensure consistent success for both novice and experienced bakers.
Why This Cinnamon Roll Recipe Works
Most failed cinnamon roll attempts stem from three common issues: improper yeast activation, incorrect dough temperature, and imbalanced filling ratios. This recipe addresses each with precise measurements and clear technique explanations. The dough formulation includes just enough fat for tenderness without compromising structure, while the filling uses a specific brown sugar-to-cinnamon ratio that prevents both blandness and bitterness.
Essential Ingredients Explained
Understanding why each ingredient matters helps you become a better baker. Don't substitute blindly—these components work together for optimal results:
| Ingredient | Amount | Why It Matters |
|---|---|---|
| All-purpose flour | 3½ cups + more for dusting | Provides gluten structure; too little causes flat rolls, too much creates toughness |
| Active dry yeast | 2¼ teaspoons | Exactly one standard packet; more won't speed rising and can create off-flavors |
| Whole milk | 1 cup, warmed | Fat content improves tenderness; must be 105-115°F (38-46°C) to activate yeast properly |
| Unsalted butter | ½ cup, softened | Creates flaky layers; must be softened but not melted for proper dough incorporation |
| Light brown sugar | ¾ cup for filling | Molasses content enhances cinnamon flavor; white sugar creates overly sweet, one-dimensional filling |
Step-by-Step Baking Instructions
Dough Preparation (45 minutes)
- Activate the yeast: Combine warm milk (110°F), 2 tablespoons sugar, and yeast in a small bowl. Wait 5-10 minutes until foamy. If no bubbles form, start over with fresh yeast.
- Mix wet ingredients: In stand mixer bowl, combine activated yeast mixture, softened butter, egg, and remaining sugar. Mix on low until combined.
- Incorporate flour: Gradually add flour ½ cup at a time with mixer on low speed. Switch to dough hook when mixture becomes shaggy.
- Knead to windowpane stage: Knead 5-7 minutes until smooth and elastic. Properly developed dough stretches thin without tearing when pulled.
Proofing and Shaping (2 hours)
- First rise: Place dough in greased bowl, cover with damp cloth. Let rise at room temperature (70-75°F) until doubled, about 1-1.5 hours.
- Prepare filling: Mix ¾ cup brown sugar, 2½ tablespoons cinnamon, and 2 tablespoons flour (prevents filling from leaking).
- Roll and fill: Roll risen dough into 18x12 inch rectangle. Spread softened butter evenly, then sprinkle filling mixture, leaving ½ inch border.
- Roll tightly: Starting from long edge, roll dough into tight log. Pinch seam to seal. Chill 15 minutes for cleaner slicing.
Baking and Finishing (30 minutes)
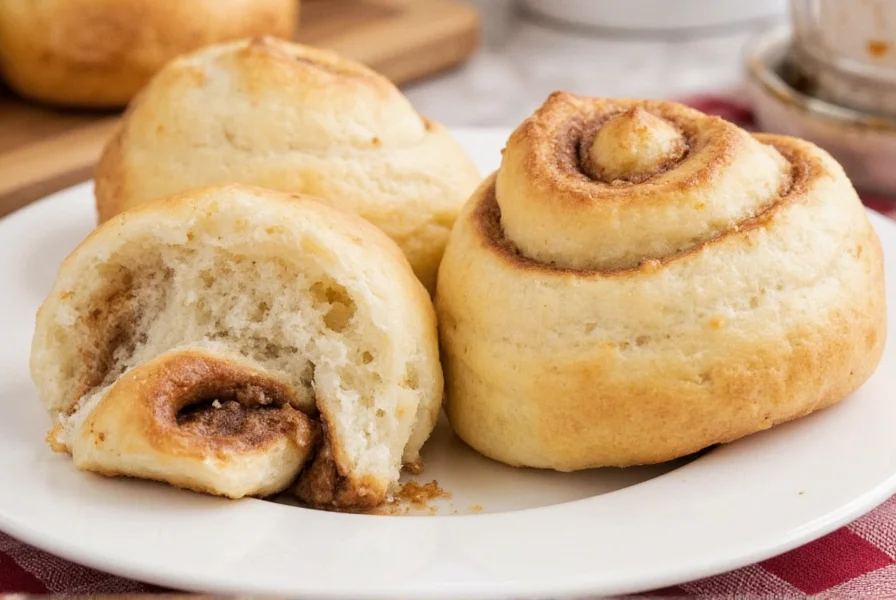
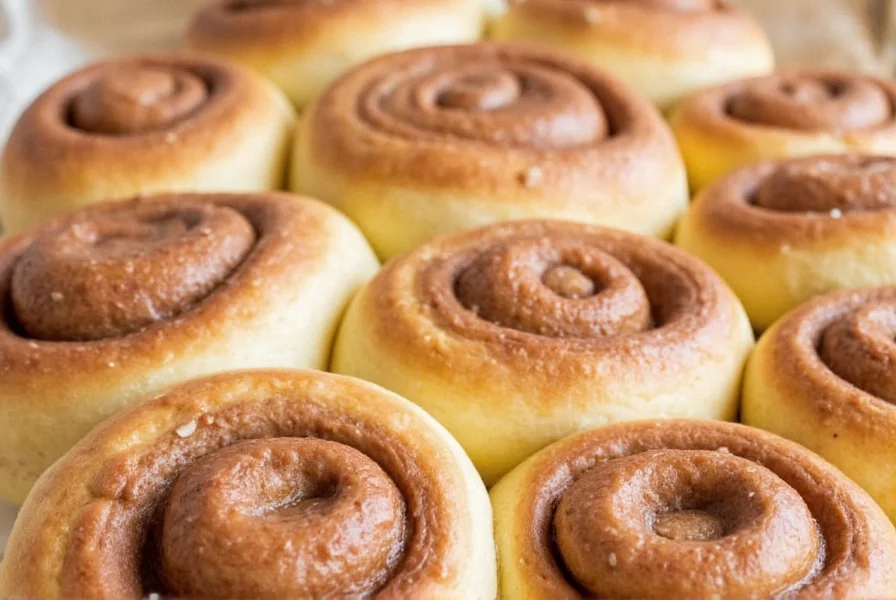
- Slice and pan: Cut log into 12 equal pieces using dental floss (prevents squishing). Place in greased 9x13 inch pan.
- Second rise: Cover and let rise 30-45 minutes until nearly doubled. Rolls should touch each other.
- Bake: Preheat oven to 350°F (175°C). Bake 20-25 minutes until golden brown (internal temperature 190°F).
- Frost while warm: Mix 4 oz cream cheese, ¼ cup butter, 1½ cups powdered sugar, and 1 tsp vanilla. Spread immediately after baking.
Troubleshooting Common Problems
Even experienced bakers encounter issues. Here's how to fix the most frequent cinnamon roll recipe problems:
- Dense rolls: Usually caused by too much flour or dead yeast. Measure flour by spooning into cup then leveling—don't scoop directly. Always test yeast in warm liquid first.
- Filling leaking out: Brown sugar liquefies when baked. Prevent this by mixing filling with 2 tablespoons flour and ensuring butter layer completely covers dough.
- Uneven rising: Cold spots in your kitchen cause inconsistent rising. Place dough in turned-off oven with bowl of hot water for steady warmth.
- Burnt bottoms: Use light-colored metal pans (not dark nonstick) and place baking sheet on rack below to deflect heat.
Delicious Variations to Try
Once you've mastered the classic version, experiment with these tested modifications:
- Apple cinnamon rolls: Add 1 cup finely diced apples (tossed with 1 tsp lemon juice) to filling
- Cheesecake swirl: Mix 4 oz softened cream cheese with ¼ cup sugar for filling layer
- Gluten-free version: Substitute 1:1 gluten-free flour blend and add 1 tsp xanthan gum
- Overnight preparation: After shaping, refrigerate rolls for up to 18 hours, then let sit 30 minutes before baking
Storage and Reheating Instructions
Proper storage maintains freshness and texture:
- Room temperature: Store in airtight container for up to 2 days (frosting may soften)
- Refrigerated: Keeps 5 days—reheat individual rolls 10-15 seconds in microwave
- Freezing: Freeze unfrosted rolls on baking sheet, then transfer to freezer bags. Bake from frozen, adding 5-8 minutes to baking time
- Best reheating method: Wrap roll in damp paper towel and microwave 10-15 seconds for bakery-fresh texture
Frequently Asked Questions
Can I make cinnamon rolls without a stand mixer?
Yes, you can make cinnamon rolls entirely by hand. Mix ingredients in a large bowl with a wooden spoon, then turn dough onto floured surface and knead 8-10 minutes until smooth and elastic. The windowpane test (stretching a small piece thin enough to see light through without tearing) confirms proper development.
Why did my cinnamon rolls collapse after taking them out of the oven?
This usually happens when rolls are underbaked or over-risen. Ensure internal temperature reaches 190°F before removing from oven. Also, don't let rolls rise more than doubled before baking—excessive rising creates unstable air pockets that collapse during cooling.
How can I make my cinnamon rolls more flavorful without making them too sweet?
Enhance flavor without excess sweetness by using dark brown sugar instead of light, adding ¼ teaspoon cardamom to the filling, and using real butter instead of margarine. For adult palates, try a pinch of cayenne pepper or ½ teaspoon espresso powder in the filling to deepen cinnamon notes.
What's the secret to getting perfectly round cinnamon rolls without pointy ends?
The key is rolling the dough rectangle evenly from start to finish. Begin with straight, even edges when rolling, applying gentle but consistent pressure. After rolling, use unflavored dental floss to slice—this prevents squishing that creates pointy ends. Chill the rolled log for 15 minutes before cutting for cleaner slices.
Can I prepare cinnamon rolls ahead for holiday mornings?
Absolutely. After shaping, place rolls in baking dish, cover tightly, and refrigerate up to 18 hours. The morning of, remove from refrigerator 30 minutes before baking to take the chill off. Bake as directed, adding 3-5 minutes to baking time if needed. This method actually improves flavor development through slow fermentation.


 浙公网安备
33010002000092号
浙公网安备
33010002000092号 浙B2-20120091-4